No portion of this book may be reproduced in any form without written permission from the publisher or author, except as permitted by U.S. copyright law.
This publication is designed to provide accurate and authoritative information in regard to the subject matter covered. It is presented with the understanding that neither the author nor the publisher is engaged in rendering legal, investment, accounting or other professional services. While the publisher and author have used their best efforts in preparing this book, they make no representations or warranties with respect to the accuracy or completeness of the contents of this book and specifically disclaim any implied warranties of merchantability or fitness for a particular purpose. No warranty may be created or extended by sales representatives or written sales materials. The advice and strategies contained herein may not be suitable for your situation. You should consult with a professional when appropriate. Neither the publisher nor the author shall be liable for any loss of profit or any other commercial damages, including but not limited to special, incidental, consequential, personal, or other damages.
The following text is a draft copy of a book I am currently working on to teach people how to write code for computer programs. It is still a work in progress, and you may find issues with the wording or images as you read through it. I’m actively looking for feedback to help improve the content, so you will find survey links at the end of each chapter that you can fill out. If you have any other comments, questions, or suggestions send me an email at do.u.code.bro@gmail.com.
Thanks for visiting. Hope you enjoy the book.
This book is dedicated to my sister, whose passing was a reminder of the finite time we have and the importance of pursuing our dreams. It is in honor of her life that I make this project available for others to benefit from.
Chapter 00: So You Want to Write Computer Code, Do Ya?
You’re about to be dropped in the middle of a rainforest, bro!
You see the little bunny in this picture? That little bunny is you 🐇. Lost and alone in this rainforest. The only tools you’ll have to keep you alive are your computer 💻, your brain 🧠, and this book 📒 (I guess there’s the internet too, but that’s only going to help you after you get through part 1). Sadly, some of you who start reading this will not survive the journey. “What rainforest? I thought this was a book about code. What are you talking about?! ” I hear you asking. Let me put it to you this way…
Learning new Information is like hiking through a freaking jungle.🌴🌳🌴 You can try to figure out your way on your own… but most of the time you’re going to get hopelessly lost, especially if the thing you’re learning is complicated. The harder the thing you’re trying to learn, the thicker the forest. 🌴🌳🌴 🌴🌳🌴
But with most thick jungles, there are many hidden treasures waiting to be discovered 🗺. You just have to know where to start looking for it.
Computer programming is easy to get lost in if you don’t have a guide. You can spend countless hours reading text books or online articles about how to do specific things. But unless you have a clear path to walk… you’ll have a hard time getting through the forest. That is why most people spend tens to hundreds of thousands of dollars in college or coding boot camps to learn this stuff.
Now, I went the college route, and let me tell you… there are things that are great about learning computer science in college. There is also a lot that they don’t teach you that you need to know… and then there is just the totally useless stuff that you never use in the real world. They teach you the theory… without practical use, which is like telling you about the rainforest, without giving you any tools for the actual journey.
That’s where this book comes in. This is the book I wish I had when I started my journey learning to code. I’m going to give you just enough theory so you can understand the layout of the forest, and then hand you a machete 🔪 to start cutting your way through it (yes, I realize that is a knife emoji but it’s the closest thing I could find to a machete). My goal is serve as a guide on your journey in learning how to code. I can’t walk the path for you. I can only show you a way through. You’re going to do the cutting, you’ll be writing the code, and you are going to get yourself out of this forest to the top of some majestic mountain ⛰ where you’ll look down on all those lost souls still wandering in the forest.
Are you up to the challenge? Great, let’s get a couple of things cleared up first.
How to use this book
Unlike other ebooks, this ebook is intended to be read on a desktop or laptop computer. This is because we are going to be writing a lot of code together. Throughout this book, I will walk you through coding exercises with complete working examples of programs for you to type out. I will highlight these blocks of code with a ‘CHECKPOINT’ heading above each of them. I recommend you have this book open on the same computer you will be writing code with so that it is easier for you to copy the code examples as you need them. For every exercise, I encourage you to try to type out the code on your own at first, as this will help you get familiar with all the keywords of the code. But if you happen to get stuck on a part and just can't figure it out after 10-15 minutes of trying, feel free to copy the block of code to help get you in a working state.
The code and terminal commands in this book were tested using the Windows 10 and macOS Catalina operating systems. I have hopefully set up the code samples to work with many operating systems, but just be aware that your milage may vary 🚗.
Throughout this book, I’m going to share with you terms that are commonly used in computer science. These words will be in bold text and highlighted like this the first time they come up. (If you don’t see these words highlighted, makes sure the background color or ’color mode’ of your e-book reader is set to a white background. Unfortunately the text and code highlighting will not work correctly if you are using a dark background).
Pay attention to these highlighted terms and what they mean since this will help you get familiar with the layout of the land we’re walking through.
This book is divided into four parts. In “Part 1 - The Basics”, we cover the simple basics of code, how it works, and how you can run code on your computer. We also write a couple of programs together while I explain what all the different words mean.
“Part 2 - The Next Level” starts digging into material that you would likely learn from college courses or a coding internship with a company. We cover important topics such as version control, databases, and unit testing.
“Part 3 - Full Stack Web Development” is where we dive into topics you would learn from web development courses and working on the job. We will walk through designing and building a web application. You will learn about creating apps with a Graphical User Interface (GUI) as well as designing REST APIs.
Finally in “Part 4 - The Cloud”, we discuss how you can host your web app on the internet so it can be used by others. This section is by far the most technically advanced in this book. By the end of this we will walk through the process of hosting a web app step by step, and you will have your own website on the internet.
Now… there is one thing I want you to be aware of as we are hiking through this forest 🥾. Through this journey you are going to experience moments when… how do I put it… you will want to destroy your computer 💻🧨. You will curse the day you ever started working with code, and you will curse me for writing this stupid book that doesn’t explain why you can’t get your program to run the way you think it should… and your frustration will be caused by the fact that computer programming is like casting a magic spell 🧙♀️. You have to get your stance just right, you have to recite the incantation flawlessly, and you have to remember to always have a closing curly brace for every opening curly brace {} (I guarantee this one in particular is going to bite you several times before you’re through this book). Unfortunately, I won’t be able to help you solve these problems for you because I’m obviously not actually standing there behind you looking over your shoulder through your code (at least, you better hope I’m not 😨).
“If writing code is so frustrating, why does anyone torture themselves doing it?” You may ask. Great question! There are many reasons for this, but in my personal experience, the most rewarding part of coding is when you finally solve a problem that you have been working on for a long time. If you have never experienced this kind of high before, let me tell you it’s one heck of a drug!
For real though, the thing that keeps me coming back to my coding addiction is the fact that once you learn to code, and you learn it well, you open up a whole world of possibilities for the kinds of things you can do. If you get really good, people will pay you for it. Or maybe you decide you want to do your own thing and create a startup company. Anything is possible with code.
Now like I said earlier, I’m going to give you complete working examples of programs that you can copy and paste if you get stuck… but maybe one time you copy it wrong, or miss a letter when typing stuff out. You know what your program is going to do?
You are going to get something that doesn’t work. Your program is going to start screaming 🔥😱🔥 at you with ancient dark tongues of cryptic stack traces (more about those in part 2). When this happens, let me offer three options that may help you on your journey:
Ask a friend to hike the journey with you.
Statistically speaking, if you are interested in coding then you probably don’t have many friends 😔(you’re probably learning to code so you can build your own A.I. friend, aren’t you? Admit it 🤖). If you do happen to know someone who knows a little about coding or is willing to learn with you then you’re less likely to get totally stuck on your journey.
Ask the internet for help.
The internet is great. I still use it to look up answers to coding questions on a day to day basis (all professional coders do, there is just too much stuff to keep it all in your head). This book actually has a chapter about how to use the internet to find answers to issues you encounter (chapter 1.10). If you find you get stuck or have a particular question about something that I don’t answer in the book, the internet is a great place to find stuff.
If neither of those work, go ask your Mom or Dad…
They probably won’t be able to help either… but I ran out of ideas and needed a third option 😅.
This book will point you in the right direction, but it can’t solve all your problems for you that you will encounter as you work through code. It can’t debug your programs for you (More about what debugging is and how to do that in part 2 of this book). There are some things you will only solve through your own experience, and honestly it’s more rewarding that way.
Why You Should Learn to Code
Alright, still willing to stick it out? Great, with that out of the way… I want to ask you something.
Why do you want to learn how to code?
While you consider that question, let’s talk about some of the ups and downs of coding for a hobby or a career. By the end of this book, I promise you will know if you really (and I mean REALLY) want to pursue coding as a hobby or career.
Programmers Solve Puzzles 🧩
If you’re wondering if you would actually enjoy coding and working with software, consider the following questions:
Do you enjoy learning new ways of doing things better, or do you prefer to learn something once and do that same thing over and over?
Do you enjoy solving puzzles, or do you usually look for others to give you the solutions?
Are you willing to stick with a problem when it seems there is no solution, or do you usually walk away from something if it seems like you can’t figure it out?
There are no wrong answers to these questions. We all think in different ways for a reason. You have skills and abilities that others may lack. The main reason to answer these questions truthfully is to help you discover if you would actually enjoy a career as a Software Developer (the official title of a person who works with code).
Software development is freaking hard! And the reason it is hard is you are required to solve problems that usually no one has tackled before (if they had, the code would already be written and you could just copy it from StackOverflow).
You have to stretch your mind to look at problems from different angles until one of those angles gives you an idea of how to solve it. There have been a handful of times I’ve faced puzzles that I could not find the solution to, and those times are stressful.
Writing code and tackling really complicated problems can be stressful, especially when you are in a time crunch. Yet at the same time, if you enjoy solving problems, programming can be really fun as a job. What? Fun at work while making good money? Impossible… no really it’s true. Most of my career has been around solving tough puzzles, and it is really fun when you find the answer to those problems and build something that really helps people.
Being a Wizard has its Perks 🧙♂️
Let’s face it, software development is the closest you can ever get to becoming a real life wizard.
Why? Well the following sentences are true if you are a wizard/witch or a programmer:
You can read symbols whose meaning are lost to mere mortals
You know how to perform incantations to make things happen that others can only describe as magic
Whenever you try to explain how your magic works to non-magic users they ask you to fix their printer 🖨
The thing is, the more skilled you are in your magic, the more people will pay you for that magic. This is because the magic of programming has the ability to make really useful stuff that you can’t really do any other way.
Job Security
As of the time of this writing, there is a massive shortage of competent software developers, especially in the United States (though I’m hoping that this book helps to start changing that 👩💻👨💻👩🏻💻👨🏿💻👨🏽💻👩🏾💻). Now when I say competent, I’m talking about developers that actually know how to write code and solve technically challenging problems using good development principles. If you are willing to put in the effort to learn these skills and concepts to stand out from the crowd, you will never need to worry about finding a job. Quite the opposite actually. You will find tech recruiters bang down your door to get you to join all kind of companies. Technology is evolving so fast and there are so many awesome ideas people are coming up with that need good developers. If you can get the skills and prove your worth, programming can be a solid career choice.
Before we finish up the introduction, let’s see if I can answer some common questions.
Programming FAQ
Do programmers make lots of money?
I’m going to answer this question by sharing my personal experience with you, and let you decide the answer for yourself.
Back in 2014, I was working as a fry cook (yes, that really was my title 👨🍳) in a sushi bar and grill 🍣 making around $8.50 an hour. I had worked a handful of jobs like this for years. It was back breaking work, and I knew I didn’t want to be doing it for 40 more years. Around this time I discovered code and software development, and it just clicked for me. Fast forward to 2018 and I get an internship with a non-profit software organization making $18 an hour. That seemed like a lot of money to me, plus the work environment was awesome. But wait… it gets better.
The next year, after I finished my degree, I was hired on at the same place as an entry-level junior developer, making around $33 an hour. This was life changing for me. I was making more money than I ever dreamed of as a fry cook and, from my perspective, the work wasn’t nearly as hard as all those other jobs I had worked back then. But wait… it gets better.
Years later… after my employer refused to give me a well deserved promotion. I decided to jump ship. Tech recruiters flooded my inbox with offers, and I finally interviewed with a company that seemed like a good fit based on the technologies they were using. The company offered me 150k a year, which was almost double my salary! This… this was truly life changing.
Maybe you are in similar position that I was in, working a back breaking job with little pay, looking for something better. Maybe you just want to work a career that pays well. Whatever your story, if you pursue software and work hard at it, I truly believe you too will be able to find financial success.
Is it hard to learn how to code?
Most new skills in life are hard to learn, otherwise it wouldn’t be worth talking about. Like putting on clothes. Putting on clothes is easy. Did you put clothes on this morning? No?… you should probably go do that and then pick this book back up. 👖
Ok seriously it depends on what you think is hard. Obviously some people are going to find it easier to understand and use these skills than others. But I truly believe that software development, just like any skill, can be practiced and improved if you’re willing to stick with it. I will also say there is a point in your journey where learning software starts to shift so you’re more focused on making cool stuff rather than figuring out the programming language itself. How long does it take to get to that point? It differs from person to person. For me it was about one year after working in the industry to where I felt I knew enough to be dangerous on my own.
Should I go to college or a coding boot camp?
Everyone asks me this… like everyone. I’m going to share my opinion based on conversations with people that hire programmers.
If you want to get into the bigger companies (think the big ones), you will likely need that piece of paper known as a bachelor’s degree from an accredited college. People just really care about it for some reason. In my opinion… college is built on an outdated system, but a lot of people still trust in that system so if you get through college you are in a decent position to land a job.
Now… if you want to just get into the industry as quickly as possible and start making better money than you are now, coding bootcamps are a viable option if you pick the right one. The problem with boot camps is there are so many of them and many of them are money sucking garbage cans 💸🗑 designed to take your money and leave you stranded in that rainforest. Do your research and ask others in the programming community for their opinion.
With that being said… whether you go to college, a coding bootcamp, or learn on your own, the work is still the same. If you are going to stand out as a programmer, you have to do the work outside of what you are taught in the books and class. You will have to explore and learn what is possible on your own. People will pay you well if you have taken the time to build your skills and can show off those skills.
At the end of the day, the best way to learn programming is hands on experience, especially working with others who have more experience than you.
Which Language should I study?
This is another question I get asked a lot. And the answer I have given has changed over the years. Rather than answer this question directly, let’s go over some of the most popular languages (there are many, many others not listed here).
Python
Python is one of the easiest to learn. This is because it reads the most like English, which is one of the reasons it is so popular. One area you will see Python being used is for machine learning (aka fancy statistics labeled as Artificial Intelligence) and data science.
Java
Java has been around for a long time. For this reason it is used heavily in the industry, especially with bigger enterprise sized companies that have been around for a while. It’s a little more complicated to learn than Python since you have to define types for all of your variables (more on variables and types later in the book). It’s one of the languages I’ve used a lot in my career, and there are many jobs available for Java developers.
C++
If you’re interested in developing software for embedded systems (think robots or cars) C++ is one of the languages used heavily for these types of ‘low-level’ programs. It has also been around for a long, long time. This was the first language I studied as part of my college degree, and it was a steep learning curve compared to Python. It is an interesting language to work with though because you really have to understand software concepts like memory allocation and garbage collection in order to use it effectively.
JavaScript
First noob move all people make when learning programming is mistaking JavaScript (JS) for Java and vice versa… JavaScript and Java are totally different. At this time of writing, JS is the most popular language when it comes to building web apps. As someone who has worked with JS, it has a lot of things going for it. JS has been with us since Web 1.0, back when websites were just single pages with flashy rainbow text 🌈, cat backgrounds 😻, and loud obnoxious music that you couldn’t turn off 🎶 (aka the Golden Age of the internet). And it is for this reason that JS is still used heavily today. Modern Web browsers like FireFox, Chrome, and Edge all understand how to use JS code.
Another thing that has made JS popular within the last decade is its use for full stack development. Traditionally, many would use JS for programming the “front end” of your web site (the code that controls how your site looks) and Java for the “back end” (code that doesn’t have a visual impact on your site but is important to handling your data). Node.js is a technology that can run JS code in a server instead of just your web browser, which means you can now stick to one language and build both the front end and back end of your app. This is awesome because it makes it easier to build a full stack app if you only know one programming language.
For these reasons, in this book we are going to work exclusively with JS for our exercises. That being said, the concepts you learn in this book can be moved over to other languages you may want to learn on your own. Most modern programming languages have similar words for doing the same thing.
Alright with that, I think we’re ready to start our hike. Let’s get moving! 🥾
”To become the master of something, you must first master the basics”
~ me paraphrasing something I read on the internet once…
Chapter 1.1: Computers. What’s up with them?
Ok for real, have you ever wondered how smart devices work📱? It’s crazy that with just a few button clicks I can order a pizza 🍕, or watch whatever show I want 📺, or send money to a friend or crowd fund 💸… you can do anything with these devices.
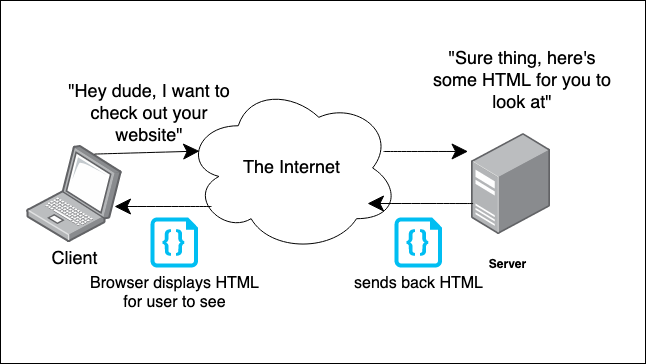
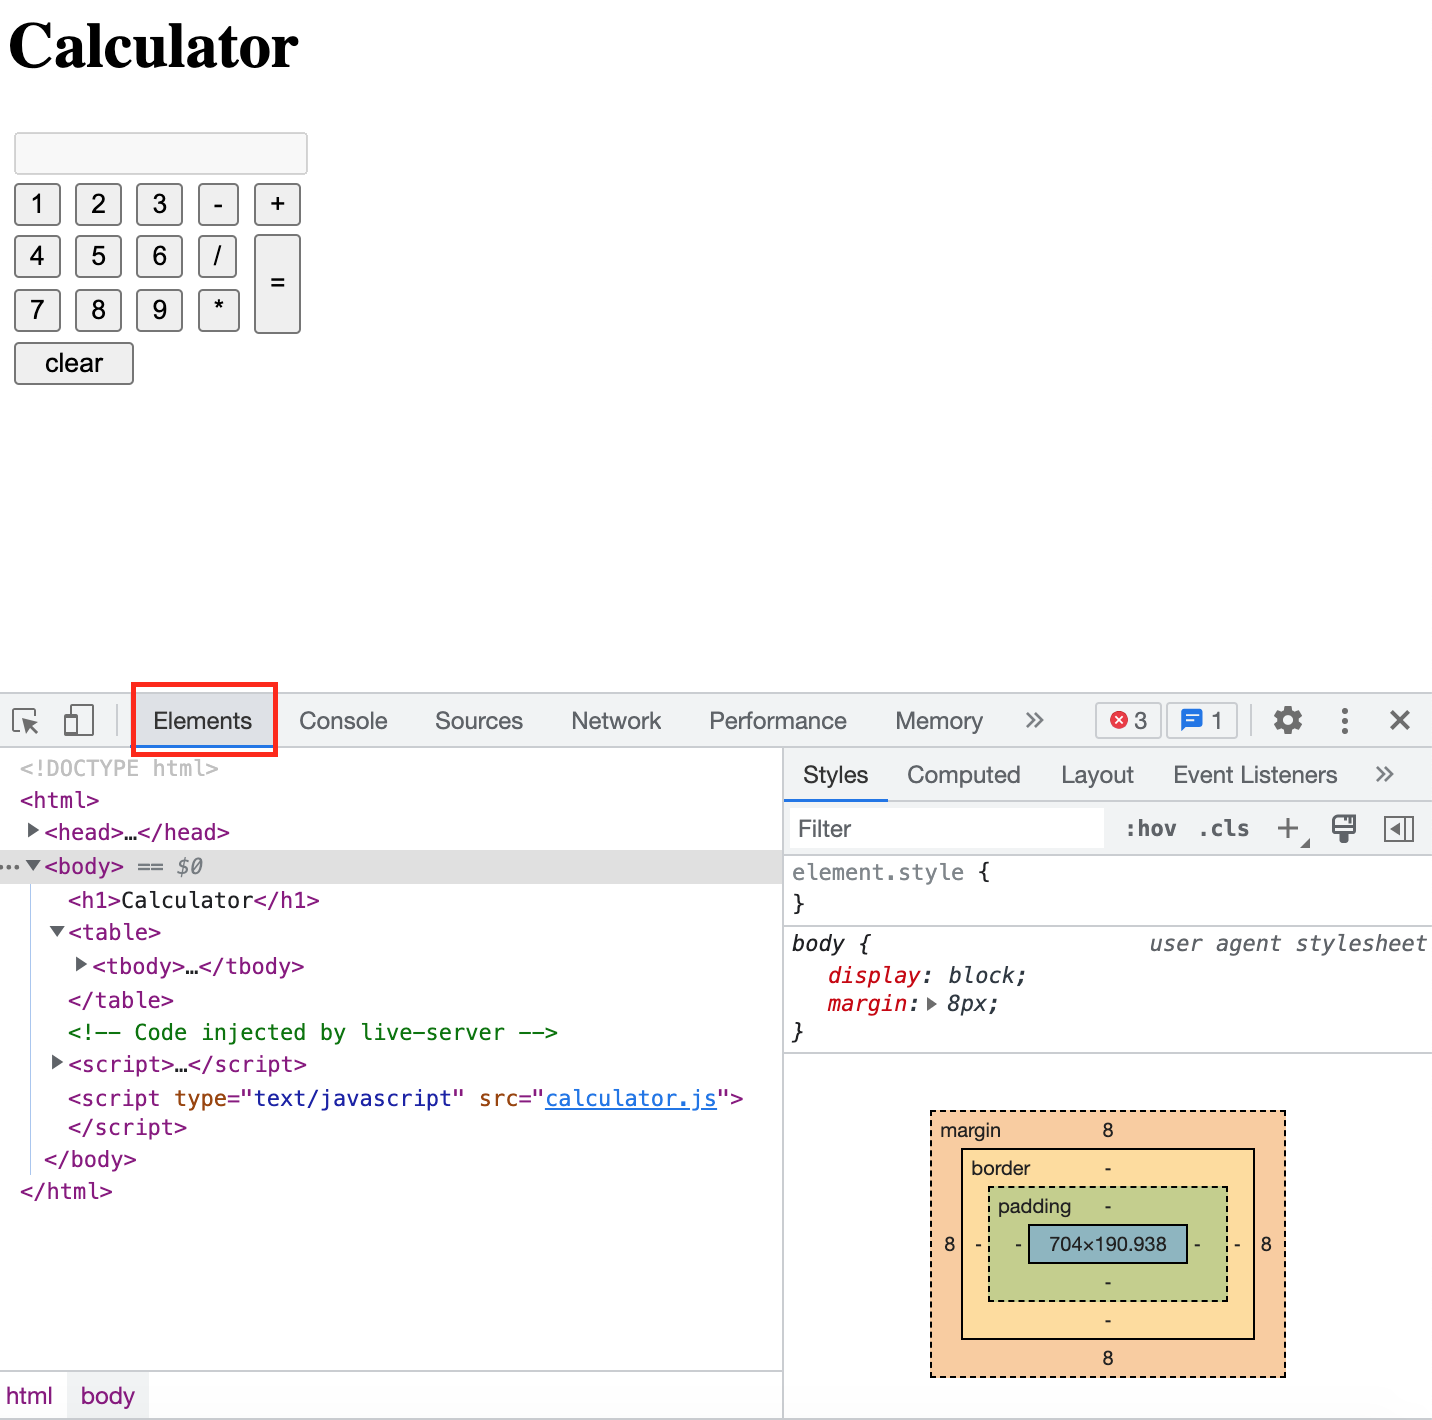
The truth is… given enough time, you can build almost anything with the right hardware and software. If you don’t know the difference between the two, hardware is the actual physical parts of a computer (they’re generally made out of things like metal or silicon, which is usually hard). Software, on the other hand, is stuff that runs on the computer itself, like code (I guess they just called it software because it’s not hard? Who knows 🤷♂️). In this book, we are going to focus on software development, a fancy way of saying working with code. At the same time, you need to understand at a high level of how your code interacts with the physical parts of a computer. To start, let’s look at the following diagram:
It may look like just a couple of boxes pointing to each other, but there is a lot of ideas packed in this diagram. Let’s take a look at each box separately and then talk about how they work together:
Compute
To compute something means you take information and do work on it to transform it into something else. Let’s take a basic example. If I have the math equation 1 + 1 and I perform a computation on it, I get the answer 2. I started with some information, or some input (1 + 1) and I transformed it into a result, or an output (2). This is a really simple example, but the concept works with really complicated problems. The compute section of a computer is what performs work transforming inputs into outputs based on what you tell it to do with code. In your own computer, this is generally your CPU, or central processing unit.
Next is storage.
Storage
When you store something, you put it somewhere safe so you can use it later when you need it. Most computers have storage space where you can store information. In your computer, you might have a SSD (Solid State Drive) or a HDD(Hard Disk Drive) where your files are saved. The important thing here is the storage section of the computer is meant to keep things for long-term use. This is different from memory, which is meant for short-term use as we will see in the next section.
Memory
Unlike Storage, information put in the memory section of your computer usually only lasts for as long as the program that made the information is running. Once the program ends, everything that the program put in the memory section of the computer is cleaned up. There are a couple of reasons for using memory instead of storage:
It is generally faster for your program to work with information in memory compared to storage.
When your program ends, the information in memory is no longer useful, so we want the computer to get rid of it rather than saving it in storage.
In your computer, the part that holds memory is called RAM (Read Access Memory). Back in the day, programmers had to be very careful about how much memory your computer program used, because you could quickly fill up all the space you had in memory and crash the computer. Now days, we’re pretty spoiled since computers have become much more advanced in terms of memory size, though it is still possible to create problems if your code has what is known as a memory leak. This means as the program runs you are creating way too much information without cleaning it up.
Next stop, I/O.
I/O
I/O stands for input/output, and it represents the parts of your computer that allow people to provide input to a computer (for example, a keyboard) as well as see the output from the computer (for example, a screen). All useful computer systems must have some I/O parts, else why exist? Keep in mind though it isn’t always a person interacting with a computer program. For example, a self driving car uses sensors to take in input from its environment and the output is the steering controls which it uses to pilot the car where it needs to go.
Putting it all together
All of these pieces come together to make a system. The word system is pretty important to understand when talking about computers 🖥, because it is all of these parts working together that make the miracle of technology a reality. Now that we have talked about all the parts individually, let’s walk through an example of how these work together in a real-world scenario.
Let’s say you want to order a pizza (I must be really hungry cause I keep thinking about it 🍕), you open a pizza app on your phone. You select the items for your order, and you pay for your order. Wait 30-45 minutes and you have a pizza at your door. How does pushing some buttons on your phone magically cause pizza to show up at your house? What parts make up that computer system?
Well, to start, your phone’s touch screen is part of the I/O. The programmers who designed your phone wrote code to detect touching the screen as input. This lets the phone know what buttons you are clicking on, like when you clicked on the pizza app icon. The pizza app you have on your phone is saved in your phone’s storage. All of the apps on your phone are saved for long term use so you can use them whenever you need them. When the pizza app opens it stores some information in memory for short term use while you have the app open. This could be stuff like the current time and your location so it can find the closest pizza restaurant to you and figure out when your pizza can be delivered to you (It won’t need this information after you close the app so it doesn’t need to put that in storage). As you click on buttons the app continues to store more information in memory, such as the list of items for your order, any coupons you want to use, and your payment information (all of these pieces of information are known as variables, because they change every time you use the app. We will talk a lot more about variables in chapter 1.4).
Finally, you pay for your order. This sends your order information over the internet to the pizza company’s computer system so they can put your order in and their employees can start cooking it.
After you order, you close your app. Any information that is stored in memory is cleaned up from your phone to make room for the other apps you decide to open.
By the way, during that whole process. Your phone was performing countless computations in its compute section. Transforming the input of the touch screen sensors into coordinates, opening the pizza app when it was clicked on, processing the colors of the pixels so the screen could show you something pretty to look at… the list goes on and on. Every step of the way the CPU was working to get you from one step to the next.
It took countless software and hardware engineers to design and create all those moving parts to create such a smooth experience. And we need more of them every day to help build the future of technology.
You could be one of them...
You now have a 30,000 foot view of how computers work. Over the next couple of chapters, we are going to start digging through how code works. We will first set your computer up so you are ready to write some code. Then I’ll walk through through the fundamental pieces that make up computer programs.
Get ready, cause I’m about to hand you that machete I was talking about last chapter 🔪 to start hacking at these trees 🌴🌳🌲
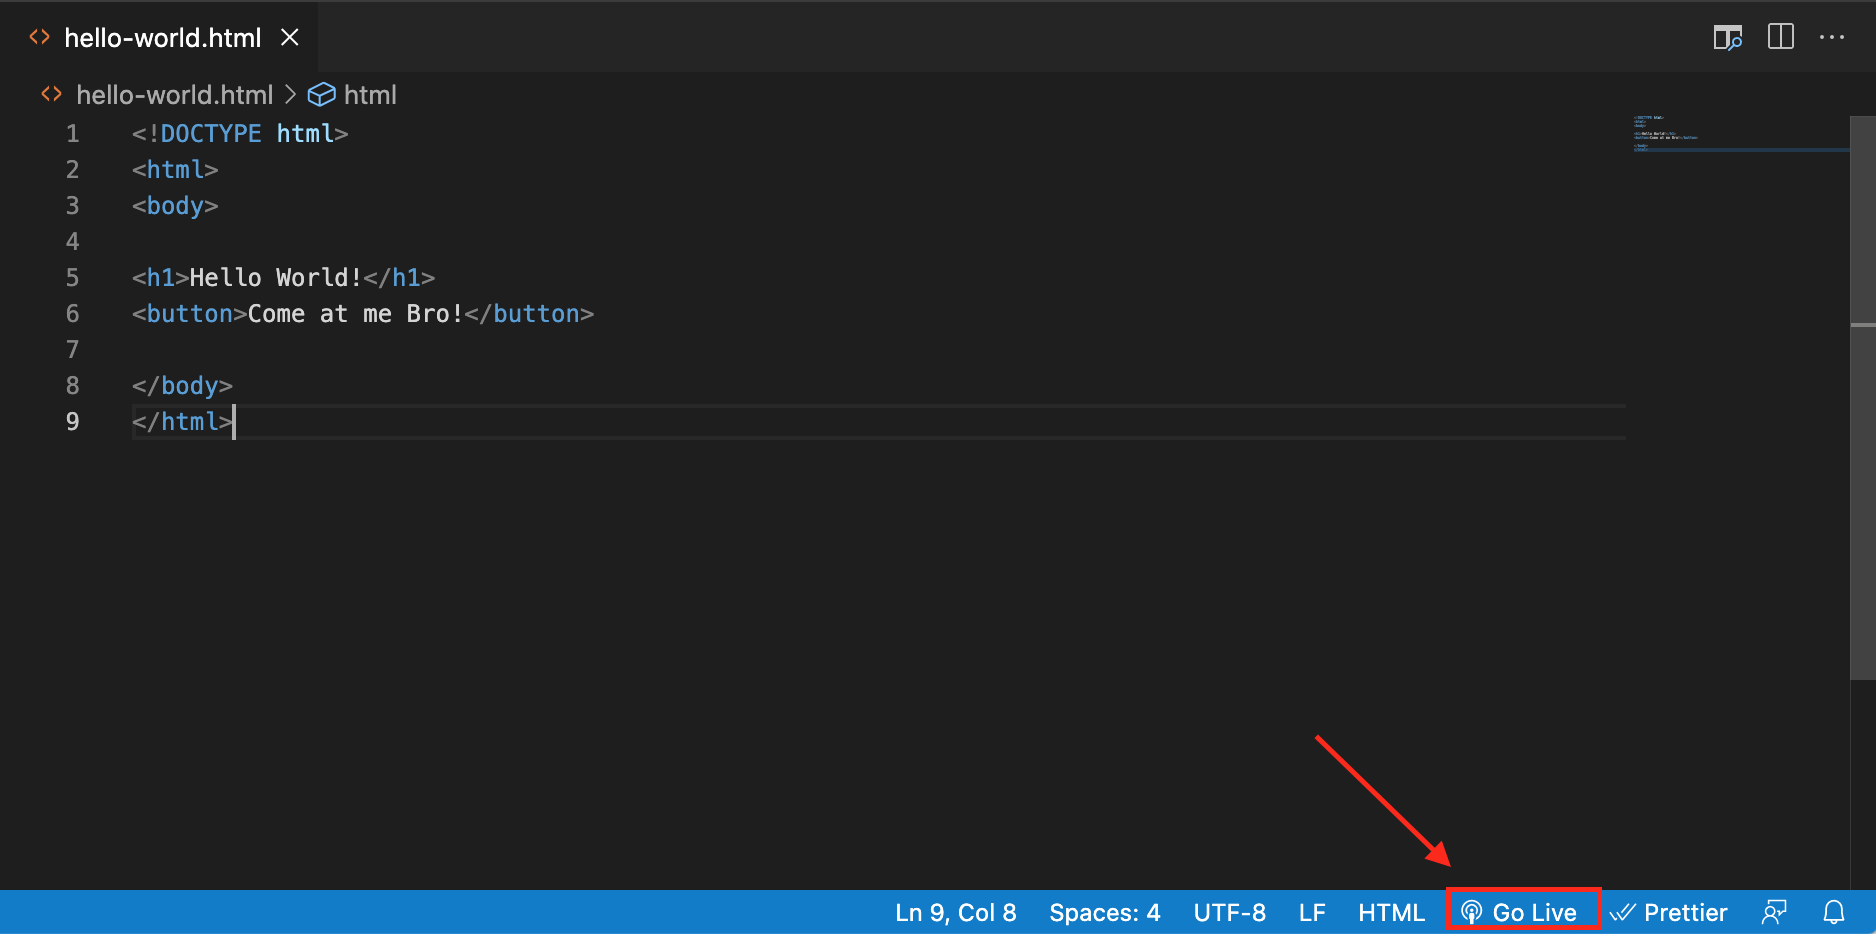
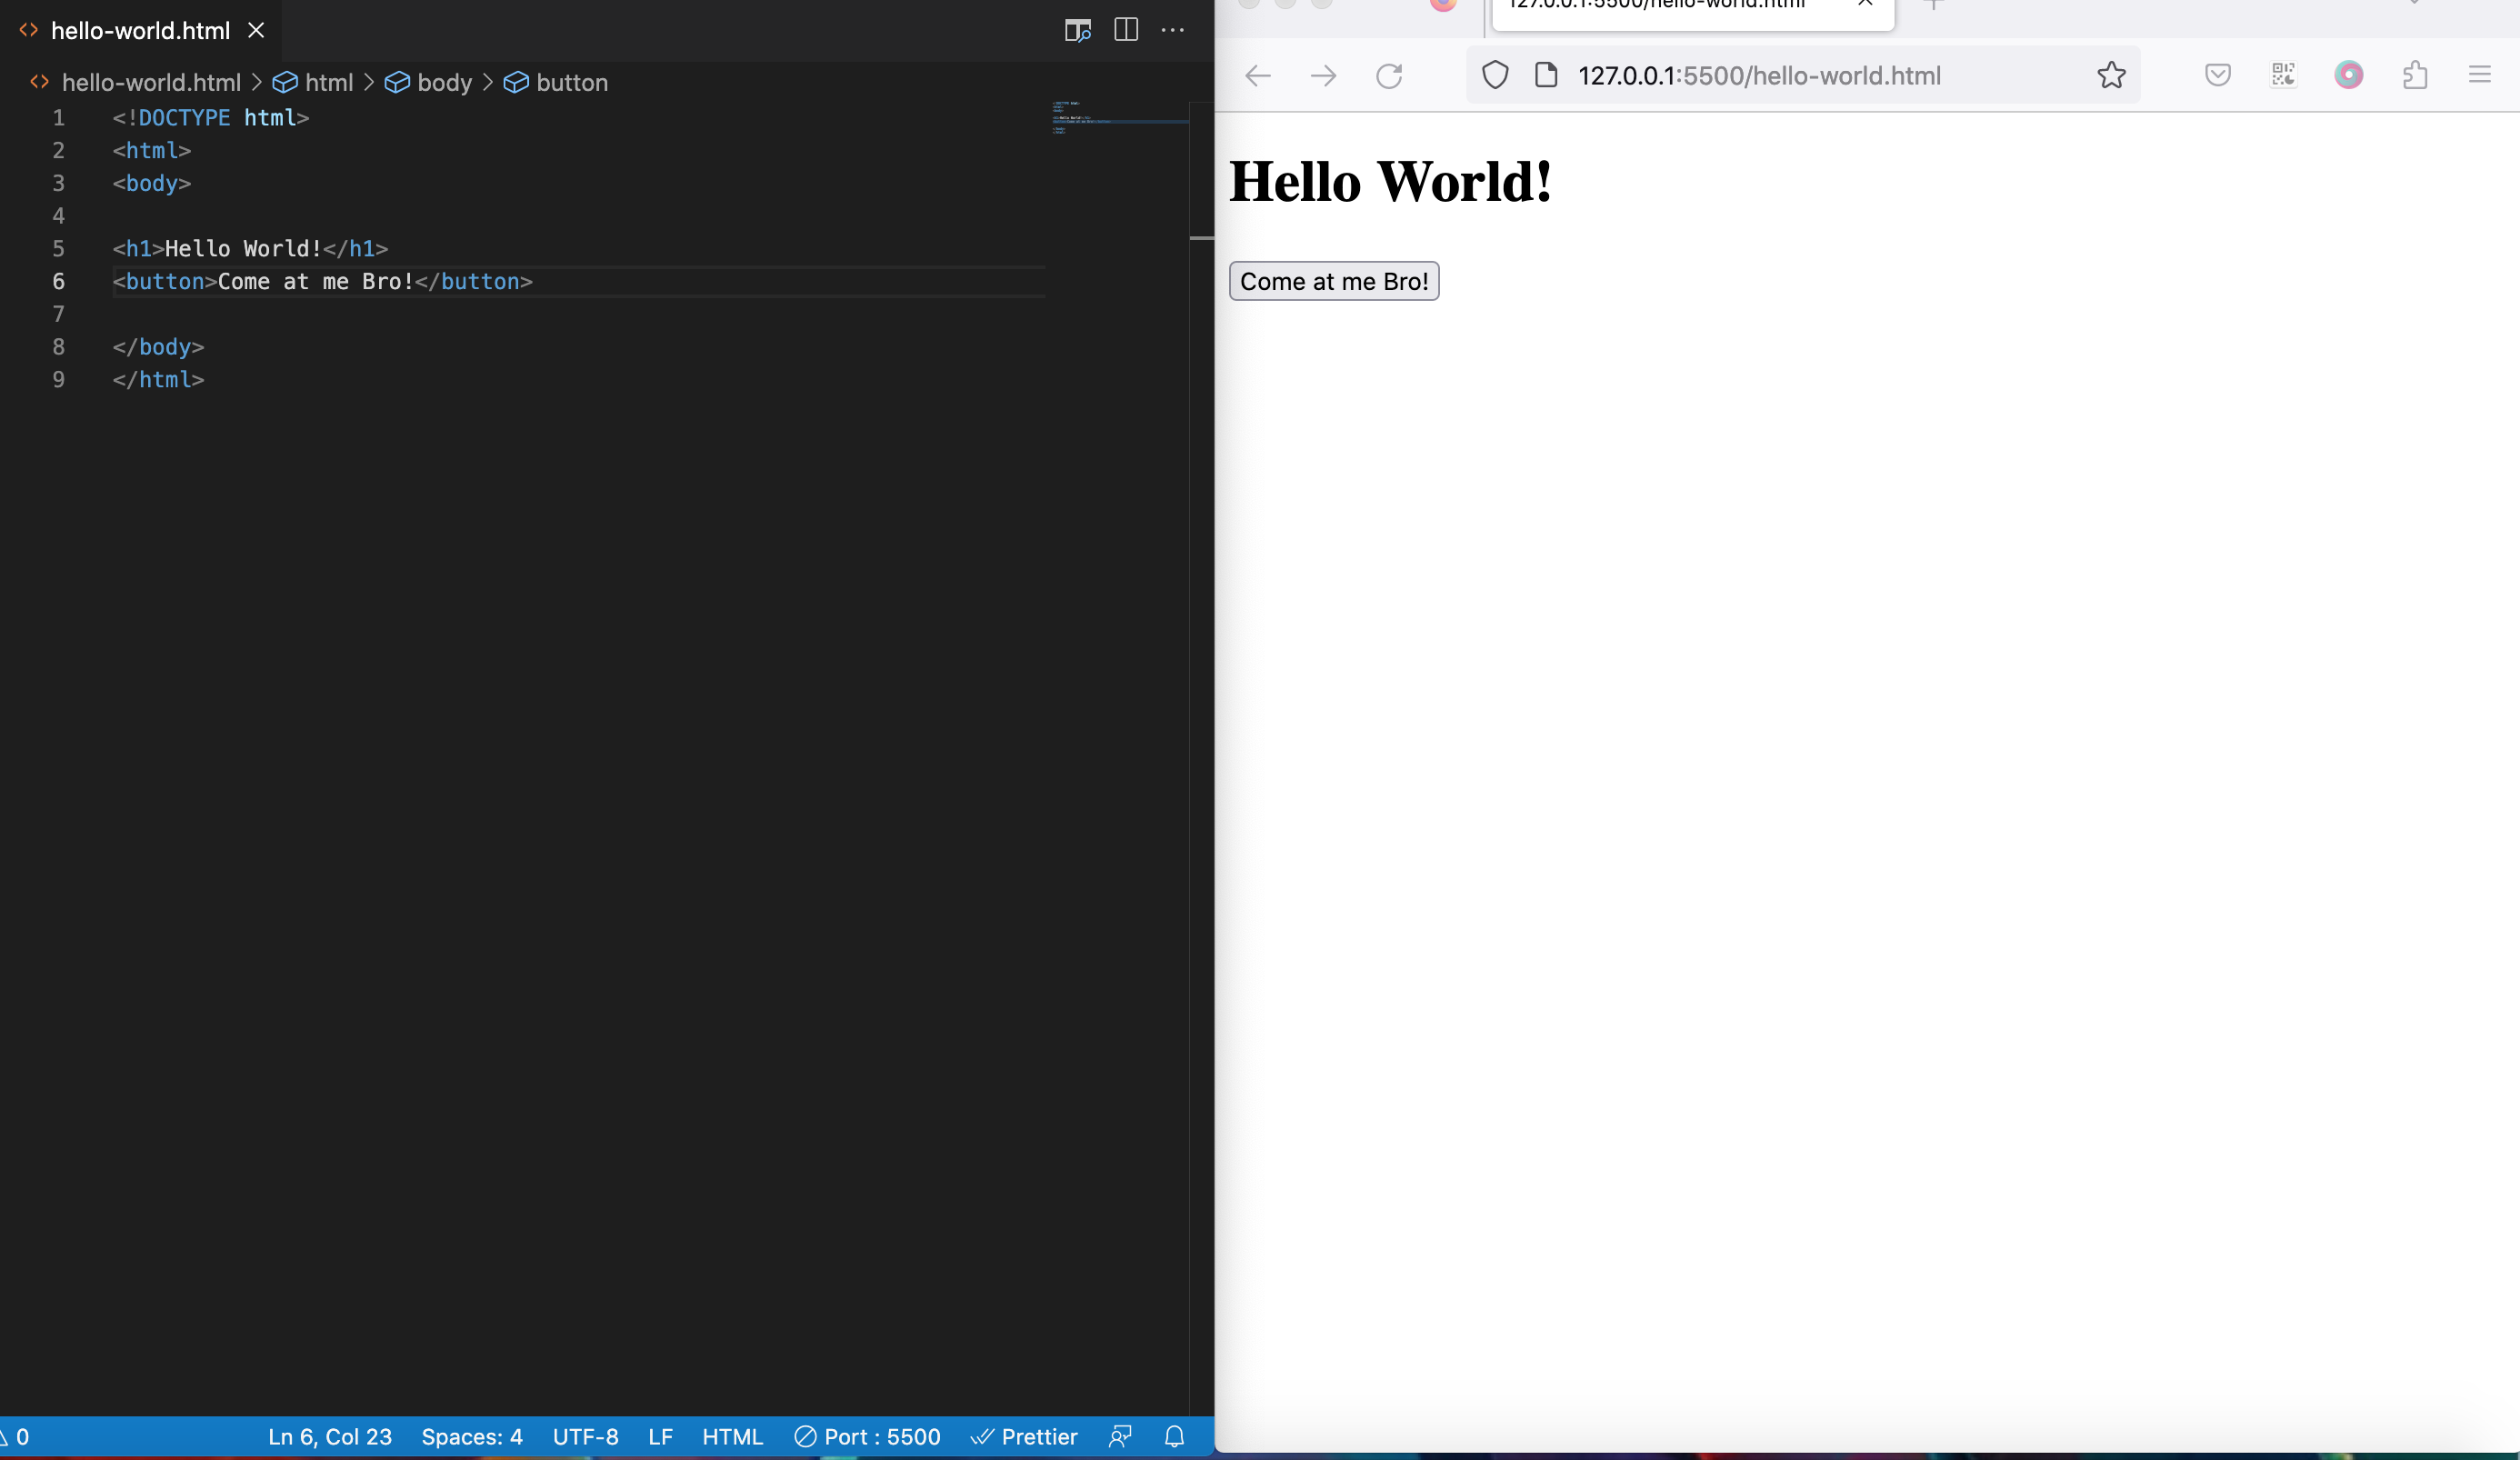
Chapter 1.2: Writing your First Program (Hello World)
In programming, it is customary to learn a new language or technology by creating what is referred to as a “Hello World” program. This name comes from the fact that usually all you are trying to do is to get your code to show the sentence “Hello World”, but the concept of a Hello World program applies to learning any programming technology by performing a really simple task. In this chapter, we are going to set up your computer so that you can write and run your first program.
Note: Throughout this chapter and other chapters I am going to give you blocks of text to type into your computer. THESE SHOULD BE TYPED IN EXACTLY AS YOU SEE IT IF YOU WANT TO GET THE SAME RESULT. Computers are so unforgiving. If you don’t type in a command with the right words, you’re toast 🍞. Remember to copy and paste the text from the book if you get stuck.
With that being said, sometimes the fun part of programming is seeing how you can break stuff or change it up to get different results. The code blocks are meant to give you a starting point from which you will then be able to explore and try out different things. See what works and what doesn’t. And always be curious about better ways to do things. That curiosity will help you throughout your journey.
So in other words, follow the rules, until a rule prevents you from learning and improving 😅
Alright! Let’s set up your computer to write code! 😆
Step 1: Download some stuff from the internet!
We are going to set up your computer with several tools that you will need to work through the exercises in this book. As mentioned in chapter 00, all of the code we are going to write throughout this book will be in JavaScript. So first things first, we are going to download a tool called Visual Studio Code (aka VS Code), a popular IDE produced by Microsoft that we will use to write our code.
What’s an IDE, you may ask?
It stands for Integrated Development Environment which is a fancy way of saying it helps you write, or develop, code.
You can download the installer for your computer by clicking the following link:
Just select the installer for your specific type of computer (Windows, Mac, or Linux based). If you happen to not be using any of these (Chromebook for example) you will need to search the internet for how to install VS Code for your device (or you could, you know, just make my life easier by going out and buying a computer with a standard operating system 🤷♂️ Just sayin’).
Once the installer is downloaded open it from your downloads folder and walk through the steps to install VS Code onto you computer, using all the recommended settings.
Once VS Code is installed, go ahead and launch it so it opens to the main menu.
Setting up your monitor space
Once you have VS Code open, if you only have one computer monitor I recommend having this e-book on one half of the screen and VS Code on the other half (if you have more than one monitor, then you must either be a technical person or a hard core gamer 🎮🖥🖥🖥🖥). By splitting the screen with the two apps, you won’t have to keep jumping back and forth between reading the book and writing the code in VS Code. You can simply view both at the same time. Both Windows and MacOS support splitting your screen between multiple apps.
For Windows Users
Click and drag the top of the VS Code app window all the way to the middle-right edge of your screen. You should see a transparent rectangle fill up the right half of your screen. When you let go of the VS Code app window, it should fill up the right half of your screen. You can then click on the app that you are reading the e-book with and it will fill up the left half of the screen.
For MacOS Users
Click and hold down on the green “maximize” button on the VS Code app and select “Tile Window to Right of Screen”:
It should fill up the right half of your screen. You can then click on the app that you are reading the e-book with and it will fill up the left half of the screen.
Now you have both apps open side by side. This will make it easier to work through the exercises in this book since we are going to spend most of our time in VS Code.
Woah… this is a picture of the book you are currently reading which has another picture of itself with an even smaller picture inside of that and… where does it stop? Man that hurts my brain 🧠.
About VS Code
There are many awesome IDEs out there in the world of programming. I chose this particular one for several reasons.
It’s lightweight
When you are first starting out, it’s easy to get lost in the tools and all the features they can provide. We don’t need a lot of stuff to write out some simple JavaScript files, and VS Code helps keep things simple until you are ready to explore more.
It’s used heavily by the community
When something is popular in the programming community, you can expect to find help on the internet for any questions you may have. Sites like Reddit (specifically the learn programming subreddit) or Stack Overflow are great places to ask questions or look for previous answers about VS Code and how it works. There are also many tutorial videos that you can search for and watch to get more familiar with it (just look up “VS Code beginner tutorials”).
It has all kinds of plugins
Because VS Code is so popular in the programming community there are a ton of plugins that you can use with it. A plugin is a feature that wasn’t included with the original tool, but can be downloaded and added to make the tool better (sort of like DLC for a video game). VS Code has some really cool plugins that do all kinds of stuff.
It’s free
Nuff said.
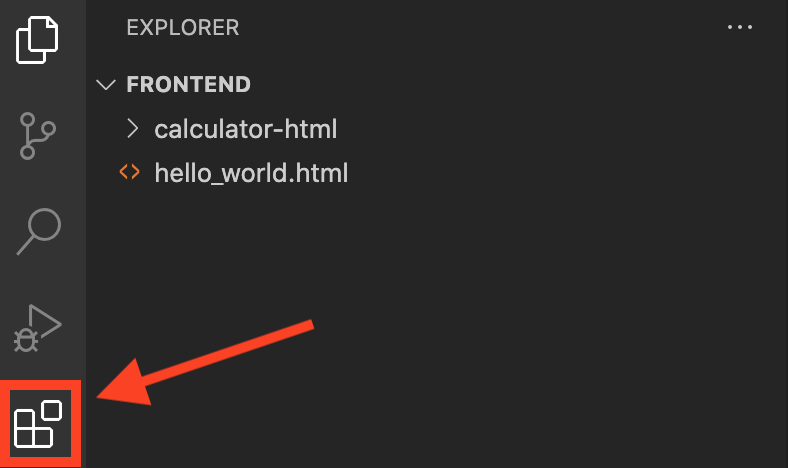
VS Code also makes it easy to create a terminal. A terminal is where you can type in commands to get your computer to do stuff without needing to click all over your screen, which means it’s much faster to get stuff done! For most of our examples in this book, we are going to be using terminals in VS code to set up your coding projects. Speaking of terminals, let’s open one up in VS Code. After installing and opening up the VS Code App, you will notice a tool bar at the top of your screen with several options. In the tool bar select Terminal -> New Terminal (you may have to click on the three dots (…) in the toolbar to see the “Terminal” option).
You will see a terminal window show up on the bottom half of the screen.
Try typing the following line of text into the terminal:
CHECKPOINT
echo'Hello World!'
Make sure you type in the full line, including the word echo, echo 'Hello World!'
Then hit the enter key, you should see Hello World! show up in your terminal. If this is your first time using a terminal, Congratulations! 🎉 You technically just wrote your first “program” in the terminal (I’m using the term pretty loosely here). But we can do better than that…
We want to write JavaScript code, so the next step is to download the tool that is actually going to run your JavaScript code. We are going to use Node.js for this. In technical terms, Node.js is a JavaScript runtime environment. This means it can understand your JavaScript code and will run whatever commands you tell it to. Node.js can be downloaded at:
Just download the recommended installer for your computer and run it:
IMPORTANT: When using the installer, unless you know what you’re doing just click the next button on each page and use their recommended defaults. Don’t select any extra features for now (like chocolatey).
After downloading the Node.js installer and running it on your computer, you will need to close and re-open VS Code.If you don’t do this, the following command will not work. After restarting VS code you should be able to make sure Node.js was installed by opening a terminal and running the following command:
node --version
This should return a version number (the value you see will match whatever version you downloaded from the Node.js website). For example:
Step 2: Create your First Javascript File
Awesome, you now have the tools needed to write and run JavaScript code. For your first project, we are going to use the terminal in VS Code to create a new folder on your desktop with a JavaScript file in it.
If you are using Windows:
Open a terminal in VS Code and type these commands into the terminal (NOTE: the ~ key can usually be found above the top-left tab key on your keyboard, just below your escape key. You must type shift and ~ at the same time to type ~. The \ key is found above your enter key. The - key is usually found to the right of the zero 0 key.):
mkdir ~\Desktop\codebro
cd ~\Desktop\codebro
New-Item hello-world.js
If you are using MacOS or Linux:
Open a terminal in VS Code and type the following commands into the terminal (NOTE: Similar to Windows, the ~ key can usually be found above the top-left tab key on your keyboard, just below your escape key. You must type shift and ~ at the same time to type ~. The / key is found next to your bottom-right shift key. The - key is usually found to the right of the zero 0 key.):
mkdir ~/Desktop/codebro
cd ~/Desktop/codebro
touch hello-world.js
The mkdir keyword stands for ‘make directory’ (remember talking about directories/folders last chapter?). It lets you quickly create a folder in a specific place on your computer. We are using it to create a folder called codebro on your Desktop. The ~ character represents your computer’s home directory, and makes it easier to get to common folders like Desktop or Documents without having to type out your full file path.
The cd keyword stands for ‘change directory’ (aka change folder) and it lets you quickly move your terminal to different locations on your computer to get to files. We are using it to move into the codebro folder you just created using the mkdir command.
The touch keyword (New-Item for Windows) lets you quickly create files in a folder. In this case you are creating your first JavaScript file, hello-world.js
Now we need to open the file in VS code. There are two main ways to do this. The first way is by clicking on the File -> Open File in the VS Code tool bar (ctrl + o in Windows, command + o for Mac) and then finding the hello-world.js file in the codebro folder on your desktop. For example…
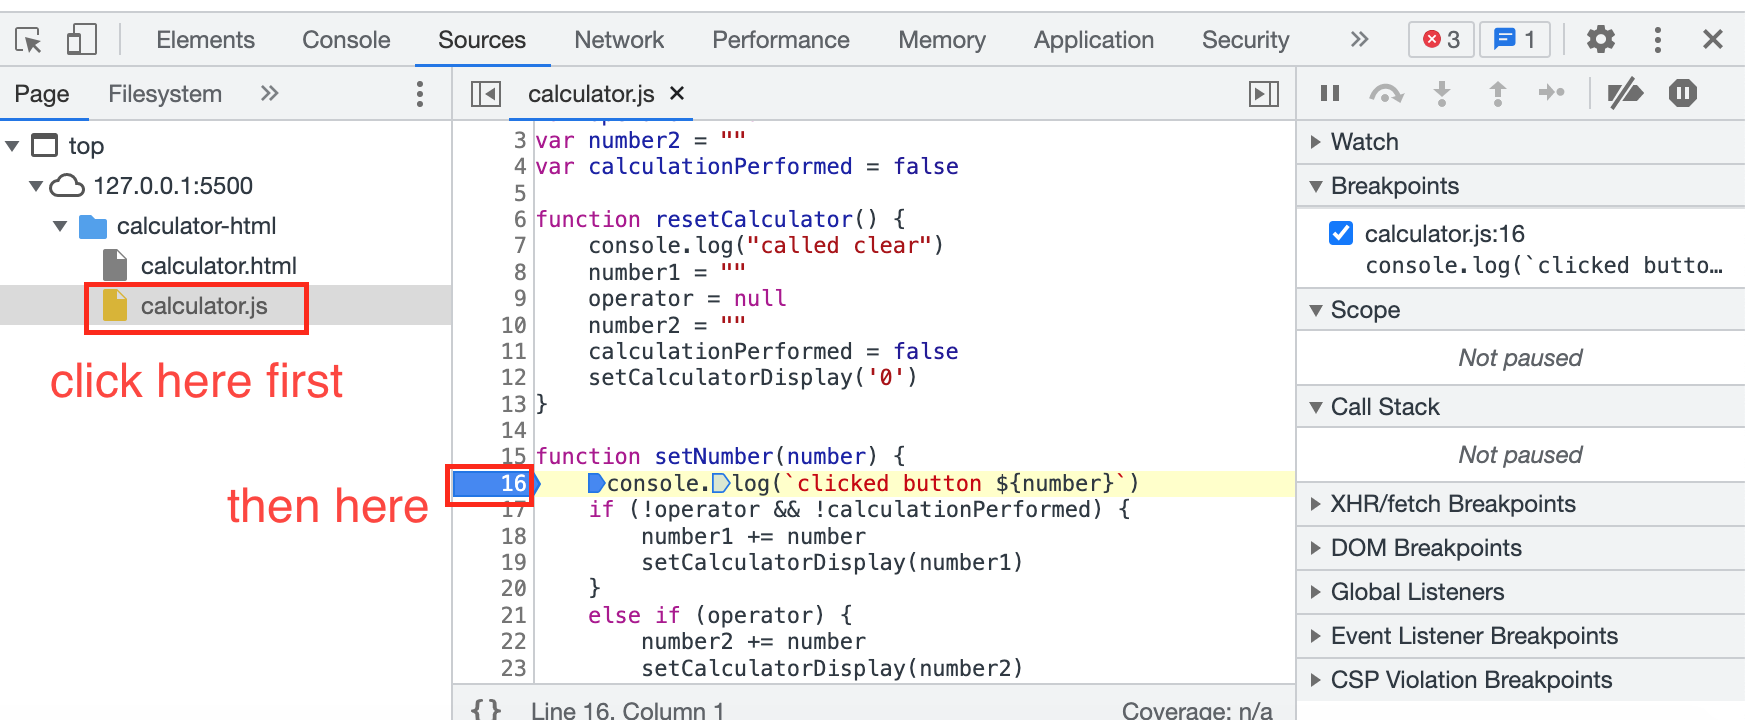
That will certainly work, and it’s how most people open stuff in VS Code cause it’s easier to use the graphical interface. But if you want to be like the cool kids… 😎 there is a much faster way. VS Code has a command that you can run from your terminal in order to open up files and folders. This command is called code and it makes opening stuff in VS Code much easier for you. If you are Windows user, the code command should have been installed automatically when you downloaded VS Code.
If you are a Mac or Linux user:
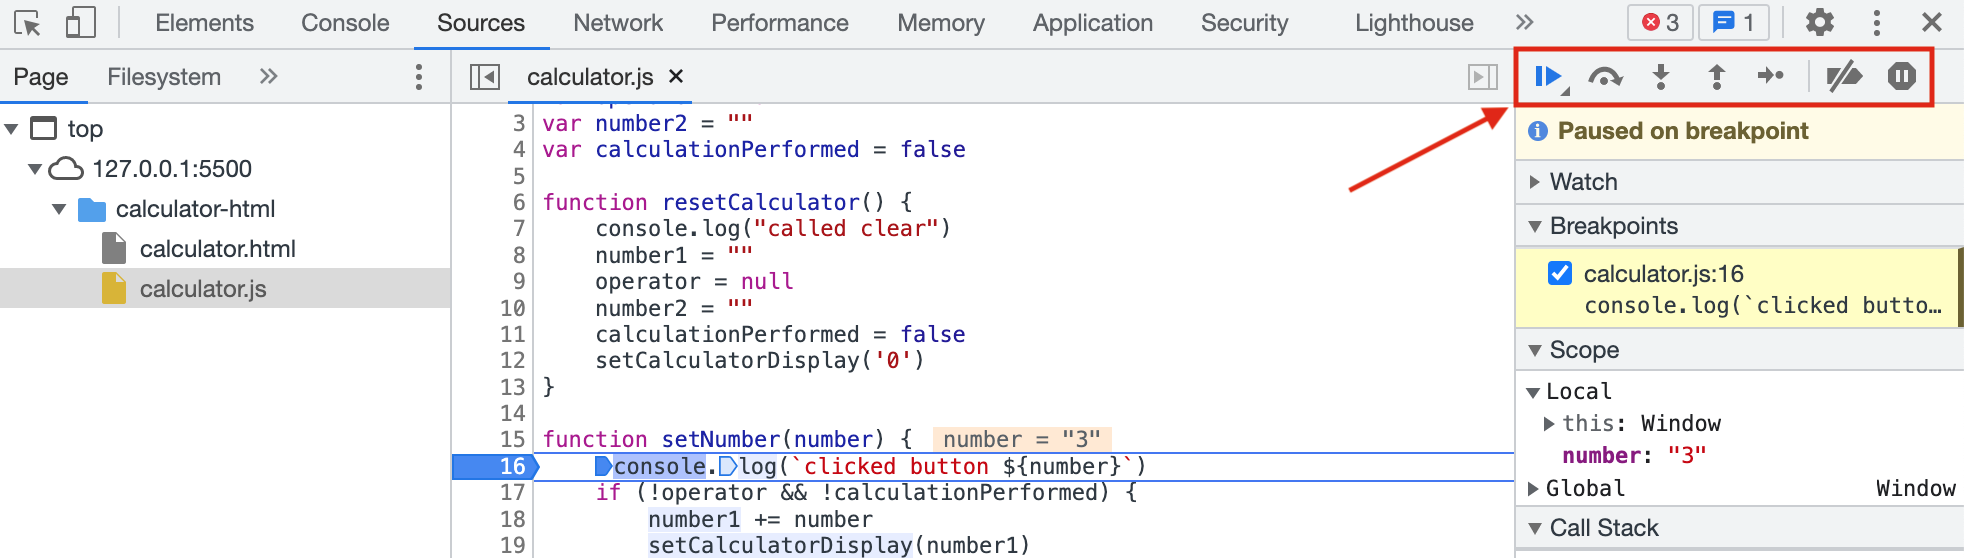
You will need to install the code command to use it in your terminal. VS Code makes it easy to do this. Inside of VS Code, type Command + Shift + P to open options in VS code then type the word shell in the search bar that shows up. You will see an option that says something like Shell Command: Install 'code' command in PATH. Click on that option:
If you ever see the message command not found: code in your terminal, just rerun through that step and it should start working.
Once you are set up to run the code command, Go ahead and try running the following command in your terminal:
code hello-world.js
If you had already opened the hello-world.js file previously using the open button, you won’t notice a difference because the file is already opened (you can try closing the file and then re-running the command to prove it works). For any future files or folders that you need to open in VS Code, I recommend using the code command, but obviously you can open stuff using the first option if you want (just don’t expect to sit at the cool kids’ table during lunch 😔 😜🍽 😎)
After running these commands. You should have an empty file window open up in the top half of the VS Code app.
Once this file is open, type the following code into the file, not the terminal
CHECKPOINT
console.log("Hello World!")
Keeping it simple, this code just says "Hello World!" in the terminal when the program is run.
You will need to save this file before you can run it (ctrl + s for Windows and Linux, command + s for Mac). After saving the file, you are ready to run your JavaScript code. Type the following command in your terminal.:
node hello-world.js
Then hit the enter key, you should see "Hello World!" in your terminal. Your screen should look similar to the following.
Step 3: Setup Auto Saving
If you ever forget to save your file after making a change, your program won’t run the way you expect it to, and it may take you a long time to figure out why because it isn’t so obvious when you forget to save a file. To avoid this headache, you can tell VS code that you want to automatically save files for you. This is actually really useful and I highly recommend setting it up. To do this, open your options menu in VS Code (ctrl + shift + P for Windows and Linux, command + shift + P for Mac). Type in auto save in the search bar that pops up and select the option File: Toggle Auto Save.
That’s it for that step. You will notice that any changes to your code will automatically be saved without you have to hit the save hot keys over and over.
Step 4: there is no step 4…
Step 5: Profit! 💰
Congratulations! 🎉You have now officially written your first program in JavaScript. Even better, you computer is now setup to write even more interesting projects. In the next chapter, we are going to walk through some concepts we will need to create more JavaScript programs.
This chapter wasn’t a part of my first draft, but after working with a couple of readers for the book it became apparent that before we write a bunch of code together, we need to cover the basics with terminal commands. This chapter will help you understand how you can best use the terminal to work on coding projects, as well as some pro tips that you can use to make your life easier while coding.
Getting to Know Your Keyboard
First things first, how well do you know your way around a keyboard? Sure you may know how to find any letter or number, but what about ~? What about /, \, `, {}, [], (), <>, or |? Do you know where those are? You’re going to be using them… like a lot… when writing code. Let’s take a look at a keyboard and highlight these less common keys.
Even though this is a picture of a MacBook Keyboard, the location of these keys is generally the same for most keyboards (unless you have one of those ergonomic keyboards, then you’re on your own for finding stuff 😥). Let’s walk through these different keys and the names of the symbols on them. Don’t worry about memorizing all of these keys now, this is just here for you to be aware of the various keys we will use when we start writing more code.
Diagram number
Pressed with shift key
Pressed without shift key
1
tilde~
We will use it often in the terminal to go to our home directory (more on that in the next section).
back tick `
Used often when working with strings in JavaScript (more on that in the next couple of chapters).
2
parentheses( )
You use these when writing functions (more on that next chapter).
9 and 0
I sure hope you know what these are…
3
curly brackets{ }
Very common programming keys. These are used for too many things to list here, which we will see in later chapters.
square brackets[ ]
These are used to create arrays, or lists of items (more on that next chapter).
4
back slash\
Windows users will use this often in the terminal.
pipe|
This is mainly used in programming to make what is known as the OR conditional|| (more on conditionals next chapter).
5
angle brackets<>
Angle brackets are commonly used when writing HTML (more on that in part 3 of the book).
, and .
Nuff said
6
?
What? Do you not know what ‘?’ means?
forward slash/
This is used by MacOS and Linux users in the terminal. It is also the division symbol when performing math in programming.
You will get plenty of experience using these keys throughout the book. It may take you a couple times to remember where all these keys are, but hopefully with practice you will remember where everything is without having to even look at the keyboard. This is known as touch typing, meaning you know where the keys are located on the keyboard simply by the touch of your hands. It is one of the most valuable skills you can develop as a programmer since it will improve your speed dramatically, reduce strain on your neck from not moving your eyes back and forth from your screen to your keyboard, and make it easier for you to see auto-complete hints from your code editor (more on this in a moment).
Navigating Folders and Files
Most computers use the same basic concepts for storing and organizing data using files and folders. A folder (aka directory) 📂 is a container for other files or folders (kind of like a physical folder which you can put other folders and papers inside of). A file 📄 is an individual container of information (like a homework report, a spreadsheet, a gaming app, etc.). With files and directories, you can store any information you need in any order. A directory that is located in another directory is referred to as a subdirectory.
We briefly mentioned this last chapter, but in the terminal you can move through these different directories in your computer using the change directory command (cd). When you first open a terminal, you often start in what is called your home directory. From here you can cd into directories like Documents and Desktop. You can always get back to this directory by typing cd ~. At any time you can find out your current directory, in other words the directory your terminal is working in, by typing the following command:
pwd
Running one of these commands will show you the absolute path to the directory your terminal is working in (for example /Users/shumway/Desktop/codebro or C:\Users\shumway\Desktop\codebro). The absolute path starts from the root directory, or in other words the top, of your computer’s file system and tells you all the subdirectories that you are in to get to your current terminal location. This way you can make sure your terminal is working in the directory you think it is.
Why bother with changing directories in a terminal? It all has to do with running commands on files. For example, in the last chapter you ran JavaScript code by typing node hello-world.js. The reason that command worked is because you had a file called hello-world.js in the directory your terminal was working in. If you tried running the node hello-world.js command and your terminal was in a directory that did not have a file named hello-world.js, it would blow chunks like this:
~ % node hello-world.js

node:internal/modules/cjs/loader:958
  throw err;
  ^

Error: Cannot find module '/Users/shumway/hello-world.js'
    at Module._resolveFilename (node:internal/modules/cjs/loader:955:15)
    at Module._load (node:internal/modules/cjs/loader:803:27)
    at Function.executeUserEntryPoint [as runMain] (node:internal/modules/run_main:81:12)
    at node:internal/main/run_main_module:18:47 {
  code: 'MODULE_NOT_FOUND',
  requireStack: []
}
This error is telling you that you tried to run JavaScript code using the node command on a file that does not exist in the directory where your terminal is running, so it has no idea what you want it to do (remember, computers are dumb 🤤🖥). This means that before you run the node command, you must either cd to the directory where your JavaScript file is located, or you must type out the path to the JavaScript file. As a hands on example, let’s cd into your home directory by running the following command in your terminal:
cd ~
Now in order to run your hello-world.js JavaScript file that you created last chapter in your codebro directory, you can type out the following command:
For Windows users
node Desktop\codebro\hello-world.js
For MacOS and Linux users
node Desktop/codebro/hello-world.js
This works because node is able to find the hello-world.js file using this relative path to the file. Unlike absolute paths, which include the complete path of subdirectories starting from the root directory (/Users/shumway/Desktop/codebro/hello-world.js), relative paths just include the directories starting from your terminal’s current location to where you are trying to do something (Desktop/codebro/hello-world.js). This is important when you start working on projects with multiple JavaScript files, because sometimes you don’t know the absolute path to a file, but you do know the relative path. We will see examples of this at the end of part 1 of this book.
Notice that for Windows users, you use backslashes\ to separate directory names, while everyone else uses forward slashes/. Isn’t that great! I’m so happy for that inconsistency. It made this book much easier to write! (In case you can’t catch on to my sarcasm through text, here are some emojis to help convey my feelings 😡🤬😩)
Listing Files in a Directory
If you are not sure what directories or files are in the current directory your terminal is in, you can easily find out using the ls command (Note that is a lowercase letter l, and not the number 1. Don’t ask me what ls stands for 🤷♂️). Try opening a terminal in VS Code and typing it in:
ls
This will show you all the files and directories found in your current terminal location, for example:
Windows:
    Directory: C:\Users\User\Desktop\codebro

Mode                 LastWriteTime         Length Name
----                 -------------         ------ ----
-a----        12/24/2022   8:20 AM              0 hello-world.js
MacOS and Linux
codebro % ls

hello-world.js
This can help you figure out your way around when changing directories. If for whatever reason you want to cd into the parent directory (the directory above where you currently are) you can use the cd .. command:
cd ..
The .. is shorthand for “the directory above this current one”. Let’s practice these concepts together with an actual example. First, to make sure we are all in the same directory, run the following command in your terminal:
For Windows users
cd ~\Desktop\codebro
For MacOS and Linux users
cd ~/Desktop/codebro
This puts us in the codebro directory you created last chapter. Now run the ls command in your terminal, you should see the hello-world.js file that you also created last chapter, for example:
codebro % ls

hello-world.js
Now let’s go ahead and create a new subdirectory here in your codebro directory. We do this by using the mkdir command:
mkdir my-first-sub-dir
Now, if you run the ls command again, you will see the new directory my-first-sub-dir shows up alongside your hello-world.js file, for example:
codebro % ls

hello-world.js
my-first-sub-dir
Now let’s move into this new directory using the cd command:
cd my-first-sub-dir
Once you are in the my-first-sub-dir directory, if you run the ls command here you won’t see any files or directories, because you haven’t created anything here yet. From here, if you wanted you can create a file using either the New-Item command for Windows (touch for Mac and Linux) followed by the name of the file:
For Windows users
New-Item my-special-file.js
For MacOS and Linux users
touch my-special-file.js
Once you create the file, if you run the ls command again you will see the new file show up:
my-first-sub-dir % ls

my-special-file.js
Finally, we want to move our terminal back into the codebro directory, which is the parent directory of my-first-sub-dir. To do this we use the cd .. command:
cd ..
You will notice the terminal moves out of the my-first-sub-dir directory and back into the codebro directory.
If this is your first time creating a subdirectory and then cd’ing in and out of it, congratulations! 🎉 Using the cd <directory name>, cd .., and the ls commands, you can make your way around most of the file system on your computer.
Using your Terminal Command History
Throughout the next couple of chapters, you are going to run the node command in the terminal a lot. Rather than retyping it every time, you can just press the up arrow key 🔼 on your keyboard after clicking on the terminal window. This will show the last command you typed into the terminal so you don’t have to type it over and over. You can press it multiple times to go back through your terminal command history.
Using Auto-Complete Hints in VS Code
VS Code has a code auto-complete feature, where it will try to guess what code you are trying to type. When you are typing code into a file you will often see a box pop up next to you with several options to pick from. If one the options it shows matches what you are trying to type, simply press the tab key and VS Code will put that code in the file. If none of the options match or you are not sure if any of them are right, just ignore the pop up box and keep typing.
As you continue into the more advanced coding projects in this book, the auto-complete feature will save you gobs and gobs of time.
Creating Files in VS Code using the Code Command
This is a pro tip that will save you a couple keystrokes when making new files in VS Code. Last chapter I showed you how to create a new file in your terminal and then open that file in VS Code.
For Windows users
New-Item <file name>
code <file name>
For MacOS and Linux users
touch <file name>
code <file name>
But it turns out you can just use the code command by itself to automatically make and open files in VS Code, so you don’t need to use the New-Item or touch commands.
code <file name>
The code command will open a file with that name in VS Code even if it doesn’t currently exist. The important thing to remember is you must save these new files when they are first opened in VS Code using ctrl + s for Windows/Linux or command + s for MacOS. This is what actually creates the file on your computer. After you save the file like this the first time, VS Code will automatically save any future changes to the file if you turned on the auto saving feature that I showed you last chapter. This will make it faster for you to create the files you will need for the coding exercises we will be doing together throughout the book. Some of the examples I show will use the code command to create files, and some will use the touch/New-Item command. It just depends on how I was feeling at the time I wrote it 😆.
Alright, that covers the basics of the terminal you will need to work through the coding exercises. In the next chapter we will get hands on experience with writing actual JavaScript code.
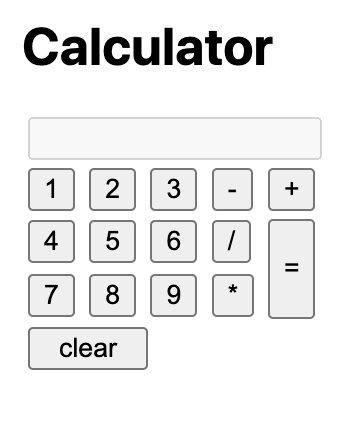
Over the next couple of chapters, we’re going to build a simple calculator that can do basic math (add, subtract, multiply, and divide). In this chapter we are going to talk about the different parts that computer programs are made of. As part of this, we will walk through examples of JavaScript syntax. Here syntax means the rules of a programming language that let you to tell the program what you are trying to do. With this background we will then write up a calculator app that you can interact with in the next chapter.
You should note that I’m intentionally running through these pretty quick. If any of these sections seem to go over your head, don’t sweat it. Remember the intent of this book is to simply introduce you to the concepts so you at least get familiar with the terms and then practice those concepts with working code.
Before we dive in, I recommend you create a new file in your codebro directory called scratch.js and open it using the following commands in a VS Code terminal (As a reminder, to open a terminal In the VS Code tool bar select Terminal -> New Terminal):
For Windows users
cd ~\Desktop\codebro
New-Item scratch.js
code scratch.js
For MacOS and Linux users
cd ~/Desktop/codebro
touch scratch.js
code scratch.js
This should give you an empty file that you can use to play around with the code examples in this chapter. I’ve tried to set up most of the code in this chapter so you can copy and paste it into your scratch.js file.
With that, let’s start with the basic building blocks of code.
Variables
A variable is a piece of information in your program. It lets you label your information with names so that you can keep track of all the code you are writing. For example:
varmyFavoriteNumber=8
With this line, my program now knows that the variable named myFavoriteNumber is the number 8. This allows me to use it in my program by typing myFavoriteNumber whenever I want. If you remember from Chapter 1, variables are stored in the memory of your computer as long as the program is running.
You may have noticed the letters var in the code example above, what’s that about? Those letters are short for ‘variable’. This is how you tell your program that it needs to create a variable instead of something else (will take a look at what the ‘something else’ might be later in the chapter).
Try adding the following code to your scratch.js file:
You can then run the code in this file using the following command in the terminal:
node scratch.js
This should print out the number 8 to your terminal window, for example:
node scratch.js
8
One more important thing to note about variables is that, in JavaScript, they are written using camel case. This means that you capitalize the first letter of each word, except the very first letter. For example:
varsodaFlavor="root beer"console.log(sodaFlavor)
Notice the letter s is lowercase, since it is the very first letter of the variable name, but the letter F is capitalized since it is the first letter of the word Flavor.
There are many different types of variables, let’s look at a couple of them…
Numbers (Integers and Floats)
As you might expect, you can write numbers in your code. They are often written as integers (-1, 0, 1, 2, etc.) or with decimals (aka floats or floating point numbers if you’re a nerd 🤓)
varmyInteger=1varsomeFloat=1.50
You can perform all kinds of math operations on numbers and store the results
You can also use text values in your code. Text is referred to as strings in programming terms, as in a string of letters.
varmyString="Hello"
You can put almost any character you can think of in a string, but usually you will use strings to store alphanumeric characters (0-9 and A-Z). Just like numbers, you can perform operations on strings to change what the string looks like. For example, replace the code in your scratch.js file with the following:
When you run this, "Hello World" will be printed to the screen:
nodescratch.jsHelloWorld
Booleans
Booleans are fun, I love working with them because they are simple to use and help you to make choices in your code. A boolean value can either be true or false.
varthisBookIsAwesome=truevarcodingIsEasy=false
We’ll talk about this type more when we get to conditionals.
Arrays
An array is a list of items, like numbers or text.
varluckyNumbers= [8, 23, 10, 38, 11]
varfortuneCookieFortunes= ["Your true value lies within your heart", "You will find true love on Flag Day", "Learning is the first step to doing"]
console.log(luckyNumbers)
console.log(fortuneCookieFortunes)
You often use arrays to put pieces of data that go together (example: test scores for all the students in a class). Arrays make it easier for you to write your program with fewer lines of code. We’ll look more into arrays when we talk about loops later in the chapter.
There are many other types of data that you will encounter in the wild, but these are the most important to be familiar with to start.
Operations
Code is mostly made up of variables, which is your data, and operations, what you actually do with that data. For example, adding two numbers together:
In this example, number1, number2, and number3 are variables in my code and the = and + are operations I perform on my code. The = is known as the assignment operator, and it lets you create a variable. The +addition operator, as you could probably guess, adds things together. There are many types of operators in code. We will talk more about them as we work through our calculator example in the next chapter.
Alright, you hanging in with me? Next we have to talk about conditionals.
Conditionals
Conditionals are so cool. They are used so your program can make choices. You tell it what to do in certain situations, or conditions, so that the correct action is taken. Conditions are created using the if and else keywords. Try running the following code in your scracth.js file, replacing the value of yourFavoriteNumber with your actual favorite number:
varyourFavoriteNumber=8if ( yourFavoriteNumber==8) {
console.log("That's my favorite number too!")
}
else {
	console.log("That's a great number!")
}
The == characters mean equals. You can almost read this section as if it were English:
if your favorite number is equal to 8, then say "That's my favorite number too!" Else say "That's a great number!"
Let’s break this down:
if ( yourFavoriteNumber==8) {
console.log("That's my favorite number too!")
}
The == is how you ask the computer to check if two values are equal to each other. In this example we are telling the computer to check if the variable yourFavoriteNumber is equal to the number 8. If this is true, we want it to run all of the code that is in the following {} characters.
Now for the next section:
else {
console.log("That's a great number!")
}
This is the code we want to run if yourFavoriteNumber is not equal to 8. But what if we want to check for another condition and do something else? That’s where an else if can be used:
if ( yourFavoriteNumber==8) {
console.log("That's my favorite number too!")
}
elseif (yourFavoriteNumber==4) {
console.log("That's half of my favorite number!")
}
if,else if, and else. With these three keywords you can make any conditional you can think of. The important thing to notice with conditionals is they check for a condition that is either true or false. Remember talking about Booleans?. This is why booleans are a thing. Many times you will use Boolean variables in your conditional code, for example:
varyourFavoriteNumberIsMyFavoriteNumber=yourFavoriteNumber==8if (yourFavoriteNumberIsMyFavoriteNumber) {
console.log("We have the same favorite number")
}
Comparison operators (aka relational operators), such as ==, will return a boolean value of either true or false. What other kinds of conditions can you make a computer check for? Turns out quite a bit.
Comparison Operators
We’ve looked at == which is an comparison operator that returns true if two values are equal, but there are other things we can check for:
less than (<) - true if the value on the left is less than the value on the right.
less than or equal to (<=) - true if the value on the left is less than or equal to the value on the right.
greater than (>) - true if the value on the left is greater than the value on the right.
greater than or equal to (>=) - true if the value on the left is greater than or equal to the value on the right.
not equal to (!=) - true if the two values are not equal to each other.
Boolean Operators
Boolean operators allow you to chain conditions together to check for multiple things at the same time. Look at the following sentence:
If it is hot outside and I have money, we should go buy ice cream!
Notice here we should only buy ice cream if two things are true, ‘it is hot outside’ and ‘I have money’. Now take a look at this sentence:
If I am hungry or you are hungry, we should go get some sushi!
Notice here we should get some sushi if one of those things are true, either you or I are hungry (man why are all my examples about food? I must be hungry, which means we should go get some sushi 🍣 even if you aren’t hungry).
As you can imagine, chaining these conditions in order to make choices is incredibly useful, which is why in programming boolean operators are used often. Here are some of the most common you will see:
AND (&&) - true if both conditions on the left and right are true.
NOT (!) - This one is a little weird to get your head around the first time so I’ll add a little more detail to this one. Consider this conditional sentence:
If you are not allergic to seafood, we should go eat some seafood!
This condition is a little different, since I’m checking for something to not be true (you are not allergic to seafood) in order to decide to do something (get some seafood 🍤, man I’m so hungry right now!) This is called a logical negation, meaning I set a condition to true if it is originally false, or false if it was originally true.
Just remember the following:
!true=false!false=true
So that’s what the boolean operators look like, but how do we actually chain conditions like this in code. Here is an example taking all of those conditions that you can run in your scratch.js file:
varitIsHotOutside=true// it's always hot where I live
variHaveMoney=false// maybe someday this will change
if (itIsHotOutside&&iHaveMoney) {
console.log("Let's go buy ice cream!")
}
variAmHungry=true// always
varyouAreHungry=false// idk, maybe you are
if (iAmHungry||youAreHungry) {
console.log("Let's go set some sushi!")
}
varyouAreAllergicToSeafood=false// unless you are allergic, in which case I'm so sorry for you!
if(!youAreAllergicToSeafood) {
console.log("Let's get some seafood!")
}
In this case, because iHaveMoney is false, the first condition, if (itIsHotOutside && iHaveMoney), is false. This is because the two conditions on both sides of the && must be true in order for the whole condition to be true (true && false = false). This means the first if condition will evaluate, or in other words end up being false. Any condition that is false will not run the code inside the {} under the condition. So in this case, the code in first if block will not be run.
What about the second condition, if (iAmHungry || youAreHungry)? iAmHungry is true so in this case the whole condition will evaluate to being true and the code inside will be run, even though the second condition is false (true || false = true).
Finally, what about the condition if(!youAreAllergicToSeafood)? In this case, youAreAllergicToSeafood is false, but because there is a ! in front of it the false gets turned into true (that ! symbol is called a bang btw). Because the condition evaluates to true the code in that condition will be run.
There are many other types of conditions we can check for. We will explore more with conditionals in the following chapter.
One last minor note, did you notice all the // marks with plain English written in the code? Those are called comments. Comments are lines of text that are ignored by your program. They allow you add detail to your code for other people to read that is not actually part of the code itself. Comments can help others understand why your code is doing what it is doing (they can also help you remember why you wrote something the way that you did). I went a little overboard in this example, but comments can be helpful if used well. You will likely see many comments in code found out in the wild.
Loops
Many times in code you want to perform the same action multiple times without have to rewrite the same line over and over again. Loops help us to do this. A Loop is a section of code that you only write once, and will repeat itself as many times as you tell it to. There are two types of loops you should care about.
For loops
A for loop is probably the most common type of loop (at least it’s the type I’ve used the most). They are really useful for working with arrays. Using loops you can get to each item in the array and do something with it. Let’s take a look at an example. Replace the code in your scratch.js file with the following:
If you run this, you can see the average of these test scores is 75:
nodescratch.jsaverage:75
We’ll break this code down line by line:
vartestScores= [85, 74, 91, 50]
This is an array of test scores. As mentioned earlier an array is just a list of items. In this example the items are numbers.
varscoreSumTotal=0
This variable will be used to track the total of all the scores added up together.
for (varscoreoftestScores) {
Starting with the word for, this tells the program that you are using a for loop (in case you didn’t guess that already). Inside of the () you have two key parts:
Variable name to represent a single item in the array
The name of the array you are looping through
In this example, score is the variable name I chose to represent a single item in the list of test scores. The array we are looping through is the testScores.
scoreSumTotal+=score
Ok a new operator here to talk about, the += operator. This tells the program to add a value to a variable. For our example, at first scoreSumTotal was set to 0, and on the first run of the loop the number 85would be added to it, then the number 74, then 91, and finally 50 for a total of 300. The for loop is then complete since we looped through each item in the array.
varaverage=scoresSumTotal/testScores.length
This last line will run after the loop is complete (it is outside of the {}that the loop uses). It gets the average of all the test scores by dividing the scoresSumTotal by the number of test scores 4 for an average score of 75.
That is one common way to do for loops, but there is a more traditional way you are likely to see out in the wild (and other chapters in this book). It looks like this:
This variable will be used to track the total of all the scores added up together.
for (leti=0; i<testScores.length; i++) {
Alright, quite a bit going on here. Starting with the word for, this tells the program that you are using a for loop. Inside of the () you have three key parts to the loop:
The starting number
The finishing number
The increment value
In this example, let i = 0 says you are starting your loop at the number 0 (When working with arrays in for loops, you want to usually start with the number 0, I’ll explain why in the next couple of paragraphs).
i < testScores.length tells the program that you want the loop to stop looping when you get to the end of the list of test scores. In our example, there are 4 numbers in the array, so testScores.length is equal to 4. i < 4 tells the program to run the loop as long as i is less than4.
Then you have the increment value, which is how much you want the value of i to change after each run of the loop. In our example, i++ is just a short way of saying increment i by 1 after each loop. So iwill start at 0 and go up by 1 each run until the loop completes (0, 1, 2, 3).
scoreSumTotal+=testScores[i]
Ok another operator worth talking about. The [] operator. When used next to a variable name that is an array the brackets [] tell the program we want to get a single item out of the array. We put a number between the [] to tell it where in the list to find the item we want to get. We call this number the index. For example, if I want the first item in the array, I would put an index number 0 between the [].
Wait… 0? Why 0? Wouldn’t the first item in the list be 1? You would think so, but it turns out that many programming languages start counting at 0 when it comes to arrays. There is some rich history behind why we start counting with 0 rather than 1… but I can’t remember it and I don’t care enough to look it up (feel free to search for it, the internet is awesome). The important thing here is that if you ever need to get an item out of an array, you start counting with the number 0
0123vartestScores= [84, 73, 91, 50]
Honestly, I don’t really use this operator as much as I used to. When working with arrays I just use the type of for loop we used in the original example. This is because most of the time when you loop, you want to loop through every item, so it’s much easier to use the for (var score of testScores) style of loops.
While loops
While loops are slightly different than for loops. You use for loops when you know when you should end the loop. While loops are often used when you don’t quite know when the loop should end (for example, you are waiting for something to happen in your program and you don’t know how long it could take). I prefer not using while loops when I can help it, as they can be pretty dangerous if written incorrectly. If you write the code wrong, it can create what is known as an infinite loop, meaning the loop will run an infinite number of times and the program will never end.
That being said, there are times when you need them and they are pretty common in most programming languages so let’s see what it looks like. Replace the code in your scratch.js file with the following:
vari=0while (i<3) {
i++
}
console.log(i)
Running the code should print 3 to the screen:
nodescratch.js3
Here are the interesting bits to this code.
while (i<3) {
This tells the program to loop while the value of i is less than 3. You put a condition between the () that tells the program when the while loop should stop looping.
i++
i++ is just a short way of saying increment the value of i by 1 after each loop. So iwill start at 0 and go up by 1 each run until the loop completes (0, 1, 2, 3).
For the most part, a for loop can do anything a while loop can do, and it is generally safer to use than a while loop. If you do ever accidentally create an infinite loop, you can force the program to end by typing the control + c keys in your terminal.
Ok now onto the really good stuff, functions.
Functions
So remember how variables can be used to name a piece of data?
varmyFavoriteNumber=8
Turns out you can also name whole sections of code, and then reuse that code over and over just by typing out the name. We call these functions. Functions are the true building blocks of code. When written the right way, functions will make your life so much easier and your code much easier to write and read. We will talk a lot about what makes a good functions throughout the book, for now let’s walk through some examples.
Here is a basic function that adds two numbers together. Replace the code in your scratch.js file with the following:
Running this code will print the number 8 to the terminal:
nodescratch.js8
There’s a lot of parts here, so let’s break it down:
The first part is the word function. This is what tells your program that you are making a function, pretty straightforward.
Next is the name of your function, in this example it’s addTwoNumbers. You want to try and pick a good name that describes what the code is doing in the function. Well thought out function names can make the difference between good code and terrible code.
The next part are the parameters of the function. This is where you describe the variables that you need in order for your code to do its job. In this case, we are adding two numbers, so we need two number parameters. I have named them number1 and number2 but you can name parameters whatever you want. The code does not care what you name your parameters. The names are there to make it easier for you to now what you are working with. Just like your function name, you want your parameter names to explain what the parameter is.
The whole line put together, function addTwoNumbers(number1, number2) is known as the function signature. A function signature is the term for the name and the parameters of a particular function.
Next is the { character. The { tells your program that everything between { and } belongs to the function named addTwoNumbers. This allows you to organize your code in a way that is readable to you and the computer. { characters define scope for your variables. We will dive deeper into the concept of scope in a future chapter.
Finally inside of the {} is the code of the function itself:
{
varsum=number1+number2returnsum
}
In this example we add the number1 parameter with the number2 parameter and create a variable called sum. Then you’ll notice the word return. This is a special keyword that the program uses to send data to you whenever your function is used. Let’s see what that looks like. The following code shows how we call, or in other words use, the function:
A couple of key things to notice here. First, notice you don’t see the words number1 or number2 anywhere here. You do not have two type out the parameter names when using the function. The program knows which number goes where by the ordering of the arguments. An argument is a value you give(pass into) a function in order for it to do something. In this case, the argument 5 will take the place of number1 and the argument 3 will take the place of number2.
Next, notice you have a variable someNumber and a =. Remember the equal sign is used to create a variable. So what var someNumber = addTwoNumbers(5, 3) is saying in English is:
create a variable called someNumber and set it equal to the value returned by the function ‘addTwoNumbers’ when number1 is equal to 5 and number2 is equal to 3.
So why use functions at all? Can’t I just type out this code instead of creating a function?
varsomeNumber=5+3console.log(someNumber)
Yes you absolutely can, and for our simple example of adding two numbers you probably should do this instead… but what if I write some code that does much more than just adding two numbers. Let’s say I have some code that does several different operations before returning some data:
functiongetStandardDeviation (dataPoints) {
constn=dataPoints.lengthconstmean=dataPoints.reduce((a, b) =>a+b) /nreturnMath.sqrt(dataPoints.map(x=>Math.pow(x-mean, 2)).reduce((a, b) =>a+b) /n)
}
There is a lot of stuff going on in this function, don’t worry about trying to understand what it does. Just ask yourself this question and you’ll see how useful functions are:
Would you want to retype all of those lines every time you needed to get the standard deviation? Or just type getStandardDeviation?
Functions allow you to solve a problem once and then reuse the solution over and over again. That is the miracle of software.
Note in that last block of code there are other functions being called inside of that function. reduce, map, and sqrt are all examples of functions. You can call functions that then call other functions which then call…. well you get the idea. Functions are just building blocks and you can use them wherever in your code you want.
You can have as many lines of code in a function as you want, but usually as a rule of thumb if you start having more than 50 lines or so, you should think about breaking it down into other functions. We’ll talk about this more in our chapter about Code Smells in part 2.
Last thing I want to point out is that like variables, function names are also writing using camel case, with the first letter of each word capitalized, except the very first letter.
Now that we have run through the basic concepts used in programming. We are ready to dig into our first useful project, making a calculator in JavaScript.
Alright, enough with the theory. Let’s write some actual code! In this chapter we’ll walk through creating a calculator that can take in numbers from a user, do some math on it, and then print out the answers. Along the way we’ll talk about any new keywords or characters we encounter so that you can understand how the code is working.
As a reminder, throughout this chapter I will give you blocks of code that can be used by copying and pasting them directly into your calculator.js file. I will highlight these blocks with a ‘CHECKPOINT’ heading above them. I encourage you to try to type out the code on your own at first, as this will help you get familiar with all the parts of the code. But if you happen to get stuck on a part and just can't figure it out after 5-10 minutes of trying, feel free to copy the code to help get you in a working state.
First things first let’s setup your project.
Create your calculator file
Open up a terminal in VS Code, and create a new file called calculator.js using the following commands:
If you’re running Windows:
cd ~\Desktop\codebro
New-Item calculator.js
code calculator.js
You should see the calculator.js file open up in VS Code. Type the following line into the file:
console.log("hello calculator")
Let’s make sure you can run your program before we get too far ahead. In your terminal, type the following command:
node calculator.js
Hit the enter key and make sure you see hello calculator show up. This lets us know that you are wired up correctly before we start adding more code.
The Main Function
In several programming languages, the first function that is called when you run your program is known as the main function. This is also referred to as the entry point of your code because it’s where your program starts. In your calculator.js file, remove the previous line of code so the file is empty. Then type in the following code so the calculator.js file looks just like this:
Make sure you use the enter key to separate the code on different lines like it looks above! Some people will put all of the code on one line like this when coding for the first time:
DON’T DO THIS!!! Your code might work this way, but it will get really hard to read as you add more code to the program.
In case you’re wondering what the code is doing, here you are defining your main function, which for now just prints the hello calculator message from before. Then after you have defined what the main function does, you have to call it for the code to actually run. The line of code that just says main() is how you do this.
Go ahead and rerun your calculator app by typing:
nodecalculator.js
After hitting the enter key you should still see the message hello calculator, but now your program is running a function. If this is your first time writing a function and then calling it, Congratulations! 🎉 But don’t pat yourself on the back just yet, you’ll need your fingers for more typing.
Getting input from the user
A calculator that can’t take in any numbers from a user isn’t very useful… We need to write some code that takes in numbers, or inputs, from users of our calculator app. Turns out, it’s pretty easy to do this if you type in your inputs in the terminal like this:
node calculator.js 1 + 2
When you type stuff in the terminal like this, they are called Command Line Arguments. If you remember from the last chapter, arguments are values you give to your program so it can run some code on it. In JavaScript, any arguments you type on the command line can be accessed by using the process.argv keywords. argv stands for argument variables, and the value of argv is an array, or list, of all the things that were typed in the terminal when your program was run. For example:
This is an array of all the arguments that were typed in the terminal. What’s up with all the /’s you may be wondering, we didn’t type those… Well the first two arguments for any node program run in a terminal are:
The location of where node.js is located on your computer (since you typed node).
The location of the JavaScript file that you are running (since you typed caluclator.js).
Everything after that is the other stuff you typed in, in this case '1', '+', '2'. This is how we are going to get the numbers and the math operator to use to perform a calculation (+, -, /, etc.).
Ok great, so how do we get the numbers out of this array thingie? Well since I guess you’re too lazy to google it, here is the code:
Here, we get the list of all arguments that the user types in the terminal when running the program. Then we get the first number, the math operation to use, and the second number, all using these brackets []. Like I mentioned last chapter, when used next to a variable name that is an array, the brackets [] tell the program we want to get an item out of the array. The number between the [], aka the index, says which item we want to get. Remember that arrays start with the number 0. So in our calculator example, you use the following index numbers to get the items in the array:
Here we print out the equation to the terminal. The ` marks you see around `${number1} ${operation} ${number2} = 42` are special in JavaScript, they let you put in variables directly into your message to make it easier to print messages to the user (you can usually find the ` key between your esc key and your tab key in the top right section of your keyboard). The ${}characters around ${number1} tells the program that you want it to put the value of the number1 variable into your message.
The biggest thing to notice is we are using the values of ${number1} ${operation} ${number2} to print the three values that were entered in the terminal to show that it always equals 42… wait 42, why 42? Now don’t start sweating on me 😓, the program is not complete. This is just a checkpoint to make sure you can run the program and put in three different values. Save the change and run the program again using any values you want (example, node calculator.js 1 + 2 ) You should see the print statement that shows the final result equals 42. If this was your first time getting command line arguments in a program, Congratulations! 🎉 I threw some curveballs ⚾️ at you there but I knew you could hit them (probably).
Adding conditionals
Ok, now that you are getting the needed inputs from the user, it is time to perform actual calculations with the input. To do this, we need to know what kind of operator the user typed into the terminal, and then perform the related math operation. Let’s start with an easy one, the + sign. We need to add a conditional in our program that checks if the user typed in a + sign for the operator. Here is the full program with the extra code:
Cool, let’s run the program again, node calculator.js 1 + 2… and see if you spot the bug!
In case you are not familiar, having a bug in your code means that something is causing your program to behave in a way that you wouldn’t expect. This term comes from a famous story in the early days of computers, where a computer scientist literally pulled a bug out of a computer that was stuck in the circuits 🐜.
Do you notice something weird about the program when you try to add two numbers together? Here’s what I’m seeing when I run my program in the terminal:
1 + 2 = 12
Now, I’m no math Major, but I’m like 90% sure that 1 + 2 does not equal 12. What’s wrong with the program?
Type Casting
Well, this bug gives you a little peek into a concept we skimmed over last chapter. Remember talking about strings (text). Strings are made of characters, and characters can be letters (a-z) or numbers (0-9). This is important to know about, because there is a big difference between a number that is in text form ("5") and a number that is actually in a number form (5). When you use a + on two actual numbers, it adds their values together. But when you use a + on strings, it combines the two into one string! This is why to a computer, "1" + "2" = "12" instead of 3. This is also true if one variable is a number (1) but the other is a string ("2"), JavaScript will convert the final result into a string "12"
Ok… so how do we fix this? We want to add numbers, but all arguments typed on the command line by a user is seen as a string by the program. To solve this problem, we need to tell the program that we want to use number1 and number2 as numbers, not strings. To do this, we have to do something called Type Casting. Type casting is where you tell your program to change the type of a variable into something else (for example, change a string into a number). Casting a variable from a string into a number is probably one of the most common scenarios, though there are other situations where you need to do this. In JavaScript, the way you cast a string into a number is by using the Number keyword. Here is the updated lines of code that casts the strings into numbers:
Notice the Number() keyword used for number1 and number2? This tells the program to treat these two values typed in the terminal as numbers, rather than text. Update your code to use these keywords and then re-run your program with node calculator.js 1 + 2. You should notice this fixes the bug we were seeing:
1 + 2 = 3
But wait… what if you type in something other than a number (like the word ‘purple’)? How will the program handle that? Try it out and see. Run the program and type in something that is not a number (go ahead, I’ll wait here) 😌.
Did you see it? The program replaces your input with NaN… what is that about? NaN stands for not a number and it’s how JavaScript tells you that you tried to turn something into a number that wasn’t a number. You can actually add a conditional that checks for this so you can tell the user they typed in something that wasn’t a number.
if (isNaN(number1)) {
	console.log("The value you entered was not a number")
}
You can put this code in your program and test it out if you’re interested. There will be many times in programming that you need to check any inputs that users put into your program and make sure they didn’t put in something stupid (which happens way more than you would think 🤪).
For now, we will write our program assuming the user will always put in numbers to keep things simple.
More Operations
Now that we have the + working, let’s add some more operations using conditionals. In the next block of code you can see we add the basic operations, -,*, and /
Let’s take a look at the key differences. We are now using the else if keyword that we discussed last chapter. This lets you check which operation to perform on the numbers based on what the user put in (if the user put in +, add the numbers. Else If the user put in -, subtract the numbers, etc.).
Finally we have the else section, this is run if none of the other conditions are true:
In our example, if the user puts in a value for the operation that your code doesn’t know what to do with (like ‘purple’), this section of code will print a message to the user letting them know the program can’t handle the operation and exit the program using process.exit(). The process.exit() function causes your program to end without doing anything else. This concept of checking for scenarios where your code doesn’t know what do to is called exception handling. We will cover exception handling more in depth in part 2 of this book.
More Functions
Sweet, we have a very basic calculator that can take input from a user and do some math. For this next part, let’s try to make our code a little cleaner… what do I mean by cleaner, you may ask. Well, as you may have noticed we have been adding a lot of code into one function, our main function. So far, this has been ok, but as we continue to add code to the program this function is going to get bigger and our code is going to get harder to read and it will be harder for us to make changes without introducing more bugs. How do we fix this? We break down our code into smaller functions.
Personal tip - anytime I see a bunch of if and else if blocks, I try to see if I can move them into a separate function. This section of the code would work well as a separate function:
If you remember from last chapter, a function takes in arguments, or variables that the code needs to work. Here we are passing in the two numbers and the operator that the user typed in as the arguments.
Now paste the code you cut out of the main function into this new function. It should look something like this:
Ok looking good, we’re just missing one thing… You may also remember from last chapter that a function returns something. In our example, we want to return the final result of the calculation. We need to add return result as the last line of our function. So the final function looks like this:
A little bit easier to read, don’t you think? Functions are really useful for breaking down your code into smaller, easier to read pieces. Now your program should look something like this:
This change we just made to clean up the code is known as a refactor. A refactor means changing the way code is organized without changing what the code is doing. We will talk more about refactoring in part 2 of this book.
Final Thoughts
If this is your first time building a calculator, Congratulations! 🎉 You’ve now created a program using a handful of basic programming concepts. This program used input that the user typed in through the terminal. In the next chapter, we will be looking at other ways we can get input into our program using files.
That is all the code I will be going through for this exercise, but feel free to mess around with the program and try some things out yourself. Here are some challenges you could consider to practice your skills.
Challenges
Add an if conditional that checks to see if the user entered a value that was not a number (NaN) and prints a message to the user letting them know.
Add more operations for your calculator to perform. Note your operations do not have to be single characters like +. For example, You can make your own special keyword operations like power which gives you the result of the first number raised to the power of the second number.
Advanced: Check the command line arguments to see if the user entered more than one calculation (for example 1 + 2 * 5) and perform all the calculations using the correct order of operations (think PEMDAS from math class).
Ok so you can handle getting input data from the terminal… big deal. My Grandma can do that 👵🏼💻. Now it’s time to kick it up a notch.
Most of the time, you won’t get data through a terminal like in our last chapter, unless you just want to be a script kiddie. You’re better than that. In this chapter, we’re going to practice getting data through files. In many programs, you often start off with data found in a file (or a database, we’ll talk about those in part 2 of the book) and transform it into another form. This is known as data processing, and it is one of the most common jobs of computer programs.
For our next program, we are going to create a magic fortune teller program 🔮. This program will let the user ask a yes/no type question and then print a response to the terminal. We will have a file that has a list of answers for the program to choose from.
Reading Data from Files
Ok… so how do we get data from a file? Well for starters, we need to create a folder and new file for this exercise. In your terminal, type the following commands
Windows:
cd ~\Desktop\codebro
mkdir fortune
cd fortune
code data.csv
MacOS or Linux:
cd ~/Desktop/codebro
mkdir fortune
cd fortune
code data.csv
If you remember from Chapter 3, the code keyword lets you create new files in VS Code (just remember to save it the first time using ctrl + s or command + s to actually create the file). In this case you are creating a comma separated values (csv) file called data.csv in a new folder called fortune. We are going to put some fortune answers in here to use in our next program. Copy and paste the following text into the file exactly as shown here. Make sure the answers have a comma , between them:
Yes,No,Maybe,Ask again later,Why do you want to know?,Who cares?,Go ask your mom
Great, we now have some answers in a file we can use for our fortune teller program. Now let’s setup our program file. Use the following commands in your terminal:
code fortune.js
We will now create the JavaScript file we are going to write our program in. Just like last chapter I’m going to give you blocks of code that you can reference in case you get stuck. For this program, we need to write some code that can open our data.csv file, read all the responses from the file, and then get those responses from the file into our program. Writing all of this code from scratch would be pretty complicated. Fortunately, someone else has already solved this problem and made a function for us to use! So rather than writing the code ourselves to work with the file, we are going to use this pre-written code in our program.
When using code written by others in JavaScript, this type of code is referred to as a module. We will talk more about modules in later chapters and how to work with them. For now, add the following code into your fortune.js file:
Ok, some of this should seem familiar from last chapter. We have a main() function that has some code in it. Let’s break down the new lines we are introducing:
constfs=require('fs')
Remember how I told you the code we needed was written by someone else? We need to tell the program to include code that was not written by us. In Node.js, we use the require keyword to do this, as in “I require some more code in order for my program to work”. You can think of the require keyword like a special function which returns a module of code. It takes one argument, which is the name of the module you want to include in your program. In this case, we want to use the fs module (I think it stands for file system but what do I know 🤷♂️). The fs module has some code we can use to get input from a file.
Also, we have a new keyword here, const, which is short for constant. This means that once you have created the variable, you cannot change its value. This is different from when you use the var keyword, which allows you to change the variable into whatever you want whenever you want. For example, this is working code in JavaScript:
varmyString="This should be a string!"// some other developer turns it into a number
// later in the code
myString=3// later it turns into a boolean!
myString=false// now an array!
myString= [1, 2, 3, 4]
console.log(myString) //output [1, 2, 3, 4]
It is a bad idea to change your variables types like this! The problem is changing the type of a variable on the fly like this makes your code hard to read and understand and can cause bugs that are difficult to find 🦟. If you try to change the value of a variable that was created with const later in your code, it will blow chunks and remind you not to do that, which is a good reminder. The main thing to learn here is it is better to use the const keyword to create variables whenever you can, because you are less likely to introduce bugs into your code this way. Throughout the book, you will often see the keyword const in the examples, so I wanted to tell you about it now.
Ok now that we’ve covered that important detail, let’s look at the next section:
So modules are pretty cool in that they have all kinds of code inside of them that you can use in your program. Here we are using the function named readFileSync in the fs module to read information from our file. Sync is a word you will see often in JavaScript code. It stands for synchronous. We won’t go too deep into this concept until a later chapter. For now, just know that it means the program will wait until all the contents of the file have been read.
The first argument to the function, data.csv, is the file we want to read (If our file was in another folder, we could tell the program how to get to it by giving it a different path to where the file was located. For example, '~/Desktop/someOtherFolder/anotherFile.csv').
The second argument, 'utf8' tells us how the data in the file should be decoded. Because computer programs work with all kinds of information, you need to tell it what kind of data we expect to be in the file. We do this by using an encoding. utf8 is a standard encoding used to transform text into binary data (1’s and 0’s) and back into text.
The last thing to notice about this line is const fileContents =. This puts all of the data from the file into a variable named fileContents . This will allow us to work with the data in our program. Which we do in the next line.
console.log(fileContents)
Here we print the data from the file to the terminal. Save the file and then run your program through the terminal:
node fortune.js
You should see all the text from the file printed into the terminal as output:
Yes,No,Maybe,Ask again later,Why do you want to know?,Who cares?,Go ask your mom
Getting specific lines from a file
Ok, so we can print out the whole file… but we only want to print a single response. To do that, we need to break apart, or split, the individual responses in the file.
constresponses=fileContents.split(",")
The split function turns a string into an array, breaking it apart by the character you tell it to. In our example, the responses in the file have a , between them, so we use this character to split the file into a list of responses. Change your fortune.js file to have following code:
If you run the program now using node fortune.js you will see that the responses variable is an array of all the different responses that are in your data.csv file:
[
  'Yes',
  'No',
  'Maybe',
  'Ask again later',
  'Why do you want to know?',
  'Who cares?',
  'Go ask your mom'
]
Great, you now have an array. And if you remember from last chapter, the way we get a specific item out of an array is by using the [] operator. Now the question is… how can we make it random so that the response is different every time? Turns out, that is such a common need that someone wrote some code for it. We can use the Math JavaScript module. This module has a ton of useful functions that you can use, including making random numbers. If you want to see all the different types of functions the Math module provides, check out these docs.
So once we generate a random number, we can use that number as the index to tell the program which response we want to use. Easy enough right? Kind of… let’s take a look at the code and see what you think. Here is the final fortune.js program:
You’ll notice we added a new function, getRandomInteger that we use to get our random integer. This takes an argument called max, which is the maximum number we want returned (if there are only 7 items in the list, we want to make sure not to ask for a random number that is bigger than that like 12. If we did, the program would break since it wouldn’t know what item to get from the array).
This line, return Math.floor(Math.random() * max) returns a random integer between 0 and the max number we pass in. Math.random() creates a number with decimals, but we need an integer to use as our index. We use Math.floor() to round the number down to the nearest integer. Again you can read the documentation to see how those functions provided by the Math module work.
Here we are still reading from the file as before and splitting the results into an array. Then we call our new function to get the random number and save it in the variable named randomIndex. Finally, we use this number to get a random response from our list of responses and print the message to the console.
Ready to try it out? Go ahead and think of a question, then run your program node fortune.js. The program should give you a random fortune answer for your question. When I asked ‘is this book going to be successful?’, my fortune was:
Goaskyourmom
So I did and she said yes! Thanks mom! 💕
If you were able to get the program to answer your question, and this is your first time writing a program that can predict the future, then congratulations! 🎉 you’re practically doing A.I. machine learning stuff now.
The many different types of files
In our fortune program, we worked with a csv file, which stands for comma separated values. This is just one way to organize data in files. As you can imagine there are many different ways to put information in a file. Some are easier to work with than others. Let’s go over a few of them and what they look like.
Text files (.txt)
This is one of the most common file types. These are usually just filled with plain text information but sometimes can have different types of information shoved in there.
Shell/Powershell Scripts
Shell scripts are really fun to write. They are files that have a bunch of terminal commands written in them that you can run from a program or the terminal. Shell scripts are for operating systems that use a Unix based terminal (macOS and Linux). Windows has a similar concept known as PowerShell.
We won’t dive too much into these in this book, simply because they are not cross-platform compatible, but I highly encourage you to learn more about them for your operating system.
XML
XML is a file type from ancient times when humans were first figuring out how to organize complex relationships into files. They use the concept of tags to show how complex data relates to each other (similar to HTML tags, which we discuss in part 3 of this book).
Here is a simple example of what that looks like:
<book>
	<title>The Adventures of Little Tim-Tom</title>
	<author>Randy Tiddilywinks</author>
	<year>2110</year>
</book>
If you ever see these kinds of files, turn around and bravely run away 🐔. Ok, it’s not that bad. One of the problems with XML is you have to do a lot of typing to write out all the tags, which makes it tedious for you as a programmer. To my knowledge, most modern systems don’t use XML unless they rely on stuff that’s been around for a long time. But, if you want to be like the cool kids… you work with JSON.
JSON
JSON’s full name is “JavaScript Object Notation”, but his friends just call him JSON (pronounced jay-san, or jay-son if you like to annoy me 😬). JSON is probably the most popular way to format information when it comes to programming. It uses curly brackets, {}, to organize information and show how pieces of data are related to each other.
For example, let’s say you had a file of student test scores for a school system. This shows how you could organize that information using a .json file:
This file has a list of objects labeled testResults. An object is a collection of information that belongs together (objects are a really important concept that we will dive into deeply in the next chapter). In this example, each testResult object has two pieces of information: a studentName, to identify the student, and a testScore to show what percentage the student scored on the test.
Using this result file, let’s write a program to search for the scores for particular students. Create a .json file in your terminal using the following commands:
cd ..
mkdir testResults
cd testResults
code results.json
The empty file should be opened in VS Code, copy the JSON data from above paste it into the results.json file, and save it.
Now create a new JavaScript file that we will write our program in:
code getScore.js
Add the following code to the getScore.js file and save it:
Similar to the previous program we wrote in this chapter, we read the data from the results.json file and store the data in a variable called rawData. Then we do something a little different. Since we know the data is in a JSON format, we can use the special JSON.parse function to transform the file data into a JSON object (to parse something here means to convert it from a string into an object). This will allow us to interact with the file data using JavaScript code, which we immediately do in the next section:
consttestResults=jsonData.testResults
Once we have our file data in a JSON format, it makes it really easy to get specific data from the file. The first line here const testResults = jsonData.testResults gets the list of test results. It is really important to note here that the text testResults in jsonData.testResultslooks exactly like the text we have in the results.json file:
{
 "testResults": [
		{
			...
Let’s say for example the text in the file didn’t say testResults but something like this:
{
 "studentResults": [
		{
			...
If you wanted to get the list of results now, you would need to type const testResults = jsonData.studentResults instead of const testResults = jsonData.testResults to match whatever is in the file. The wording that you type to get a specific piece of information from a JSON object is known as a key.
You can think of a key like a variable name. When you type in jsonData.testResults you are asking “give me the variable in the jsonData that has the name testResults”. If the program can find a key named testResults in the JSON, it will return the value of the variable. Every JSON object is made up of keys (variable names) and values (the information that is in the variable) which are paired with each other. You will often hear the term ”key value pairs” when talking about objects like this (for example, Java calls them Maps, Python calls them Dictionaries, etc.).
Don’t worry if that doesn’t all sink in right away, we will dig deeper with more examples in the next chapter. For now, let’s finish walking through the program. Once we have our list of testResults, we want to go through each item in the list and search to see if the student name matches our search text. We can use a for loop to go through every item:
for(constresultoftestResults) {
if (result.studentName.includes(studentNameSearchText)) {
console.log(`${result.studentName}'s Score: ${result.testScore}`)
}
}
If you remember, a for loop can take a list and check each item in it. The first line, for(const result of testResults) { starts the loop. It says “for each result item in the list of testResults…
Next we have a conditional to check if our search text matches any part of the student’s name. We do this using the includes() function. includes() checks a string to see if it “includes” or contains the text we pass in as a parameter. If the studentNameSearchText is found anywhere in the student’s name, we print their test score to the screen.
Again, it is important to note here that the keysstudentName and testScore both line up with the text we have in our results.json file:
{
	"studentName": "Jim John",
	"testScore": 89
}
If the keys were different, you would have to make sure your code is using the correct key words to get the data you want.
Alright, let’s run the program. Running the program and searching for all student names with the letter “J” (the search is case sensitive, so if you type in a lower case “j” you won’t get the same results):
node getScore.js "J"
Gives the following results:
Jim John's Score: 89
Joe Momma's Score: 45
Nihon Jin's Score: 9005
Looks like Joe Momma needs to spend a little more time studying and less time nagging. Meanwhile Nihon Jin seems to really know how to get high test scores (IT’S OVER 9000!!!)
By the way, if you wanted to make the search case insensitive, here’s a little trick 🎩. When working with strings, you can use a special function called toLowerCase() that makes all the letters in a string lower case. You can use this function on both strings that you are trying to compare to make your code case insensitive, like this:
for (constresultoftestResults) {
constlowerCaseStudentName=result.studentName.toLowerCase()
if (lowerCaseStudentName.includes(studentNameSearchText.toLowerCase())) {
console.log(`${result.studentName}'s Score: ${result.testScore}`)
}
}
Writing Information to Files
Ok, you now know how to read data from files into a program, but what about writing data from your program into a file? This is actually pretty easy to walk through using some of the code we have talked about already. For the next section we will write a program for a teacher to enter in test scores and save them into a file. The teacher will put the name of the student as the first command line argument, and their test score as the second argument. The program will then save the test score in a file as a JSON object similar to our last example.
To start, create a new file called saveTestScores.js and open it in VS Code:
cd ..
mkdir scoreSaver
cd scoreSaver
code saveTestScores.js
Once the file is open in VS code, type in the following program and save the file:
Only now, instead of it being in a file, we are creating the object in code and then writing it into a file. We are setting the value of studentName and testScore to whatever values are passed in on the command line.
Ok, so the JSON keyword looks familiar, we used the JSON.parse function last time to turn our file data into a JSON object… but what does stringify mean? 🤔 While parse turns a string into an object, stringify does the opposite. It takes an object and converts it into a string. This is often used to write objects to a file or to send the data over the internet. This is because if you tried to write the JSON object to a file before turning it into a string, your program would fail with an error message like this:
TypeError [ERR_INVALID_ARG_TYPE]: The "data" argument must be of type string or an instance of Buffer, TypedArray, or DataView. Received an instance of Object
In other words, the program doesn’t know how to save your Object in a file, but it does know how to save strings to a file. So we can use the JSON.stringify function to turn our object into a format that can then be saved to a file. This work of converting data from an object into a format that can be transmitted to files or over the internet is referred to as serialization. When you convert an object into a string, you are serializing it, and when you parse the string into an object, you are deserializing it. Another common term you will hear for this is marshaling (like ‘forcing’ your object to convert to a string) and unmarshaling.
Ok now that the object is in a string format, we can save it to a file:
Here instead of reading from a file we use the fs.writeFileSync function to write our JSON string to a file called savedScores.json.
Let’s run the program. Here I put in the student name "Joe John" (Jim John’s brother actually 🙋) along with his test score:
node saveTestScores.js "Joe John" 90
After you run the program for the first time, you should see a new file named savedScores.json get created in your scoreSaver folder. You can run the following command in the terminal to see the contents:
This is pretty cool, but we have a problem… Every time you run the program your file is going to be overwritten by the new student name and score. Go ahead and try it. Any old contents in the file are lost every time you run the program. What if we want to save every student we put in without erasing the old data? How can we pull that off?
To solve this, we need to read the current contents of the file, append(or add) the new student data to the object, and then write the stringified object back into the file. Let’s update our program in saveTestScores.js to do just that:
Here we are reading the content of the current savedScores.json file if it existsif(fs.existsSync("savedScores.json")) and deserialize the file string into a JSON object. If the file doesn’t exist then we create our own object that doesn’t have any test results in it.
Here we are creating a new testResult with the studentName and testScore the user typed in on the command line. This data will be added to the list of testResults on the next line.
Here we take the deserializedTestResults object and add the newTestResult to the list. In JavaScript, the push function is used to add items to an array.
If this is your first time serializing and deserializing file contents, congratulations! 🎉 You now know the basic steps to working with files using JavaScript.
Different Types of JSON Formatting
When working with JSON in Javascript, there are a couple of different ways to write these objects that you should be aware of. I will show brief examples of each and how they work. Every one of these examples is syntactically the same, meaning you can write objects any of these ways and the code will work the same. First, let’s review the syntax that we have used already:
Here you will notice we have put “ marks around the keys"studentName" and "testScore". This is the longest way to type these objects out. You actually don’t need to put " around the keys. You could just type it out like this:
Little less tedious for us to not type out all of those " around the keys… and notice in this example the key (studentName) looks exactly the same as the variable name (studentName) we are using for the value. Whenever this is the case, you can do even less typing like this:
Here, because studentName is both the key and the variable name, we can just type the variable in the object without the :. Javascript will automatically use the variable name as the key when we write the object to the file, and the value of the variable will be the value in the object. The object will look exactly the same when it is written to the file as in the first example. You will often see this shorthand syntax out in the wild when working with Javascript code, and honestly it’s nice not having to type all those extra characters when you don’t need to.
Final Thoughts on Files
Files are useful for storing data for long term use. They allow you to use that data between multiple runs of your program, as opposed to variables which are deleted from your computer’s memory whenever your program finishes. Because files store data that persists, or lasts even after the program completes, they are a simple way for you to make a program that can share information between multiple users. For example, you can make a game that uses files to save game data which can then be loaded later by another user (we will see an example of this when we build a choose your own adventure game later on). In the next chapter, we will talk about ways we can design our code to make it easier to work with JSON objects using object oriented programming (OOP).
Challenges
Write a program that updates, or replaces, the test score of the student whose name matches the search you type in. The user should type in the exact name of the student and the new test score for that student. Write the updated score back to the file.
Write a program that reads in the test results from the file and deletes any test results for students whose names match the search string you type in from the command line.
Advanced: Design your own program that tracks and displays player high scores for different video games. The user types in the name of the video game, the three initials of the player, and the score they earned. If the video game title isn’t found in the file, add it to the list of games in the file. After adding the new player score and initials to the file, show all the scores for that video game in the terminal.
Chapter 1.7: Object Oriented Programming Part 1 - Classes and Methods
Up until now, we have been working mostly with functions and individual lines of code, and honestly for some programmers that is all you need. But for me, where designing and creating Software gets really fun is when you start working with Object Oriented Programming (OOP). The concept of OOP has been around since the 60’s, and the main idea is this: Just like the real world is made up of objects that interact with each other, we can design objects in code and have those objects work together to make a program.
In this chapter, we are going to walk through the common terms used when talking about OOP with code examples. In the next chapter we will take these ideas and create a choose your own adventure game.
What is an Object?
We started talking about objects in the last chapter when we were working with JSON files. In programming terms, an object is a collection of properties, or pieces of information, that you can put together to organize your code to model the real world (properties are also commonly known as fields or attributes). Let’s make an example similar to our student test results exercise from the last chapter. Suppose you wanted to write a program that created a student directory. Every student should have a name, an address, and a phone number to contact them. If we were to use JSON, we could combine that information into student objects like this:
This JSON object is a model of a student for our program. Students have a name, they have an address, and they have a phone number for contacting them. The three keys, studentName, address, phone are all properties of this object. These properties will have different values based on the student the object is representing. Now let’s add another student object:
Here we have two student objects for our program. Another way of saying this is we have two instances of the student object type. An instance refers to a specific object that has its own unique values. These two students have different names, addresses, and phone numbers. They are different instances of the same student object type.
Why is this important? Well in order to best organize our code, we need to tell the program about this student object type, and the way we do that is through classes.
Classes (Object Types)
The official term for an object type is class (I’m guessing this is short for ‘classification’, but who knows 🤷♂️). A class tells a program what properties belong to an object when it is created. Here is an example of how you create a class in JavaScript:
Here we tell the program we are creating a specific class (or in other words a type of object) and we are calling this class Student.
constructor(name, address, phoneNumber) {
Here we tell the program how we want to create new instances of the Student class using a special function called a constructor. As you can guess from the name, a constructor constructs, or creates, new instances of the object type whenever you use it. For our example, in order to create a new student object, you have to give the constructor a name, an address, and a phone number.
I’ll show you an example of using the constructor in a bit. For now, know that all classes have constructors.
this.studentName=name
Fun, another keyword to play with, this. In this example, when you see the word this it means
”The studentName of this instance is equal to the name that was passed into the constructor.”
I really wish they would have picked a different keyword… If I were to use my own keyword to explain what this represents it would be instance. instance.studentName = name…
”The studentName of the instance is equal to the name that was passed into the constructor.”
Unfortunately the keyword this was picked out before I was even born. So we’ll stick with it I guess.
this.address=addressthis.phone=phoneNumber
Here we set the address and phone property values of the instance equal to the address and phoneNumber values that were passed into the constructor.
Let’s look at an example of how we can create a student object using a constructor. Create a new folder oop in your codebro directory with a file called school.js.
Windows:
cd ~\Desktop\codebro
mkdir oop
cd oop
code school.js
MacOS or Linux:
cd ~/Desktop/codebro
mkdir oop
cd oop
code school.js
Here we use the special keyword new. The new keyword tells the program to create a new instance of a class using its constructor. This instance gets created and put somewhere in your computer’s memory for tracking.
In our example, the Student constructor needs a name, an address, and a phone number, so we provide it all three of those things and the constructor returns the new instance that is created. We can then use that object like this:
We get the properties of the object by using .. Remember that studentName, address, and phone are all defined inside of the Student class code. Just as a side note, another common term used to refer to properties of a class is member variables. So if you ever hear that term it just means all the variables that belong to a class.
So… this looks almost identical to the JSON syntax we were using in the last chapter, and this code takes way more steps to set up… so why bother ever creating classes? There are several reasons, but maybe the biggest IMO is it gives you the ability to add methods.
Methods (functions that belong to a class)
Methods are simply functions that exist in a class which can then be used to perform tasks. Let’s take another look at our student example:
Let’s say we need to add some code that will show all of the Student’s information on the screen with labels. We could add a method to do this called printStudentInfo:
It looks almost like a regular function. One thing to point out here is you’ll notice there is no function keyword in front of the printStudentInfo method name. JavaScript knows you are adding a method to the class so you don’t need to type function here.
The other important thing to note is that methods have access to all of the properties of a class using the this keyword. Notice how printStudentInfo() does not take in any parameters and yet it can still print the student’s information by calling this.studentName, this.address, and this.phone. This is a really powerful concept that helps keep your code organized and makes it easier to manage.
To use a method, you create an instance of the class and then use a . followed by the name of the method you want to call. Here is our program from earlier using the method instead of the previous console.log lines we were using:
So… it looks like we just moved the console.log lines from one spot to another, what’s the big deal? Well, this change makes it easier for you to only have to write the print code in one place and be able to use it anywhere in your code that uses the student class. Suppose you had to create many students and print their info in multiple places throughout your program. You would either have to retype your print code multiple times or you would have to make a common function that takes in three parameters name, address, and phone in order to print everything. This function would then have to be imported in every file you want to use it along with your student code, and you would have to pass in the three student values every time you wanted to use it.
Using this method, you keep the print code tied together with the student code so it is easier to keep your code organized. And because the printStudentInfo() method has access to the name, address, and phone values of the instance using the this keyword, the method does not have to have any parameters passed in. This makes it much easier to use compared to passing in those three values every time you want to print student information (the less words I have to type to get the job done, the better ⌨️).
Private vs. Public Variables and Methods
When talking about OOP, there is an important concept that is often covered in college freshman courses, and that is the difference between public and private variables and methods. To give you a quick definition of these two terms, public variables and methods are meant to be used outside of the class they are created in. Private variables and methods, on the other hand, are only meant to be used inside of the class that created them. In JavaScript, you mark a variable or method as private by putting an _ before the name of the variable or method, for example:
In this example, we have a Teacher class that has two public variables: teacherName and subject. This means the developer that created the class intends those variables to be used outside of the class. Then we have a private variable called _salary. The _ is how the developer communicates that you should not be using this variable unless you are writing code inside of the class.
This class has two public methods, printInfo and getWeeklyPaymentAmount, which are intended to be used outside of the class. We also have a private method _calculateSalary which we need to perform some calculations on the salary. This method code is not intended to be used anywhere but inside of the class.
Why have private methods and variables? Why not just make everything public? The main reason for this is as your project grows you are going to be making changes to your classes to add features. If you have made too much information in a class public, and you end up having to change variables and methods in that class (for example, you have to rename a variable or add a parameter to a method), you will be forced to also change all other parts of your code that were using those public variables and methods. Variables and methods that are private are easier to change since you won’t have to change any code outside of the class. As a general rule, unless you intend to use a method or property outside of a class, make it private by putting a _ in front of the name.
Getters and Setters
One common practice to make all of your class variables private is to use getters and setters. These are special methods that allow you to retrieve (get) or modify (set) the value of an object's property. Getters and setters are often used to enforce rules or constraints on the values of an object's properties to make sure the value being set makes sense. For example, you might want to ensure that a property's value is always a positive number or that it is a string of a certain length.
Here’s a simple example of using getters and setters in JavaScript:
classPerson {
constructor(title, name, age) {
this._name=namethis._age=agethis._title=title
}
get fullName() {
return`${this._title}${this._name}`
}
set fullName(newName) {
if (typeofnewName==="string"&&newName.includes(" ")) {
varsplitName=newName.split(" ")
this._title=splitName[0]
this._name=splitName[1]
} else {
thrownewError("Invalid name")
}
}
get age() {
returnthis._age
}
set age(newAge) {
if (typeofnewAge==="number"&&newAge>=0) {
this._age=newAge
} else {
thrownewError("Invalid age")
}
}
}
constperson=newPerson("Mr.", "Anderson", 30)
console.log(person.fullName) // Output: "Mr. Anderson"
console.log(person.age) // Output: 30
person.fullName="Ms. Jane"console.log(person.fullName) // Output: "Ms. Jane"
// these lines cause errors
person.fullName=50// throws an error because the name is not a string
person.fullName="Joe"// also an error because the name does not have a title
person.age=-10// also an error because the age is less than 0
Notice all of the class variables for this person class are private when we create them in the constructor:
These allow us to control what pieces of data can be used outside of the class as well as enforce rules of how that data is used. For example here when the fullName getter is used in the code we always want to enforce that the title is put in front of the name property.
If the value doesn’t meet the rules, then we don’t allow it to be set:
// these lines cause errors
person.fullName=50// throws an error because the name is not a string
person.fullName="Joe"// also an error because the name does not have a title
person.age=-10// also an error because the age is less than 0
The special get and set keywords are specific to JavaScript. Most programming languages create getters and setting as regular methods with the name get or set in the name of the method like this:
classPerson {
constructor(title, name, age) {
this._name=namethis._age=agethis._title=title
}
getfullName() {
return`${this._title}${this._name}`
}
setfullName(newName) {
if (typeofnewName==="string"&&newName.includes(" ")) {
varsplitName=newName.split(" ")
this._title=splitName[0]
this._name=splitName[1]
} else {
thrownewError("Invalid name")
}
}
getAge() {
returnthis._age
}
setAge(newAge) {
if (typeofnewAge==="number"&&newAge>=0) {
this._age=newAge
} else {
thrownewError("Invalid age")
}
}
}
constperson=newPerson("Mr.", "Anderson", 30)
console.log(person.getfullName()) // Output: "Mr. Anderson"
console.log(person.getAge()) // Output: 30
person.setfullName("Ms. Jane")
console.log(person.getfullName()) // Output: "Ms. Jane"
// these lines cause errors
person.setfullName(50) // throws an error because the name is not a string
person.setfullName("Joe") // also an error because the name does not have a title
person.setAge(-10) // also an error because the age is less than 0
This code does the same thing as the other code block, just using a different syntax. This is how I’m used to doing it, so in future examples anytime I use a getter or setter I’ll use this pattern (old habits die hard 😁).
These concepts are difficult to wrap your head around until you’ve been coding for a while. You start to see the value of making things private and using getters after being bit by sharing too much information with other classes and then have to make changes. We will see examples of this when we get to refactoring in part 2 of the book.
Final Thoughts
Classes are an important tool in your tool belt when creating programs, they can help you design your code in a way that models the real world. If these concepts aren’t making sense yet don’t sweat 😥. We will be doing a lot of hands on work with OOP when we build our choose your own adventure game that should help them sink in.
Chapter 1.8: Building a Choose your own Adventure Game - Designing a Project from Scratch
In the next two chapters, we will walk through your last coding challenge for part 1 of this book. Here we will be combining all of the concepts that we have worked through to create a text-based choose your own adventure game 📜. This game will present the user with text and allow the user to type in responses to decide what happens next in the story. We will use JSON files for holding the story text and use object oriented programming to organize the code so that it is easier to write. In this chapter, we will cover the process of designing a program from scratch and then code the game together in the next chapter. By the time you finish these chapters, you will hopefully have a better grasp on these basic programming concepts as well as how to design your own programs.
The Initial Design Process
Before you ever write any code, you need to think about what you are actually trying to build. Consider the following questions whenever starting a new project:
What problems are you trying to solve?
How can you solve those problems through code (particularly with the programming language you are using)?
How will you organize the code so that it is the most efficient to write (and can easily introduce more changes in the future)?
Are there any limitations or drawbacks with the proposed design that you should avoid?
These questions are vital to being able to actually complete your project. Too many times programmers start writing code without knowing what they are actually trying to create, and they end up with code that doesn’t work. A solid design is like a road map 🗺, it can show you your progress in a project and what the end result should look like.
Let me repeat that:
A solid design is like a road map, it can show you your progress in a project and what the end result should look like.
So let’s start by defining the problems we will be solving with this program.
Tell Me All About Your Problems 🛋(Gathering Requirements)
As a professional developer, one of the first things you do as part of the job is gather requirements for the application you are building. Requirements are the criteria or features that your application must provide to be considered complete. You will often work with a customer directly to gather these requirements, or they may be given to you by a product manager if you work for a company. If you are building a program for yourself you will define your own requirements, which is what we will be doing for this exercise.
Let’s go over some of the features that this program must include:
The program must allow the user to enter input using their computer through a terminal.
The program must have an auto-save feature that saves the current location of the story so that the user can load it at a later time.
The story pages should be stored in external files that all use the same format, so new stories/pages can be swapped in for old ones without having to change the code.
Ok, this is a decent list of requirements. As long as our design proves that we will accomplish these criteria then we will be in good shape to start coding. Now let’s talk about how to design our program.
Get the Big Picture 🖼(Top-Down Design)
There are many ways to tackle designing a program. One common way is to describe how the system will work at a high-level, meaning you explain your design without getting too technical with what the actual code will look like. Once you are comfortable with the high-level design, you start designing the individual functions and classes that will make up your code. This is known as top-down design (as in working from the top of the big picture down to the nitty gritty details). The opposite of this approach, bottom-up design, is when you figure out the nitty gritty details of what the functions and classes of your code will look like first and then you put the little pieces together to figure out how the whole program will work as a whole. Both of these approaches work well, and you will find you often jump back and forth between the two when designing complex projects.
For this chapter, we are mostly going with the top-down approach, but we’ll walk through some examples of using the bottom-up approach.
Defining the User Experience
Because we know we will have a person using this game, one of the first places we can start our design is walking through the user experience (UX). When we talk about the user experience, we are talking about how we expect users to use the program or app. This includes things like how the program will look and what options the user will have to interact with the program. In a professional setting where you need to make something pretty for the user to look at, you might work with a UX designer who will design the visuals of your app. A UX designer, as their title suggests, designs the experience for users of your app. This includes creating mock-ups (aka wireframes), images that show what the finished product should look like. These wireframes define the user interface (UI) of your app. A user interface is the part of your app your user interacts with to make stuff happen.
In our choose your own adventure game, we will be our own UX designer for this project (if you work for a smaller company, aka startup, you will often wear the hats of UX designer and developer). Everything will be shown through a terminal using text, so we won’t have to worry too much about looks for this project (in part 3, we will build a web app with actual graphics). We need to show how we expect our users to interact with the program.
Let’s walk through some examples. What does it look like when our user first starts the program for the first time? Because the game is text based in a terminal, we can show block of texts for our mock-ups (Any line that has a # is not something the user will actually see, it just describes what happens):
Choose your own adventure game

Starting story...

# first story page is displayed
Next is a mock-up example of what we will show to the user when they can choose what page they go to next:
1) go to the library
2) go home and go to sleep
3) tell your friend to stop being an ignoramus
4) save and exit program
A couple of interesting things to note with our user experience. We expect the user to enter a number that will decide what action is performed next. We will also offer them the option to save and exit the program at any point in the story (option 4). What if the user doesn’t put in a number? What if the number they enter in is too high? These mock-ups help drive questions that help you figure out what the full design should be. Ideally, we would have a mock-up representing every step along the user experience, and you would address any questions that pop up and redesign as needed until you have an understanding of the full program.
Here are a couple more mock-ups:
User enters an invalid number
Do you know how to count? That ain't a valid option bro! Try again!

What will you do next? (enter a number to select)
1) go to the library
2) go home and go to sleep
3) tell your friend to stop being an ignoramus
4) save and exit program
If the user input is invalid, we belittle them and then show the list of options again (Not sure how the user will feel about that UX design but whatevs 😆).
User exits the program
Story progress saved. See you later!
User starts the game again after playing previously
Choose your own adventure game

Story savepoint loaded...

# loaded story text is displayed
Flow Charts
Ok, so we have a high-level view of what the game will look like. Another thing we can create to help us figure everything out is a flow chart. A flow chart shows us the individual steps (or the flow) in our program we expect to happen when a user interacts with the program. Let’s diagram a flow chart for what happens when the user starts the program:
Pretty simple flow chart, when the user starts the program we will check to see if there is a save point already saved in the program. If there isn’t an existing save point, we just start a new game since there is nothing to load. If the save point does exist, we load the save point.
You will notice there are rectangles and diamonds in flow charts. The diamonds represent a choice or condition in your program that can cause the flow to change. These diamonds usually have yes and no paths, like we see here, but it is possible for a choice to have more than just two options (for example, if your code has an if, else if, and then an else block there would be three different flows to account for).
The rectangles represent actions, or steps, that occur in your program which cause the flow to move forward. You should give a brief description in the rectangle to show what is occurring in the step.
Flow charts can be used to diagram every area the user interacts with the system. Let’s go ahead and do one more to show the flow of how the user will move through the story as they use the program:
This chart shows us what the experience will look like for the user and helps us as the developer of the program know what the behavior of the system should be. Once the user starts (or loads) the game, we get the story page from our file and display it to the user. Once they finish reading they can select what they want to do next. The user can either select the next page in the story to visit, or they can quit the game. If they try to select an option that doesn’t make sense, we will check for that and ask them to select something else (while belittling them of course 🤤). If they select another page, we load that page from a file and display it to the user. This continues until they decide to quit the game, at which point we save the last known page we were on and exit the program.
Now that we have a better high-level view, we can start designing what the code will look like with more detail.
Designing Classes
We will be using object oriented programming (OOP) as part of our design (in case you missed it, we covered all that goodness in the previous chapter). This will help organize the different requirements our program has into manageable chunks. To figure out what classes we could use, we will use a design technique known as class-responsibility-collaboration cards (CRC cards for short). The concept behind this technique can be explained like this:
Figure out what actions the code must perform to work. Think of classes that can perform those actions. Create a card for each class and write the responsibilities of that class on one part of the card. Then write the collaborators (other classes) that will interact with this class on another part of the card to show how all of the actions will be performed.
These cards can be physical cards (like index cards), drawn out on a whiteboard, or made in a digital tool. Let’s give it a try. First let’s talk about the actions that our program needs to perform:
The program has three primary tasks: get input from a user when asked to select an option and make sure the option is valid, read story pages from files to display to the user, and track save points in the story so story progress can be loaded later.
Ok, three actions. Get user input and validate it. Readstory pages to display to the user. Finally, tracksave points so the user can load their progress in the story later.
There are three nouns that go with these three actions: user input, story pages and save points. These nouns and the actions they perform can help guide the names of the classes we could create.
Developers often use index cards to quickly try out different designs and classes to see which design fits best. Since I’m not with you in person, I created this diagram that uses digital cards to outline this concept:
Let’s describe how our program can work using OOP at a high-level:
The program will include four classes. The first class, UserInputValidator, will handle sending messages to a user and reading their input from the terminal to make sure it is valid. The second class, StoryReader, will handle reading story data from files and loading specific pages based on user input. The third class, SavepointTracker, will handle auto-saving the lastest story location every time the user changes pages, as well as loading the save point for the user whenever the program is restarted. We will also create a StoryPage class to hold all of the information for a story page. Finally we will have a Handler class that handles all of these classes to control the flow of the program.
It is important to point out that this is not the only way to design the code and classes for this project. We could come up with many other options given enough time (there is always a way to optimize, or improve a design so it is more efficient). For this exercise, this design will get the job done just fine.
This takes us into the next phase, schema design, where we start to describe what kind of data we will work with.
Schema Design
There is so many details we have to figure out to get this to work. Where in the world do we start? When in doubt, focus on your schemas. A schema describes how your data is organized so it can be stored in a file (or database) and used in your program. Often a schema is documented in JSON format (If you need a refresher on JSON, take a look in chapter 1.6). Let’s start with our story file schema. We know a page in a story needs text to display to the user, and then it needs a list of options for the user to select what to do next. Knowing what we need for the program to work, we can start to design our schema:
{
	"pageText": "<story page text goes here>",
	"options": [
		{
			"displayText": "<option text displayed to user>",
 			"optionValue": "<next story page file name>"
		}
	]
}
A couple of things to point out… here we have added a pageText property, which is where the story text is that will be shown to the user, and an options property, which is where we have the list of options for the user to pick from. Notice the <> characters. These are called angle brackets and they are used to show that the value between them will be different from one object to another (for example, the pageText of one page will be different than another). Everything that does not have <> around them means that the value shown will not change, but will always be found in each story page file (for example, each story page must have an options property in order for the user to pick what to do next).
Also notice that our options have two pieces of information. Each option has a displayText<option displayed to user>, which will be the text we show to the user when they are selecting an option. They also have a optionValue property, which tells us which page to load if the user selects the option. Why do we need both of these properties, why not just show them the page names? Well this is because humans and computers talk in different languages. In many applications when working with resources (like a story page, for example) you as the developer will translate human friendly text that the user can understand into a computer friendly id for the program to work with. In our case, when we show options to the user we want them to see the human friendly text, and then when they select an option we will translate that into which story page file should be loaded next. For example:
	"options": [
		{
			"displayText": "go to the library",
 			"optionValue": "library-3.json"
		},
		{
			"displayText": "go home and go to sleep",
 			"optionValue": "sleep-2.json"
		}
	]
Imagine if we just displayed the names of the files to the user… library-3.json they would have no idea what to do with that. Even if you did rename your files to make them more understandable, you would still have the .json extension at the end of them. We don’t want to show the user any of that technical mumbo jumbo. That’s why we get paid the big bucks 💵.
All of our story files will use this schema and be stored in a directory named story.
Now that we have defined our story page schema. Now we also need to define our schema for our save file. This file will be used to track the user’s progress through the story. This schema is actually really simple:
{
	"lastSavedPage": "<story page file name>"
}
We will name this file savepoint.json and be located in the story directory as a sub-directory, or a directory within a directory, named savepoint. That’s it, we’ll just track the last story page file name the user was on when they quit the program.
Define your API contracts 🔖
Once you have your schemas defined, another good place to focus on is your API contracts. When you make a contract, you make an agreement between two parties so they can work together on something. In software development terms, an API (application programming interface) is an agreement on what data will be returned by your code if given required information. In other words, you need to figure out what data you will need to pass back and forth between the different parts of your system so your classes can work together. Once you have these contracts figured out, the rest of your design will start falling into place (unless, you know, you designed it wrong in which case everything will start falling apart and you’ll need to go back and redesign).
In theory, the way we define contracts is pretty simple. you write down all of the inputs that your classes need to do their work. Then you write down the outputs that will be sent back so that your classes can work with each other. For our example, the way we define contracts is by designing the method signatures for each of our classes (remember when we talked about function signatures in chapter 1.4?). Let’s start with the UserInputValidator class. This class is responsible for sending messages to the user and checking responses from the user and making sure it is a valid choice for the page they are on. Let’s define what this class could look like.
Here we are defining a couple of the methods for the UserInputValidator class. For example, the getInput method takes a message to display to the user and returns whatever the user types into the terminal. The getMenuSelection method takes the currentPage and displays a menu of page options to the user and returns whatever option they select. The _optionIsValid method will be a private method (note the _ before the method name). This means it is only intended to be used inside of the class itself. It will be used check if the menu selection the user has entered into the terminal is valid and return a boolean (true if valid, false if not).
First one down, let’s try defining some contracts for the next class, StoryReader:
We have designed the StoryReader class to be responsible for loading story pages as well as getting the story text and options to the user. Here we define some of those methods to fulfill those responsibilities. The loadFirstPage will be used when we start a story for the first time. In the case of loading the first page, we can make a rule that the first page of the story must have the name first.json, so it is easy to load when the story is first started.
We also need to load story pages when the user selects an option or we are starting from a savepoint, which is where loadStoryPage comes in. It just takes the actual pageName as a parameter so it can return the loaded StoryPage. There might be other methods we add to this class once we start coding and see a need for other logic.
This class must save the current page when the user exits the program, as well as get the name of the last save point when the user loads their story. The saveCurrentStoryLocation takes in the currentPage parameter and returns void. We haven’t talked about this concept yet. A void function or method doesn’t return anything. It just performs some work without actually returning a value. In our case, when we save the location using the
saveCurrentStoryLocation method, we don’t need to return anything from this method because it doesn’t have any new data to return.
The savePointExists method doesn’t take any parameters. It just returns true or false if a save file exists for the user. The getSavepointPageName returns the saved story page file name as a string.
Finally, we have the Handler class. This is the class that brings all the other classes together to handle the flow of our program that we illustrated in our flow charts (there is a particular reason I am calling this class Handler, which you will find out about far far later in part 4 of this book). It will have one method, handler, which doesn’t take any parameters. This will be similar to the main function we used in all of our previous exercises, since it will be the method that we run when the program is started.
Pseudocode
We can’t finish our discussion about designing without talking about pseudocode (pronounced sue-dough-code). It is a pretty fun way to design your algorithms, the steps your program needs to take to actually work. Pseudocode is fake code. You write your program in a way that looks like code but would not actually be understood by a computer. This can help you quickly write out the flow of a function without having to get stuck on the particular syntax of the programming language you are using.
There are no rules to writing pseudocode. Whatever helps you work out the algorithm of your design is fair game. Let’s walk through an example of using pseudocode to write out our handler algorithm.
handler() {
display the text "Choose your own adventure game"
currentPage = null
if (savePointExists()) {
pageName = getSavepointPageName()
currentPage = loadStoryPage(pageName)
display text "Story savepoint loaded..."
}
else {
display text "Starting story..."
currentPage = loadFirstPage()
}
userStillPlaying = truewhile (userStillPlaying) {
display page text of currentPage
selectedOption = getMenuSelection(currentPage)
if (user selected save) {
userStillPlaying = falsesaveCurrentStoryLocation(currentPage)
display text "Story progress saved. See you later!"
}
else {
currentPage = loadStoryPage(selectedOption)
}
}
}
This shows the full flow we diagramed using the flow charts as well as the mock-ups earlier. Pseudocode may point out some parts of your design that weren’t considered all the way. You can take learnings from the pseudocode and go update the design to match so we make sure everything lines up.
Another benefit of this pseudocode approach is we can see areas where multiple lines of similar logic are written more than once. This helps us pinpoint where we can introduce common functions to help reduce how much code we actually have to write.
Here are a couple more examples of pseudocode for the more complicated parts of the program:
StoryReader
// in the story reader class
loadStoryPage(storyPageName) {
read fileContents from file named storyPageName
return nextStoryPage
}
loadFirstPage() {
get storyPage from file with the title 'first.json'return storyPage
}
UserInputValidator
getInput(message) {
display message
get response from terminal
return response
}
optionIsValid(userSelection, options) {
if user selection is not a number returnfalseif user selection is 0returnfalseif userSelection is greater than the size of the list of options returnfalse// the userSelection passed all of our checks
returntrue
}
getMenuSelection(currentPage) {
get list of options from currentPage
menu = loop through options and generate menu
selection = getInput(menu)
whileoptionIsValid(selection, options) returns false
display text “display text "Do you know how to count? That ain't a valid option bro! Try again!”
selection = getInput(menu)
return selected option value
}
SavepointTracker
saveCurrentStoryLocation(currentPage) {
get pageName from currentPage
fileContent = JSON.stringify({ lastSavedPage: pageName })
write fileContent to file 'story/savepoint/savepoint.json'
}
savepointExists() {
if file 'story/savepoint/savepoint.json' exists returntrueelsereturnfalse
}
getSavepointPageName() {
read file from 'story/savepoint/savepoint.json'
parse jsonData from file
return lastSavedPage from jsonData
}
You could write up as much pseudocode as you want if it helps you work out the details of the code.
We have now walked through the design process far enough that we have a pretty good idea of how we can actually build this thing. We have reached the point that we are ready to code. In the next chapter we will take our design and implement, or create, a working program that can read and load story files.
**A note about diagrams and UML
If there is one thing that nerds are good at, it is having “acronyms for everything”, or “afe” (just kidding, that is not the meaning of that acronym. Please don’t search for it on the internet).
When it comes to designing more low-level details in your program, there is a very well known way to diagram stuff. It is known as the Unified Modeling Language, or UML for short (This one is a real acronym, I promise. You can search for this one on the internet). Honestly, I remember in college we went through a bunch of details on UML that are now lost in the recesses of my brain… but in practice I really haven’t used it… and that is because the amount of detail it calls for is often overkill. So yeah, I don’t use it, but I know there are plenty of people in the industry who do and if you have aspirations of being a software architect or something it doesn’t hurt to at least be familiar with it.
Chapter 1.9: Building a Choose your own Adventure Game - Writing the Code
Now that we have taken the time to work through the design, where do we start coding? There is a lot of code to write here! It can get a little overwhelming when trying to figure out how to start, so I like to follow a simple technique called building a walking skeleton. A walking skeleton, as the name implies, is not the final product. It is the bare bones (pun intended 🦴) setup of your project to show that you have all the parts of your code in place to where you can start adding some meat to the code. The way we make our walking skeleton is by creating stubs of all of our classes, methods, and functions. A stub doesn’t have any logic inside of it. They are just function placeholders to help you organize the skeleton of your program.
Once we have built the walking skeleton, we will flesh out the rest of the logic to complete the program.
Adding the Stubs
Let’s go ahead and create the stubs for our project.
First thing’s first, we need to create a new directory for this project to live in. Run the following commands in your terminal in VS Code:
(Windows)
mkdir ~\Desktop\codebro\story-game
(Everyone else)
mkdir ~/Desktop/codebro/story-game
Unlike our previous chapters, where the whole program was written in a single file, this project is going to use multiple files. Could we shove all of this code into one file? Sure. You could also drive while intoxicated, but that doesn’t mean you should (remember this people: friends don’t let friends drive drunk, or write over 200 lines of code in a single function. It’s just irresponsible 🥴).
In VS Code, you can view all the files in the directory to help you make sure you have everything set up. To do this, let’s open up this new directory we just created in VS Code by running the code command:
(Windows)
code ~\Desktop\codebro\story-game
(Everyone else)
code ~/Desktop/codebro/story-game
This should open a new window in VS Code. You will need to open a new terminal in this window. Now that you have opened the story-game directory in VS code, you can view the directory contents by clicking on the explorer icon:
When you first click this, you should notice the directory is empty:
This makes sense because we haven’t created any files yet. Let’s create our first stub file for the SavePointTracker class:
There are a couple of things to point out here. First notice that each method doesn’t actually do anything useful. They just log the message that they were called and then return a hardcoded value, or a value that never changes. These hardcoded values will be replaced by real values once we start adding useful logic to the stubs. The saveCurrentStoryLocation function doesn’t return anything since it is a void function.
The last line in this file deserves some attention:
module.exports=SavepointTracker
This is how we export, or share, our code between files. Here we are exporting the SavepointTracker class so it can be imported into our main Handler class. Let’s go ahead and create the index.js file next so we can see what it looks like to import something:
(Windows)
New-Item index.js
code index.js
(Everyone else)
touch index.js
code index.js
Ok, I just want to point out there is a particular reason we are naming our handler file index.js, and that is because in Node projects you should name your main file that starts the program, also known as your entry point, index.js.
You should now have two files in your story-game directory. In your index.js file add the following code:
Remember the require keyword? It is used to import code from other sources. Now that we are importing our own code, we give it the path to our other file so it knows where to import it from. The ./ in './savepoint-tracker.js' means the file we’re looking for is in the same directory as this one. Then we specify the name of the file, savepoint-tracker.js.
Next we create a Handler class with a constructor that creates an instance of the SavepointTracker class. We also have a stub handler method that calls one of the SavePointTracker’s stub methods. Finally the last line of the file actually calls the handler method to run the program.
To make sure everything is wired up correctly, run the program:
node index.js
You should see the following output:
called savepointExists
If this your first time exporting and importing your own code, congratulations! 🎉 You have built the first leg of your walking skeleton.
Next let’s add the stub files for our other classes using just the code command:
code user-input-validator.js
Add the stub code for this file and then save it:
CHECKPOINT
// user-input-validator.js
classUserInputValidator {
getInput(message) {
console.log("called getInput")
return""
}
getMenuSelection(currentPage) {
console.log("called getMenuSelection")
// hardcoding this for now since the
// code will check for this value
return"save"
}
_optionIsValid(userSelection, options) {
console.log("called _optionIsValid")
returntrue
}
}
module.exports=UserInputValidator
You may choose to import the UserInputValidator class into the index.js file at this point if you want for the practice.
Adding the story-reader.js stub file next:
code story-reader.js
Here is the code for that file, it is slightly different than the other files which we’ll talk about in a moment (make sure to save the file):
So the first thing you might notice is there are two classes in here instead of one like the other files, the StoryReader class and the StoryPage class. These classes could have been put in separate files, but I choose to include them together mainly to show an example of having multiple exports from a single file. You will notice at the bottom of the file the export line looks a little different:
module.exports= { StoryReader, StoryPage }
This is how you can export more than one item from a file. The curly brackets {} show that you are exporting an object with multiple things inside of it. In this case we want to export both our StoryReader and StoryPage classes so they can be used outside of the file. You can export other things besides just classes, like functions and variables (we’ll see examples of this in later chapters).
You should now have four files in your story-game directory. Let’s go ahead and update our index.js file to include all of our classes and make sure everything is wired up as expected:
Remember how we exported these two classes with the {} around them in the story-ready.js file? We import them the same way, with {} brackets around them. If we wanted, we could choose to only import the StoryReader class and not the StoryPage class:
This pattern gives your code the flexibility to decide what you want to import from specific files based on your needs. We will explore more into these concepts in part two of this book. The only other thing worth noting for now is the use of the keyword null:
We are passing in null as the values here because we don’t have actual values for these just yet. They will be replaced with actual values once we put real logic in the stubs. For now, go ahead and run the program:
node index.js
You should see output similar to the following:
called savepointExists
called getStoryPageText
called getMenuSelection
called StoryPage constructor
If you see an error like is not defined or is not a constructor it means one of your exports does not line up with what you are trying to import. There could be a typo in the file path you put in for the require() line, or there could be a typo in the module.exports line for one of your files. If you get stuck, remember you can copy the contents of the files from the book into the individual files.
For those of you that make it through this part and can get your program to run, congratulations! 🎉 We have now created the stubs for all of our classes. Even with these stubs, we still have not completed our walking skeleton. Next thing we can do is write out our main algorithm using the stubs.
Turn the pseudocode into stub code
Now that we have all of our stub methods in place. We can now write up the algorithm we originally wrote in pseudocode. Let’s add code to the index.js so that it looks like our pseudocode but using the stub methods:
Awesome, this is starting to look more like an actual program. If you run this now, it will output all of the stubs that get called:
node index.js

Choose your own adventure game
called savepointExists
Starting story...
called loadFirstPage
called StoryPage constructor
called getStoryPageText
Story coming soon!
called getMenuSelection
called saveCurrentStoryLocation
Story progress saved. See you later!
The output shows the flow of steps that we would expect. If you are able to get the program to run at this point, congratulations! 🎉 You now have the majority of the skeleton built. We have completed our main flow of the program using stubs. At this point we could actually start filling out some of the stubs with actual code. The most useful place to start will probably be loading and displaying a story page.
Adding our first story
A choose your own adventure game without a story doesn’t sound very exciting. Let’s add our first test story file to make sure we can load and display some story text. We will put these story files into their own sub-directory, meaning a directory inside of our program directory:
(Windows)
mkdir story
New-Item story\first.json
code story\first.json
(Everyone else)
mkdir story
touch story/first.json
code story/first.json
Copy and paste this story object into the first.json file:
{
	"pageText": "Once there was an ugly bear, he was so ugly everyone died. The end",
	"options": [
		{
			"displayText": "read it again",
 			"optionValue": "first.json"
		}
	]
}
This is a really short story without any other pages, which is great for the moment. We just want to add enough code to load this file and display it to the user. Our StoryReader class will have all of this logic for loading the first story file. Let’s go ahead and add that logic now:
Here we have updated the constructor for StoryPage to store the page file name and turn the contents of the story page file into an actual JSON object using JSON.parse (this was also introduced in Chapter 5). Then we do something interesting with the story page options:
You see, we want the user to be able to save the story from any page, so they should always see the option save and exit program. One way we could achieve this is be forcing every story page to include that option in the file, but that would be annoying to have to type out every time. So… since we know we always want that option, we can just add it to the options that are displayed using this line of code. If you remember from the design, options is an array, or list of objects. If you want to add an item to an array in JavaScript, you can use the push function.
After the constructor, we just add some getters to get the specific pieces of the story page data we want:
Here we read the file located in the story directory named first.json and store the file data in a variable named rawFileData. This variable then gets used to create a StoryPage object by passing it along with the page name into the constructor. We return this story page to be used by the handler() method. Now let’s look at the loadStoryPage method:
It’s just another getter. Nothing worth writing home about… just gets the story page text.
Go ahead and run the program, you should now see the story text displayed:
node index.js
Choose your own adventure game
called savepointExists
Starting story...
Once there was an ugly bear, he was so ugly everyone died. The end
called getMenuSelection
called saveCurrentStoryLocation
Story progress saved. See you later!
You can see we are starting to replace some of the stubs and it is getting closer to our finished program. Next we will add the ability for the user to select an option.
Getting input from users
A choose your own adventure game that can’t take in any input from a user isn’t very useful… We need to write some code that takes inputs from users and make sure they put in an option that makes sense. Writing all of this code from scratch would take up dozens of pages. Fortunately, like many common problems someone else has already solved it and wrote a function for us to use (like I said before, I love it when that happens)! We are going to use this pre-written code in our program to get user input.
Just like we discussed in chapter 1.6, code written by others is referred to as a module. Update the UserInputValidator class with the following code to get some input from our user:
CHECKPOINT
// user-input-validator.js
constreadlineModule=require('readline/promises')
classUserInputValidator {
constructor() {
this._readline=readlineModule.createInterface({
input:process.stdin,
output:process.stdout
})
}
asyncgetInput(message) {
varresponse=awaitthis._readline.question(message)
returnresponse
}
asyncgetMenuSelection(currentPage) {
varoptions=currentPage.getOptions()
varformattedOptions=""for (vari=0; i<options.length; i++) {
formattedOptions+=`${i+1}) ${options[i].displayText}\n`
}
varselection=awaitthis.getInput(formattedOptions)
while (!this._optionIsValid(selection, options)) {
console.log("Do you know how to count? That ain't a valid option bro! Try again!")
selection=awaitthis.getInput(formattedOptions)
}
// subtracting 1 since arrays start with 0 index
constselectedOption=options[Number(selection) -1]
returnselectedOption.optionValue
}
closeTerminalConnection() {
    this._readline.close()
}
_optionIsValid(userSelection, options) {
console.log("called _optionIsValid")
returntrue
}
}
module.exports=UserInputValidator
Ok, I’m throwing a handful of new keywords at you here, so let’s break it down:
constreadlineModule=require('readline/promises')
Remember how I told you the code we needed was written by someone else? We need to tell the program that it needs to include code that was not written by us. In this case, we want to use the readline/promises module, which has some code we can use to get input from our users.
Here in the constructor of the UserInputValidator class we are using our module to setup a connection, or interface, with the terminal. The createInterface function returns a variable that we can use to get input from the user which we are calling _readline since it will be reading lines of input from the user.
As for process.stdin and process.stdout… In a nutshell 🌰, stdin is short for standard input, and it usually means input that is coming from your keyboard. stdout is short for standard output, and this usually is referring to your terminal. So this code will let you type in stuff using your keyboard while your program is running (the input) and print any messages through the terminal (the output).
Next we have our changes to the getInput function:
asyncgetInput() {
You may have noticed we have added a keyword to this line, async. This is an advanced keyword that we won’t go into too deep until part 3 of the book. For now, the important thing you need to know is you have to add async before the name of the method in order to use the await keyword, which takes us to the next line of code:
varresponse=awaitthis._readline.question(message)
On this line we are using the question function to prompt the user for some input (showing them the message that was passed in). The answer that is typed in the terminal will be saved in the response variable, which we then return.
So what’s up with the await keyword? As you can imagine, it will take at least a couple of seconds for users to type something into the terminal… but computers like to run as fast as possible. We need to tell the program to wait until the user has finished typing their input before the program moves on to the next line of code. In JavaScript we do this by using the await keyword. This keyword essentially says ‘you need to wait until the question is answered before continuing the program’. In fact, we need to add this await keyword to every line of code that needs to wait for user input. Let’s take a look at the getMenuSelection method to see another working example of this:
asyncgetMenuSelection(currentPage) {
varoptions=currentPage.getOptions()
varformattedOptions=""for (vari=0; i<options.length; i++) {
formattedOptions+=`${i+1}) ${options[i].displayText}\n`
}
varselection=awaitthis.getInput(formattedOptions)
while (!this._optionIsValid(selection, options)) {
console.log("Do you know how to count? That ain't a valid option bro! Try again!")
selection=awaitthis.getInput(formattedOptions)
}
// subtracting 1 since arrays start with 0 index
constselectedOption=options[Number(selection) -1]
returnselectedOption.optionValue
}
The getMenuSelection method is pretty interesting. This method formats the options so that the user gets a pretty display of the options in the terminal for them to pick from. Let’s go through this line by line. First, notice we have added the async keyword next to the method name:
asyncgetMenuSelection(currentPage) {
This is because this method needs to wait for the user to choose an option from the menu:
varoptions=currentPage.getOptions()
The first thing we do is get the list of options from the currentPage using the .getOptions() method. Looking at the next line:
varformattedOptions=""
We create a variable, formattedOptions, which starts off as an empty string. This will hold the final string of our options formatted in a user friendly way. Next, we loop through the list of options using a for loop:
for (vari=0; i<options.length; i++)
This says in English:
‘starting with the number 0 (var i = 0;), loop until you get to the end of the list of options (i < options.length;) increment the value of i by 1 after each loop (i++).
This for loop will be used to grab the displayText for each option and put a number in front of it so the user knows what number to enter to select an option:
for (vari=0; i<options; i++) {
formattedOptions+=`${i+1}) ${options[i].displayText}\n`
}
Here in the for loop we are using the ` and ${} marks to shape how the option will look when it is displayed to the user (we introduced this in chapter 1.5). The special \n character you see at the end means new-line, and it is used to put a new line in the text so that every option will be shown on its own line instead of all the options being crammed together on one line. After the for loop, we display this menu to the user and wait for their selection:
varselection=awaitthis.getInput(formattedOptions)
Once the user has typed in their input and hit the enter key, we check their input to make sure they typed in something valid:
while (!this._optionIsValid(selection, options)) {
console.log("Do you know how to count? That ain't a valid option bro! Try again!")
selection=awaitthis.getInput(formattedOptions)
}
As long as the option they typed in is invalid, we repeatedly belittle them until they finally put in a valid number (we will add logic to the _optionIsValid method in a moment). Once we know the option is valid, we can safely get the selected option from the array and return its value:
// subtracting 1 since arrays start with 0 index
constselectedOption=options[Number(selection) -1]
returnselectedOption.optionValue
It is important to note that anywhere you use the await keyword you need to add the async keyword. Because our handler will need to wait for the user to choose a menu option, we also need to add the async keyword to the handler() method. In your index.js file. Add the async keyword next to the your main handler() method:
asynchandler() {
Then add the await keyword to the line where you call the this._userInputValidator.getMenuSelection method:
There is one last step we need to take care of when getting input from a terminal: We have to tell the terminal when we are done using it so the program can complete. We do this with the readline.close() command, which closes the connection with the terminal. This is why we added the closeTerminalConncetion method to the UserInputValidator class:
Now in your index.js file, add a line to call this method at the very end of the handler() method:
CHECKPOINT
// index.js
const { StoryReader, StoryPage } =require('./story-reader.js')
constSavepointTracker=require('./savepoint-tracker.js')
constUserInputValidator=require('./user-input-validator.js')
classHandler {
constructor() {
this._storyReader=newStoryReader()
this._savepointTracker=newSavepointTracker()
this._userInputValidator=newUserInputValidator()
}
asynchandler() {
console.log("Choose your own adventure game")
varcurrentPage=nullif (this._savepointTracker.savepointExists()) {
constpageName=this._savepointTracker.getSavepointPageName()
currentPage=this._storyReader.loadStoryPage(pageName)
console.log("Story savepoint loaded...")
}
else {
console.log("Starting story...")
currentPage=this._storyReader.loadFirstPage()
}
varuserStillPlaying=truewhile (userStillPlaying) {
console.log(this._storyReader.getStoryPageText(currentPage))
varselectedOption=awaitthis._userInputValidator.getMenuSelection(currentPage)
if (selectedOption=="save") {
userStillPlaying=falsethis._savepointTracker.saveCurrentStoryLocation(currentPage)
console.log("Story progress saved. See you later!")
}
else {
currentPage=this._storyReader.loadStoryPage(selectedOption)
}
}
// NOTE the line to close the terminal here
this._userInputValidator.closeTerminalConnection()
}
}
newHandler().handler()
Go ahead and try it out. Save your changes to the file and run the node index.js command in your terminal. You should be able to type in an option now. As long as you type in a valid option, the program will work. If you don’t type in a valid option, it blows chunks (we will add validation in the next section):
If this was your first time getting user input in a program, Congratulations! 🎉 You now have the secret to making programs that you can interact with while they are running.
Validating User Input
We have user input, now we need to make sure the input is a valid number. I’m going to take a look back at the pseudocode we wrote up for this:
optionIsValid(userSelection, options) {
ifuserselectionisnotanumberreturnfalseifuserselectionis0returnfalseifuserSelectionisgreaterthanthesizeofthelistofoptionsreturnfalse// the userSelection passed all of our checks
returntrue
}
Ok, should be straightforward to write some code for this. In your user-input-validator.js file, update the _optionIsValid method so it looks like this:
_optionIsValid(userSelection, options) {
varuserNumber=Number(userSelection)
if (isNaN(userNumber) ||userNumber==0||userNumber>options.length)
returnfalsereturntrue
}
You may remember some of this syntax from chapter 1.5 when we built a calculator. We first cast the userSelection into a number to make sure it is actually a number: var userNumber = Number(userSelection). We then have a conditional that checks if the selection is not a number (NaN), or the number is less than or equal to 0, or the number the user put in is bigger than the length of the list of options. We are using the or operator here || so we can combine the three checks onto one line. We return false if any of those conditions are true since the option is invalid. Notice I didn’t put any {} brackets below this if statement. This is just another shorter way of writing a conditional that only has one line of code. (programmers take great pride in writing out a solution in as few lines as possible 🤓).
Finally, if the number the user selected passes all of our checks, we return true.
After you add this code, go ahead and run your program and enter some bogus inputs to see what happens:
node index.js

Choose your own adventure game
called savepointExists
Starting story...
Once there was an ugly bear, he was so ugly everyone died. The end
1) read it again
2) save and exit program
purple
Do you know how to count? That ain't a valid option bro! Try again!
1) read it again
2) save and exit program
0
Do you know how to count? That ain't a valid option bro! Try again!
1) read it again
2) save and exit program
3
Do you know how to count? That ain't a valid option bro! Try again!
1) read it again
2) save and exit program
2
called saveCurrentStoryLocation
Story progress saved. See you later!
You’ll notice the program will keep prompting you to put in a number as long as the value you enter is invalid. If this is the first time validating inputs from your users, congratulations! 🎉 Validating user input is really important because it allows you to trust that the rest of the logic in your program is going to work as expected without being broken by the user typing in something they shouldn’t.
Saving the Story Progress
We are so close to the end. All that is left is creating a save point file and loading the story from the save point if it exists. It turns out this is pretty simple since we took the time to design it previously. Let’s review the pseudocode for the SavepointTracker class:
saveCurrentStoryLocation(currentPage) {
get pageName from currentPage
fileContent = JSON.stringify({ lastSavedPage: pageName })
if"story/savepoint" directory does not exist, create it
write fileContent to file 'story/savepoint/savepoint.json'
}
savepointExists() {
if file 'story/savepoint/savepoint.json' exists returntrueelsereturnfalse
}
getSavepointPageName() {
read file from 'story/savepoint/savepoint.json'
parse jsonData from file
return lastSavedPage from jsonData
}
You may want to try writing this out yourself in the SavepointTracker file before looking at the solution. If you are not sure about how to do a particular step, don’t forget to search for a solution on the internet. For example, you could search How to check if a file exists in Node? or Node how to create a directory if it doesn't exist? and look at the first couple of links that show up. Also don’t forget we covered how to read and write to JSON files in chapter 1.6.
Once you have taken a stab at adding this logic, feel free to check out this possible solution:
Go ahead run the program after adding code to the SavepointTracker and save your progress:
node index.js

Choose your own adventure game
Starting story...
Once there was an ugly bear, he was so ugly everyone died. The end
1) read it again
2) save and exit program
2
Story progress saved. See you later!
You should see a file be created at story/savepoint/savepoint.json file with the following contents:
{"lastSavedPage":"first.json"}
If this is your first time creating a game savepoint, congratulations! 🎉. Rerun your program and you will see it loads the story from the savepoint now that the file exists:
Story savepoint loaded...
Once there was an ugly bear, he was so ugly everyone died. The end
1) read it again
2) save and exit program
The project is now code complete, meaning we have written all the code needed to meet all of the requirements!
Phew 🙌 that’s it! At this point we have filled out all of the stubs of our program with actual code and have a fully functioning choose your own adventure game! If this is your first time designing and coding a choose your own adventure game, congratulations! 🎉 This chapter is by far the most intense we have worked through up to this point. Good job sticking it out! 👍 Now you can add your own story files with options to create a choose your own adventure story!
Here is a sample story you can use to get started. You can create files for these in your story folder to replace our last one:
first.json
{
	"pageText": "Once there was a brave hero who wanted to learn how to program. So they decided to read 'Do You Even Code Bro?'. Little did they know...",
	"options": [
		{
			"displayText": "The book was covered in radioactive waste!",
 			"optionValue": "superhero.json"
		},
		{
			"displayText": "The book was explosive!",
 			"optionValue": "explosion.json"
		}
	]
}
superhero.json
{
	"pageText": "Yes... by touching the toxic sludge our hero was transformed into a coding superhero. They decided to use their powers to",
	"options": [
		{
			"displayText": "Go back in time to the beginning of this story",
 			"optionValue": "first.json"
		}
	]
}
explosion.json
{
	"pageText": "KABOOM! The book exploded knowledge into the brain of our hero. They suddenly found they had the ability to code simple programs to make their friends and family say 'hmmm... that's cool I guess'.",
	"options": [
		{
			"displayText": "Start over",
 			"optionValue": "first.json"
		}
	]
}
Were you able to complete the exercise? Please take a minute to fill out a quick survey about this chapter at https://s.surveyplanet.com/sx7p3yof
Chapter 1.10: How to Learn Anything with Programming
We have now walked through a handful of coding exercises. Hopefully you have learned some useful coding concepts, but it should go without saying that I cannot show you every possible keyword in the JavaScript language. I also cannot show you how to do every specific thing you may want to do with the programs you want to write. That is why this chapter is going to teach you perhaps the most useful skill that I will share with you in this entire book. That skill is how to find answers to technical questions using the internet. Once you learn how to learn, nothing can hold you back from building whatever you want to build when it comes to code (except time that is… ⏳). This is such an important skill to learn that I’m making it the last chapter of the basics.
What to Search for When You Have Questions
Turns out, there is a very specific pattern you can use to search the internet when you are trying to figure out how to do something with a specific programming language or technology. This pattern, passed down from the ancients 🧔🏼📜, will help you in almost any situation. Here is the pattern:
<technology> how to <verb>
// examples
node.js how to reverse order of array
python how to loop through object keys
java how to read data from file
Ok, I’m half kidding here 😝. Obviously the hard part is knowing what to put in for the <verb> part of that pattern. But consider these tips:
Think about the data that you are trying to do something with. Is it a string, an array, an object, etc. Use the data type in your search to help narrow the answer you find. Here are some examples:
Node how to check if array has anything in it
Node how to replace string with a different string
Node how to loop through object properties
Node how to raise number to power
Node how to check if number is even or odd
Write out pseudocode for what you are trying to do in your program, and then search for how to do that thing using the words you used in your pseudocode.
If you can narrow down what it is you are trying to accomplish with your code in this way, you are likely to find the answer you need from the community.
It’s important to note that as a programmer, you shouldn’t expect to remember all the syntax for every language in your head, that’s what documentation is for. Nobody can keep all this stuff in their head at once (that’s what I hate about coding interviews that don’t let you look stuff up online during the interview. Nobody programs like that on the job). If you ever need help remembering how to do something, there are plenty of helpful answers from the community online. You’ll find that as you use a language more, the common syntax will become second nature to you
What to Search for When you Have Errors
This is another skill that will help you throughout this book and throughout programming in general. Often times you will hit an error that you were not expecting when following the instructions in one of the chapters or working on a project. For example, while doing research for one of the later chapters in this book I hit an error running a command:
So to find a solution of how to fix the issue, I copied the first couple of lines from my terminal and pasted them directly into the search bar of my browser:
And lo and behold, the first link in the results took me to a page that offered me a solution:
Type in sudo before the command
So I tried it sudo amplify init and it worked! 🎉
You may not always get so lucky, but when you’re stuck with an issue your best bet of figuring out a solution is searching for the error message on the internet and see if anyone else had a similar problem and if there is a way to fix it. You want to use the lines in your terminal that explain what the error is. If there is any text that doesn’t seem related to the problem, don’t include it in your search or it will make it harder to find the specific solution you need.
Where to Search
So my original answer to this wasStackOverflow, and reddit/r/learnProgramming. However, as I was writing this book OpenAI pulled the rug out from under my feet by releasing ChatGPT. If you haven’t seen this tool yet, it is amazing 🤩. It can write code for you based on questions you ask it in English! This is a game changer for software developers, and I’m excited to see where the technology takes us in the coming years. At this time of writing the tool is still in a “research preview” phase and sometimes the code it writes is just flat out wrong, so you have to be skeptical with the code it gives you. That being said, a lot of times it gets it right and it has saved me hours of development time at this point and it’s only going to get better. I have no doubt that most developers will be using tools like this within the next 10 years.
Coming back to my original answer, I want to mention that Stack Overflow is a great place to find answers about code syntax from the community. The “Learn Programming” subreddit is more for discussions about computer science and deeper learning of the field in general. Both are good places to get familiar with when you are first starting out.
Finally, you can search the internet for tutorials on almost any programming language or technology (for example, ‘Visual Studio Code tutorials’). If you are trying to learn a particular language or tool, you can usually find a tutorial that will bring you up to speed within a couple hours of watching, which is pretty awesome.
What’s Next?
With this last concept, we have now covered the basics to programming simple Node.js scripts. You now have enough information where you could design your own basic programs to run on your computer. We have reached a peaceful spring in the middle of this rainforest 🏞.
But we’re not out of the forest yet. The skills and concepts we’ve talked about so far are just the beginning. In part 2, we will dive deeper into concepts you will need to understand in order to write professional grade code. We will also discuss how you can use code written by the community, and how to store information using databases instead of files.
So fill up your canteen and strap your backpack back on.🎒 We’re taking this journey to the next level.
”You see that light at the end of the tunnel? That’s the train 🚊”
~ A senior developer encouraging me after my first day as an intern
Chapter 2.1: How to Use Code Written by Others (Dependency Management)
Give yourself a pat on the back 🤚. You have walked through a bunch of coding exercises as well as designing a more complex project and building it. So far, our code examples have been pretty simple compared to code you would write professionally. When you are creating a professional coding project, you will most likely be using a lot of code that was written by others. Why redo the work that was already done by someone else? Code written by others that you use in your project is often referred to as a library, a module, or a package. There are subtle differences between these 3 words, but let’s not get nit-picky like my high school English teacher (I’d make a joke about her, but she’s dead, so… better not). For all intents and purposes,libraries, modules, and packages are collections of code that can make it easier for you to complete your project. When you use this kind of code in your project, it becomes a dependency of your project, because your project is dependent on that code in order to run.
You may ask, how can I use code that was written by someone else? Wouldn’t they sue me for stealing their code? This may be true for some code, but you would be surprised by how many libraries can be used in your project without you having to pay for it. Many of these libraries are developed as open-source libraries. An open-source library is code that is written by developers from the public community and is often usable by everyone without having to pay for it. Much of our modern technology is heavily dependent on open-source code.
In this chapter, we will be going over how you can use these open-source libraries in your projects. Since we are working with JavaScript and Node.js, I will introduce you to a tool called Node Package Manager (npm for short). We will also be talking about how to organize your dependencies in a file called package.json.
Working with Node Package Manager
As the name suggests, Node Package Manager (npm), is a tool used to manage packages for Node projects. It can also be used for running tests on your code (more on that in a later chapter), and running a build on your project (more on that in part 4 of the book). When you installed Node.js in chapter 1.2, you also installed npm since they go hand-in-hand (totes bffs). To prove this, type the following command into a terminal:
npm --version
You should see a version of npm show up in your terminal similar to this:
8.18.0
Your version of npm is more than likely different from mine at the time of writing this, and that is because the developers who work on the npm tool are constantly adding new features and releasing new versions of the tool. More on versioning later in the chapter.
Ok, so we have npm, great… what do we do with it? For starters, npm can be used to setup a legit Node project for you. Get ready for this, cause we’re about to take off the training wheels 🚴♂️
Initializing a Node Project with npm
First, let’s create a new sub-directory in your codebro folder by running these commands in a terminal:
(Windows)
mkdir ~\Desktop\codebro\my-npm-project
cd ~\Desktop\codebro\my-npm-project

(Everyone else)
mkdir ~/Desktop/codebro/my-npm-project
cd ~/Desktop/codebro/my-npm-project
Once you are in the my-npm-project directory, run the following command:
npm init
Doing this will cause npm to ask you a bunch of questions about the project you are creating. You can just hit the enter key for every question to set the recommended defaults (the values you put in are not a big deal right now). Below is an example of all the answers I put in. I left about half of the fields blank:
npm init

This utility will walk you through creating a package.json file.
It only covers the most common items, and tries to guess sensible defaults.

See `npm help init` for definitive documentation on these fields
and exactly what they do.

Use `npm install <pkg>` afterwards to install a package and
save it as a dependency in the package.json file.

Press ^C at any time to quit.
package name: (my-npm-project)
version: (1.0.0)
description: my first npm project
entry point: (index.js)
test command:
git repository:
keywords:
author: myself
license: (ISC)
About to write to /Users/shumway/Desktop/codebro/my-npm-project/package.json:

{
  "name": "my-npm-project",
  "version": "1.0.0",
  "description": "my first npm project",
  "main": "index.js",
  "scripts": {
    "test": "echo \"Error: no test specified\" && exit 1"
  },
  "author": "myself",
  "license": "ISC"
}


Is this OK? (yes)
Once you finish this step, a new file named package.json will be added to your my-npm-project directory. Run the following command to see what is inside of it:
cat package.json
The cat command prints the contents of a file into your terminal. You should see output similar to the following show up in your terminal:
{
  "name": "my-npm-project",
  "version": "1.0.0",
  "description": "my first npm project",
  "main": "index.js",
  "scripts": {
    "test": "echo \"Error: no test specified\" && exit 1"
  },
  "author": "myself",
  "license": "ISC"
}
Look at it… isn’t is beautiful? 😭 It’s a package.json file. What’s so great about this? This is your gateway into professional software development. It doesn’t look like much yet, but the package.json file is one of your most important files when doing Node software development. It is here where you set up all your configuration needed for your project to make your life as a developer as smooth as possible. To prove how awesome this is, we are going to install and use our first external dependency.
Installing Dependencies using npm
I’m really excited about this next part, because we are about to write some code that makes a call to a website over the internet! Up until now all of the code we have written was able to run without access to the internet. Needless to say, because we will be making a call to the internet you will want to make sure your computer has internet access when working through this exercise.
To make a request over the internet, we are going to use an open-source library called axios. This is one of the more popular Node modules used to make calls over the internet. To download the library and add it, we will use the npm install command:
npm install <name of module you want>
This command can be used in your terminal to download code you need for your project. Run the following command in your terminal (watch out for typos, or else you could end up downloading stuff you don’t want):
npm install axios
You will see a progress bar show up in your terminal as the axios module is downloaded. Once the step is complete, you can make sure axios was installed by running the cat command again:
cat package.json
This time you may notice there is a new property in the package.json file called dependencies:
"dependencies": {
    "axios": "^0.27.2"
}
We can see that the axiosdependency has been added to our file. Your version of axios will be different than "^0.27.2". You may also notice there is another file added to the directory called package-lock.json. This file tracks all of the different versions of modules that are currently used by the project. We will talk more about what these version numbers mean when we get to versioning later in the chapter. For now, we are ready to write some code that uses axios to make a call over the internet. Type the following commands into your terminal:
code index.js
Once the index.js file is open, add the following code to it and save the file:
This code is using axios to make a call to a specific web service, agify.io which predicts the age of a person just based on their name. Let’s walk through line by line.
constaxios=require('axios');
We should be pretty familiar with this line by now, the require keyword is used to import code from another source. Here we are importing the axios library that was installed when you ran npm install axios.
asyncfunctionmain() {
Notice the main function is marked as async. If you recall from a previous chapter this tells the program we expect to have code that we want to wait to finish running before we continue using the await keyword.
Here we are using the axios library to make a call to over the internet to a specific URL address. A URL is used to find specific websites or web services. If you’ve used the internet much, you type these in to your browser or click URL links to go from one website to another. You can also use them in code to get data to use in your program. In this case, the URL 'https://api.agify.io?name=Landon'.
As you can imagine, it will take some time for the request to travel over the internet and get back to us. So we need to use the await keyword to tell the program to wait for the request to complete before we continue on with our program. Once it does complete, we print out the data returned in the response from our call to the console.
console.log(response.data)
Here, response is an object that has a property called data. This is the data that was sent back to us by the web service we called. If you run this code using node index.js, you should see output similar to the following:
{ name: 'Landon', age: 36, count: 384 }
Hmm… not a bad estimate. It’s only off by a couple years actually. If you want, you can test out your own name by replacing Landon in the URL with your name and then rerunning the script.
There you have it. If this is your first time installing a node dependency using npm and then using it in code, congratulations! 🎉 You have now taken your first step into becoming a legit developer. There are many awesome libraries out there from the community that you can leverage to build some amazing stuff. You can even contribute code to these open-source projects to help make them even better.
Before we wrap up, we need to talk about an important concept known as versioning
Versioning
When you use libraries in your project, usually those libraries are still being improved by other developers even after you start using it. If those developers are still adding features to their library after you have already downloaded it into your project, how do you know what particular features are in your copy of the library? And how can you update your copy of the library so it has all the latest features?
This is where versioning comes into play. Simply put, a software version is a number that you label your code with whenever you make a change to it. When developers make changes to their software, they give each new version a number so everyone using the library can tell them apart.
This version number is broken up into different parts, and the number goes up based on what changes were made to the code. For example, let’s take a look at the version of our axios dependency in the package.json file again:
"dependencies": {
    "axios": "^0.27.2"
}
This was my version of the axios library when I started writing this chapter. Yours will be higher. I’ll explain what the ^ symbol is for in a minute. Notice there are three numbers shown here:
0.27.2
This follows a common type of versioning known as semantic versioning. We will go deeper into semantic versioning and backwards compatibility in part 4 of this book when we talk about creating our own libraries for others to use, but for now, just know that those three numbers all have a purpose. They follow the following format: major.minor.patch. For example:
major.  minor.   patch
0.      27.       2
To keep this explanation simple, when the major version number goes up, it means a major change was made to the library that may not play nicely with older versions (it’s like the equivalent of a gaming company releasing a new gaming system). Likewise, if the minor version number goes up, it usually means some minor features were added to the library that will work with older versions. If the patch version number goes up, it means the developers just patched up some bugs that were in the code without really adding any new features.
As a general rule, you want to try to be on the latest released version of a library. The problem is that often (not always), if you try to update to a new major version of a library, it’s not going to work with your existing code and stuff is going to break (just like I can’t play my beloved PS2 game discs 💿 on the latest PS systems 😢). So you don’t want to accidentally update the major versions of your project dependencies until you’re sure you’re ready for the update. This is where the ^ becomes useful and why it is added to the version number in your package.json file. The ^ tells npm “never increase any of the major version numbers automatically for this library when updating”.
Ok… so now that we have an idea of what the version numbers mean, how do we actually update the libraries we are using to get the latest features? First, we need to check just how out of date our library is using the npm outdated command. This command will show you any libraries in your project that are outdated (if all of your libraries are up to date, you won’t see any message from it). This is what I saw when running the command in my terminal:
npm outdated

Package  Current  Wanted  Latest  Location            Depended by
axios     0.27.2  0.27.2   1.2.2  node_modules/axios  my-npm-project
Using my example here, I am currently on 0.27.2 (the Current number), this is the latest minor version of the library, which I can tell by looking at the Wanted number, but the Latest available version for this library at this time of writing is 1.2.2. This is a different major version number than what I’m currently on.
So first of all, if my Current version happened to be on a different minor version than the Wanted version, I can safely update my project using the following command:
npm update
This will update all my project dependencies to their Wanted minor versions. If however I was ready to update to the Latest major version, I could run the following command:
Now in this case I happen to know that the code we wrote works with version 1.2.2, so I ran this command to update my project. After running my package.json was updated to look like this:
  "dependencies": {
    "axios": "^1.2.2"
  }
If you ever want to know what actual features were added in a specific version of a library, you can look at the libraries changelog . A changelog shows you the history of changes made to a project so you can see when certain features were added (kind of like a tech journal for nerds 🤓). For example, you can view the changelog for the axios project here https://github.com/axios/axios/releases.
That’s it for versioning for now, you will come to find that managing the versions of your dependencies is one of your most common jobs as a software developer, and different programming languages have different ways of dealing with this problem.
Final Thoughts
This chapter covered how to use npm to create new projects, install dependencies into our projects, and manage the versions of those dependencies. If you are ever looking for open-source libraries for you to possibly use in your programs, just search for the following on the internet:
npm module that can <thing you are trying to do>
You may not always find something, but it’s worth a shot. For example, when I searched for this:
npm module that can print colorful console text
I found a couple cool libraries that can add color to console text.
You will want to be aware of the type of license being used by the library. This determines what you are legally allowed to do with the library and not get sued. When in doubt, any library using a MIT license is probably safe to work with in your project. But I’m definitely not a lawyer 🚫👩💼 so you will have to do your own research.
Now it’s time for some fun with exception handling (yay ☀️ 🌈)
In our previous code exercises, we have focused on what developers describe as the happy path, meaning, code that is run when everything goes well in our program (yay ☀️ 🌈).
But what about when things don’t go well, Sharon? Have you ever thought about that? 🌧
Sharon’s friend is right. Sadly, things don’t always go well in our programs, we call these unhappy paths or exceptional paths. These are the times when are code encounters a situation that we hope never happens, but we need to handle in case it does happen. This is known as exception handling, as in we handle the exceptional situations in our code so the program doesn’t blow absolute chunks (I was going to put a vomiting emoji here, but it looked pretty gross and thought, ‘better not’).
Ready to get started? Open a terminal in VS Code and create a new file in your codebro directory:
Windows:
cd ~\Desktop\codebro
New-Item exception.js
code exception.js
constreadlineModule=require('readline/promises')
constreadline=readlineModule.createInterface({
input:process.stdin,
output:process.stdout
})
classInvalidOperatorException {
constructor(message) {
this.message=message
}
}
classNaNException {
constructor(message) {
this.message=message
}
}
functionperformCalculation(number1, operation, number2) {
if (isNaN(number1) ||isNaN(number2)) {
varerrorMessage=""if (isNaN(number1)) errorMessage+="The first number entered is not a valid number. "if (isNaN(number2)) errorMessage+="The second number entered is not a valid number. "thrownewNaNException(errorMessage)
}
varresultif (operation=="+") {
result=number1+number2
}
elseif (operation=="-") {
result=number1-number2
}
elseif (operation=="*") {
result=number1*number2
}
elseif (operation=="/") {
result=number1/number2
}
else {
message=`Unknown operation: '${operation}'. Cannot perform calculation`thrownewInvalidOperatorException(message)
}
returnresult
}
asyncfunctionmain() {
varinputValid=falsewhile (!inputValid) {
varnumber1=Number(awaitreadline.question("Enter a number: "))
varoperation=awaitreadline.question("Enter an operation: ")
varnumber2=Number(awaitreadline.question("Enter another number: "))
try {
varresult=performCalculation(number1, operation, number2)
inputValid=true
} catch (error) {
if (errorinstanceofNaNException) {
console.log(`Please check the numbers you entered and try again. ${error.message}`)
}
elseif (errorinstanceofInvalidOperatorException) {
console.log(`Please check the operator you entered and try again. ${error.message}`)
}
else {
console.log("Unknown exception occurred")
throwerror
}
}
}
console.log(`${number1}${operation}${number2} = ${result}`)
readline.close()
}
main()
If any of this code looks familiar, that’s because much of it is from our calculator example in chapter 1.5. We’ve made a couple of improvements, including adding exception handling and reading input from the user while the program is running. Let’s walk through the changes:
This code should look familiar from our choose you own adventure game project in part 1. The readline/promises' module gives us a way to get input from a user through the terminal. We then create a connection, or interface, with the terminal.
Here we are creating a couple of exceptional classes (not ‘exceptional’ as in they are special 😇, ‘exceptional’ as in they will be used when we handle exceptional cases in the code). They have a simple constructor that takes in a message. This message will be used to provide context, or information that can help us pinpoint what went wrong when the exception occurred. When we are handling exceptions, context is everything!. You want to provide as much information as possible that can help you or a user determine what caused the exception to occur and how it can be fixed so that it doesn’t happen again.
You’ll notice there are two classes: InvalidOperatorException and NaNException. The Exception in the names of these classes help point out that they are exceptional classes. Their names also help us see what exception they are related to. As a reminder, NaN stands for Not a Number. This exception happens when a user puts in something that is not a number. The InvalidOperatorException class will be used when the user enters a calculator operation that we don’t know how to handle.
We see this concept in action in the next section of the code:
functionperformCalculation(number1, operation, number2) {
if (isNaN(number1) ||isNaN(number2)) {
varerrorMessage=""if (isNaN(number1)) errorMessage+="The first number entered is not a valid number. "if (isNaN(number2)) errorMessage+="The second number entered is not a valid number. "thrownewNaNException(errorMessage)
}
Here, we are checking to make sure that both number1 and number2 are actually numbers before trying to perform a calculation. If either of them are not numbers we create an error message and add context to the error message describing which numbers were not valid. Finally we have this line that triggers the exception:
thrownewNaNException(errorMessage)
This keyword, throw, is used to tell the program that something occurred that cannot be handled in this particular spot of the program. It’s like saying, “I can’t handle this, so I’m throwing the ball to someone else to take care of.” And just like a game of catch, if you’re going to throw something, you better hope that someone is going to catch it. You may have seen the catch keyword in the main function. Let’s take a closer look:
try {
varresult=performCalculation(number1, operation, number2)
inputValid=true
} catch (error) {
if (errorinstanceofNaNException) {
console.log(`Please check the numbers you entered and try again. ${error.message}`)
}
elseif (errorinstanceofInvalidOperatorException) {
console.log(`Please check the operator you entered and try again. ${error.message}`)
}
else {
console.log("Unknown exception occurred")
throwerror
}
}
Here we see a standard try-catch block. A try-catch block is how you tell the program “I’m going to try to run this code between the try{...}, but it may throw an exception my way, and if it does I’ll be ready to catch it.” Here we try to run the code to perform the calculation using the user inputs, but we know there is a chance the user may put something in that we can’t work with, so we have a catch (error) to catch any exception that the code may throw using the throw keyword. Inside of the catch block we check what kind of exception it was using the instanceof keyword.
if (errorinstanceofNaNException) {
console.log(`Please check the numbers you entered and try again. ${error.message}`)
}
This if statement is true if the error we caught was an instance of the NaNException class. Which tells us that one of the numbers the user entered was not a number. This helps use provide more context to the user so they know what went wrong and how they can fix it so the exception doesn’t happen again.
Let’s take a look at how we are handling the other exceptional case in our performCalculation function, when the operation is invalid:
If the user provided operation does not match any of our known operations, we throw a new instance of the InvalidOperatorException class, giving it an error message that provides useful context into the problem. Now let’s jump back to the catch block to see how we handle this exception:
} catch (error) {
if (errorinstanceofNaNException) {
console.log(`Please check the numbers you entered and try again. ${error.message}`)
}
elseif (errorinstanceofInvalidOperatorException) {
console.log(`Please check the operator you entered and try again. ${error.message}`)
}
else {
console.log("Unknown exception occurred")
throwerror
}
}
You’ll notice in the catch block we have an else if that checks if the error was an instance of the InvalidOperatorException class, and if it is provides a helpful message to the user to check the operation they entered.
Finally, check of the else in here. If the error did not match either of our expected exceptions, then that means something else went wrong that we didn’t even known was possible. Realistically, I don’t expect the program will ever throw an exception other than the NaNException or InvalidOperatorException… but being a developer I can’t just leave things to chance, we have to account for all cases. So if something else happens here that we didn’t account for, we simply re-throw the exception for someone else to catch.
In our calculator example, handling the else condition here may seem like overkill, but in real world software this is the pattern you should follow. Handle the exception if you can, but if you don’t know what to do with the exception re-throw it so hopefully it can be caught and handled somewhere else. If you don’t re-throw it, this can cause your program to silently fail, meaning the program doesn’t work and you won’t have any clues as to why it failed. This is not something you want to experience when you have angry clients knocking down your door wondering why the software you built them is broken.
When in doubt, throw it out!
Now if you may be wondering, “Why not just wrap the whole program in a giant try-catch block. That should handle all exceptions right?” I bet you like fixing everything with duct tape, don’t you? This may work if your program can all fit into one file, but as you start to build real world programs if you make your try-catch block too big, then you start losing context that can help you pinpoint the problem. Remember, the whole point of exception handling is to help us or the users of our program figure out what went wrong and how we can prevent it from happening again.
Stack Traces
While we are on the subject of exceptions, I wanted to briefly cover stack traces. Stack traces show you which functions were called in what order when an error occurred so you can pinpoint where the problem is. Let’s look at an example. Create a new file in your codebro directory called stack-trace.js and add the following code to it:
functionmain() {
someOtherFunction()
}
functionsomeOtherFunction() {
console.log("something bad is about to happen")
thrownewError("something bad happened")
}
main()
After creating the file and adding the code, go ahead and run it:
node stack-trace.js
You should get output similar to this:
something bad is about to happen
/Users/shumway/Desktop/codebro/stack-trace.js:7
    throw new Error("something bad happened")
    ^

Error: something bad happened
    at someOtherFunction (/Users/shumway/Desktop/codebro/stack-trace.js:7:11)
    at main (/Users/shumway/Desktop/codebro/stack-trace.js:2:5)
    at Object.<anonymous> (/Users/shumway/Desktop/codebro/stack-trace.js:10:1)
    at Module._compile (node:internal/modules/cjs/loader:1119:14)
    at Module._extensions..js (node:internal/modules/cjs/loader:1173:10)
    at Module.load (node:internal/modules/cjs/loader:997:32)
    at Module._load (node:internal/modules/cjs/loader:838:12)
    at Function.executeUserEntryPoint [as runMain] (node:internal/modules/run_main:81:12)
    at node:internal/main/run_main_module:18:47
This is a stack trace. It shows you the error that occurred Error: something bad happened and the functions that were called. It shows us which function had the issue as well as which line in the file that the error occurred at someOtherFunction (...stack-trace.js:7:11) tells us the problem is on line 7 in the file stack-trace.js. The next line of the stack trace tells us that this function was called by the main function on line 2 of the file.
You will notice many of the lines in the stack trace don’t match up with any of the functions we wrote. These are internal Node.js methods that were called to start the program, so you don’t need to worry about those.
Stack traces are especially useful if you have a complex project with many different files. If this were a real issue, you could use the stack trace to dig through your code and try to figure out the cause of the problem.
Final Thoughts
Exception handling is not something we usually like to spend time on when building a program (it’s usually much more fun working on the happy path logic), but it makes a big difference in maintaining a project as the complexity grows. You should always consider the things that can go wrong in your code and how your code is going to handle those scenarios if those problems do occur. As we build more complex programs, we will continue practicing this concept. Now it’s time to dive into the really interesting stuff. In the next chapter we will be checking out version control and how we can use it to make our lives easier.
Chapter 2.3: Version Control Part 1 (Tracking Your Code Changes With Git)
We’ve written quite a bit of code so far in our journey. Up until now whenever we add more code to your exercises I’ve pasted large code blocks into the book for you to use as a references (the CHECKPOINTS ). Hopefully this has helped you progress through the code while still having a working state to fall back on in case you get stuck.
It turns out this concept of having checkpoints, or saved blocks of working code, is really, really useful to have. It also turns out there is a much easier way to create “checkpoints” than copying and pasting all of our code. In this chapter we are going to dive into this important software development concept: Version Control
What is Version Control?
Simply put, version control is the process of tracking all of the changes made to your code through the use of “checkpoints” or saved versions of your code. There are many ways to do this, some options are better than others. For example, a naive approach to tracking code changes would be to create a new file every time you want to save a particular checkpoint in your code and name it with a specific name (myCode_v1.js, myCode_v2.js, etc.). This of course would be a pain in the butt to work with, but it would technically be version control (some developers actually do this, don’t be like them).
Ok so if that is not a good approach, how do we create multiple checkpoints without creating new files? There are several tools in the software world today, but if you want to be like the cool kids 😎… you use Git.
Git, Your Best Friend in the World of Version Control
Ah Git, one of my favorite tools to work with as a developer. If you learn to use it well, it will make your life so much easier. “But what is Git?”, you may be wondering. Git is a version control system (VCS), which means it is a tool that helps manage the history of changes made to your code. It was invented by Linus Torvalds, the same guy who created the Linux kernel which is used all over the world today. Honestly, Git is pretty awesome for tracking code changes. We’re going to walk through the basics of Git and how you can use it to make your development experience better.
So, just like we have been using checkpoints in this book, Git has this concept as well. But in Git, they call these checkpoints commits. A commit is a saved copy of your code as it existed at a particular point in time. As you develop software, you can create commits to save your code when you get it to a working state and you want to save your progress. These commits create a commit history that helps you track when certain features were added to your project. It also allows you to reset, or revert your code back to previous points in time if you need to (for example, if you introduced a bug and you needed to get back to a working copy of the code). It also works a sort of journal to help you look at your commit history and see when changes were made, who made them, and why they made them. In the next couple of sections we will help you set up Git on your computer and create a simple project that we will use Git to create commits.
Adding Git to your computer
Mac Users
If you are a Mac user, just run the following command in a terminal
git --version
If you already have it on your machine, it will show you the version of Git. If not, your device will show a git installer you can then walk through to install Git.
Windows Users
You can download a Git installer for Windows from the following website: https://gitforwindows.org/. Download the installer and start it. Once you walk through the installer options and choose all the defaults, you should have Git on your machine.
Linux Users
Once again, if you are using a Linux based OS I’m assuming you know what you’re doing (maybe I should stop assuming that 😅). In any case, run these commands:
sudo apt-get update
sudo apt-get install git
Once you have setup Git on your machine, you will need to open a new terminal in VS Code (click Terminal -> New Terminal)
In your new terminal, type git --version to make sure Git is installed on your computer, for example:
git --version
git version 2.37.0
Setting up your Git Config
When you track code changes using Git, Git saves information on each commit to help you remember who made the change and when they made the change. Git does this using the user name and email you tell it to use. To set up your Git user information, type the following commands:
The last config change we need to make is to set what is called our default branch name, this will make sure that my examples here in the book match up with how git is working on your computer. Run the following command
git config --global init.defaultBranch main
Creating your first Git Repository with Commits
Now that you have Git installed on your computer and you have set up your user configuration, let’s create a Git repository. A repository is a Git project that actively tracks all of the files in a directory which you tell it to track. You create a Git repository and then save changes to your code using commits. VS Code actually works with Git to show you changes that you make to a project. Let’s walk through an example. Add a new directory in your codebro folder called gitPractice and open up that directory in VS Code by running the following commands in a terminal:
Windows
mkdir ~\Desktop\codebro\gitPractice
cd ~\Desktop\codebro\gitPractice
code .
Everyone else
mkdir ~/Desktop/codebro/gitPractice
cd ~/Desktop/codebro/gitPractice
code .
This should open up a VS Code window where you will be able to see the files we add to that directory using the explorer button.
Once you are in the directory, let’s create a Git Repository for this project by opening another terminal and using the following command:
git init
You should see a message similar to the following:
Initialized empty Git repository in /Users/shumway/Desktop/codebro/gitPractice/.git/
If this is your first time creating a Git repository, congratulations! 🎉Now we can start tracking our changes using commits. Let’s create our first change by adding a package.json file. We will do this using the npm init command and pressing the enter key to select all of the default options:
npm init
This utility will walk you through creating a package.json file.
It only covers the most common items, and tries to guess sensible defaults.
See `npm help init`fordefinitive documentation on these fields
and exactly what they do.
Use `npm install <pkg>` afterwards to install a package and
save it as a dependency in the package.json file.
Press ^C at any time to quit.
package name: (gitpractice)
version: (1.0.0)
description:
entry point: (index.js)
test command:
git repository:
keywords:
author:
license: (ISC)
About to write to /Users/shumway/Desktop/codebro/gitPractice/package.json:
{
"name": "gitpractice",
"version": "1.0.0",
"description": "",
"main": "index.js",
"scripts": {
"test": "echo \"Error: no test specified\" && exit 1"
},
"author": "",
"license": "ISC"
}
Is this OK? (yes)
This creates a new package.json file for us. Once this is created you may notice something interesting in the VS Code UI:
A new package.json file is added to the directory… and it shows up in green text. You will also notice a circle with the number 1 just showed up on the source control icon (the one with the lines and dots).
Why is package.json green? Well VS Code is able to detect Git repositories and show when Git detects changes to files inside of the project that can be committed, or saved to the git timeline. Another way to check for changes that can be committed is by using the git status command in the terminal, which will show output similar to the following:
git status
On branch main
No commits yet
Untracked files:
(use "git add <file>..." to include in what will be committed)
package.json
nothing added to commit but untracked files present (use "git add" to track)
Let’s break down what the output is trying to tell us here:
On branch main
This is telling us we are on the mainbranch of the Git repository (remember we set this name when we ran the config command earlier). We will cover branches and how to work with them in part 4 of the book. For now know that branches allow us to work with other developers to add code to the same project at the same time. This becomes very important when you start working with other developers.
No commits yet
Pretty straightforward, we haven’t committed any changes yet so this message is expected.
Untracked files:
(use "git add <file>..." to include in what will be committed)
package.json
nothing added to commit but untracked files present (use "git add" to track)
This next section tells us the first step to committing files, we need to add them to the repository. By default, changes to files are not tracked (untracked) by Git until you tell it to start tracking them. You do this by adding the files to the repository using the git add command. Let’s go ahead and add our package.json file:
git add package.json
By running this command, the package.json file is now staged, which means when you save a commit using the git commit command, the package.json file will be included as part of the “checkpoint” that is saved in the commit.
Let’s run the git status command again and see what has changed:
git status
On branch main
No commits yet
Changes to be committed:
(use "git rm --cached <file>..." to unstage)
new file: package.json
The main difference to notice is this section:
Changes to be committed:
(use "git rm --cached <file>..." to unstage)
new file: package.json
Git is now telling you about the changes to your project that will be saved to your next commit (it also tells you how to remove any changes that you didn’t mean to add). Here we see new file: package.json which is the file we just added.
Let’s go ahead and create our commit using the git commit command, type in the following:
When you run this command, you are telling Git to create a commit, or check point, in your repository. The -m option tells Git to attach a message to the commit. Commit messages are vital to have a useful commit history. They help provide context into what changes were made and (hopefully) why they were made. In our case, this is our first commit, so it is customary to include Initial commit in your message.
After running the command, you should see output similar to the following:
Here, main is the name of the branch. (root-commit) tells us it is our very first commit to the repository (the root of our history). 679b0e1 is the commit sha. A commit sha is a unique id of random letters and numbers that you can use to jump back and forth to different commits in your history. Note that your commit sha will be different than mine. Finally we have our commit message that we used in the commit command.
1 file changed, 11 insertions(+)
This line gives a summary of how many files were changed, and how many lines were added to the repository (insertions(+)). If we had removed any lines from the repository it would also show the number of deletions(-).
create mode 100644 package.json
This tells us how files were changed. This includes create mode (a file was created), update mode (a file was updated), and delete mode (a file was removed). Not gonna lie, not totally sure what the 100644 is (I’m guessing this is the file permissions, feel free to look it up. Most of the time you won’t need to worry about this). Finally you have the name of the file, package.json.
Now let’s run git status one more time:
git status
On branch main
nothing to commit, working tree clean
Here Git is telling you that any changes you had have been committed and your project is in a clean state, meaning it doesn’t detect any change in your repository from the last time you committed. You will notice the package.json text is no longer green and the number 1 has been removed from the source control icon, since VS code detects there is no longer a change to be committed. If this is your first time committing a change to a git repository, congratulations 🎉.
To show you what our Git history looks like in a visual form, check out this diagram:
We first created, or initialized, our Git repository using the git init command. Then we made our first commit on the main branch by adding our package.json file to the project. At this point, our Git history is pretty simple with only one commit. As you continue working on a project your history will become longer with more commits.
Let’s commit another change, only this time instead of using the terminal we’ll use VS Code to commit.
Let’s create a JavaScript file called index.js. Run the following command in your terminal:
code index.js
This will open up a file in VS Code named index.js. Add the following code to the file:
Once you save the file you will notice the index.js file shows up in green text in the VS Code sidebar:
This means VS Code detects that the index.js file has some changes that are different since you last made a commit to your main branch. Let’s commit those changes using VS Code. Click on the source control icon. You should see something similar to the following:
Here is the VS Code menu for committing changes to your repository. We can see the index.js file in the list of changes that can be committed. Clicking on the index.js will show you what changes will be committed:
In this case, there was no index.js file before now, so it shows that you are adding a file with five lines of code. This is expected, so we want to commit this change. Remember, we need to add the change before we commit it. We do this in VS Code by clicking the + button next to the file we want to add:
When you click this button, you will notice the index.js file is moved under a Staged Changes section:
This is similar to when you used the git add command in the terminal, the changes are now ready to be committed. To commit the changes, we need to first write a commit message that will be saved to explain our changes. In VS Code, there is a box for you to type your commit message in right above the “Commit” button:
Let’s type in a commit message for this change in the box (make sure to separate the first line from the second line with an empty line in between)
Add index.js file
This file will be used to show how to track changes in git.
Your commit message should look like this:
The first line if your message heading. It should explain what your are doing with this change. Then after the empty line you can put an optional message body, this should explain why you are making this change to your project. Adding details explaining why you made a change will help you and other developers remember important information down the road when maintaining projects long term.
Now that we have staged our change and added a commit message, we are ready to commit. Hit the “Commit” button. The index.js file will be committed to your repository with your commit message. To prove that the change was added to your commit history. Type the following command into your terminal:
git log
This command shows you the commit history for the repository. You should see output similar to the following:
git log
commit 8a9c0d0d4d8884717aeb5638d809d501e1ed478f (HEAD -> main)
Author: <your name><your email>
Date: Sun Sep 25 06:51:06 2022 -0700
Add index.js file
This file will be used to show how to track changes in git.
commit 4672d56a741b9063f79771dcca46def257aef54f
Author: <your name><your email>
Date: Wed Sep 7 07:23:08 2022 -0500
Initial commit: added package.json
Here we can see our two commits we have made to this project, one to add the index.js file and one to add the package.json. If this is your first time committing a change using VS Code, congratulations 🎉. While it is a good skill to be familiar with using git commands in a terminal, in my day to day work I generally use VS Code for typing out my commit messages and committing changes projects.
Here is an updated diagram of our commit history looks like at this point:
With each commit, we add another ‘checkpoint’ to the repository that we can use to jump back and forth to different points in the project’s commit timeline. To show you what I mean, let’s make another change to the project and commit it. In your terminal, install the axios dependency to our project like we did last chapter:
npm install axios
Once the command finishes installing axios you may notice something a little crazy about the number that pops up:
Dang, over 100 changes? All we did is install axios, why is the number so high? Well, like we saw in chapter 2.1, when you install axios it installs a bunch of other files with it. These files all get stored in a directory called node_modules. Git allows us to bundle as many file changes as we want into a single commit. So let’s commit these files to our project.
Click on the source control icon. You will see a huge list of files show up in the sidebar:
Let’s stage all of them by selecting the ‘+’ button next to the “Changes”. This way you don’t need to click each and every file to add it to the same commit:
Once the files have been staged as part of the commit, add the following commit message in the text box above the commit button (remember to add the empty line between the first and second lines):
Add axios dependency
This will allow us to make requests over the internet.
Finally commit the change by clicking the “Commit” button. You should see the huge list of files disappear from the sidebar. If this is your first time committing over 100 files to a git repository, congra…. Wait, sorry I have something to confess to you. We actually shouldn’t have committed all of those files to our project, we actually only needed like two of them. That was a MISTAKE, and you just soiled your precious git history with a bad commit 🙀. A bad commit is a commit which introduces either a bug in the code or adds files that should not be tracked as part of the project. I’m so sorry to have mislead you, but I have a way to fix this using the power of the git reset command. The reset command allows you to go back to a specific point in your commit history so you can fix any bugs that you introduced. We are going to reset our history so that we do not commit all of those files that we don’t need.
Run the following command in your terminal:
git reset HEAD~1
To explain what this command is doing, let’s take a look at our commit history before this command was run:
The last commit we added to the timeline, add axios dependency, is our bad commit that we want to fix. Because it is the most recent commit in our timeline, it is also known as the HEAD commit. We want to reset our timeline to the commit just before this one, which we do using the HEAD~1 The number 1 tells git we want to go back one commit in the timeline. This number can be as high as the number of commit in the timeline. You can also replace the HEAD~1 with a commit sha to jump back to a specific commit in the timeline.
Once you run this command, you will notice the files show back up in the sidebar, just as they did before we made the commit:
Now that we reset our timeline, we actually don’t want to commit most of these files. Why? Those files in the node_modules directory are managed by the developers who work on the axios library. We don’t ever expect to touch any of the code inside of them, so we don’t want to use Git to track them, since it makes it harder for us to keep track of our own code. In this example, the only changes we do want to commit are the package.json and the package-lock.json file, since this helps us track information about our personal project that will change over time.
Ok… so it’s kind of annoying having all of these files show up when we know we don’t want to track them, is there a way to like, ignore them so they don’t show up? Turns out this is such a common problem that git lets you add a special file called .gitignore. You can put this file in your repository and tell git about any files or directories that we want to ignore. Let’s add that file to the project by typing the following command into the terminal:
code .gitignore
This will open a file in VS Code called .gitignore. Add this line to the file:
node_modules
Now save the file. You will see that the list of files in the VS Code sidebar has changed from over 100 files to just 3:
Awesome, now we can make sure to only commit the files we actually want to track. Stage all of them by selecting the ‘+’ button next to the “Changes” row. Then lets retype our commit message:
Add axios dependency
This will allow us to make requests over the internet.
Finally, commit the 3 files. If this is your first time fixing up a bad commit, congratulations! 🎉 You now have more experience with Git than most college freshmen.
Tracking changes to existing files
Ok, so we’ve seen how to add files so git can track changes to them. Now I want to show you how to use git to track changes to existing files to make your life as a developer much easier. Let’s update our index.js file to use axios to make a call over the internet:
Here we are actually making a call to google.com and then printing out all of the HTML contents to the terminal (more on HTML in part 3 of this book). The code isn’t super important right now, what we want to focus on is the diff introduced by this change to the code. In programming terms, a diff is used to show what a file looked like before and after a change was made to it (I believe it is short for ‘difference’, but developers always use the term diff). In the VS Code file window, you should notice a green line and a blue line have showed up next to the code:
Green lines show that VS Code detected new lines were added to the file. Blue lines show VS Code detected lines that were modified. You can click on either of these lines to show how the file looked based on the last commit:
Here the code in red shows what the file looked like before we made changes, and the code in green shows the lines that replaced the previous code.
You can also view a side-by-side comparison by clicking on the file in the source control sidebar:
The important thing to remember is the red shows what lines are being replaced, and the green shows the lines that are replacing the red lines. Go ahead and stage the change and add whatever commit message you want. This is what I used for my commit message:
Calling google.com using axios
Now all your base are belong to us
Once you have added a commit message, commit your change. This is what my final commit history looks like from this exercise:
We have added four commits together, plus reset a commit to fix stuff. If this is your first time working with version control, congratulations! 🎉 You now have more experience with Git than most college freshman.
Final Thoughts
At the end of the day, code is a bunch of lines put together to perform tasks, and all it takes is one line having a bug to break the other 10,000. This is why version control is such an important tool for you to use as a professional developer. We barely scratched the surface of all the features that Git offers. You can read more about Git at https://git-scm.com/docs or search for Git tutorials.
Remember, version control helps you find bugs sooner by separating changes to a project in bite size chunks. It also helps you remember the reasons why you made the changes you did throughout the history of your project. Finally, and most importantly, it allows you to give yourself checkpoints of working code so you can reset your project back into a working state should you introduce a bug. In the next chapter, we are going to talk about another tool we can use to catch bugs before they become a problem, unit tests!
Chapter 2.4: Write Code to Test your Code (Test Driven Development)
If You Don’t Write Tests… Your Code is not Interesting
Imagine you are working on a construction job that is building a skyscraper 🏙. You are 100 stories up and trying to put up some walls. What kind of safety equipment do you think you would need to have? Maybe a cable to keep you attached to the building in case you accidentally fall? Maybe some protective glasses to keep stuff out of your eyes? The point is you would have safety equipment so you can worry less about being injured and focus more on getting the job done.
Software development is no different
You may not have to worry about physical injury, but you do have to think about the damage that can be done if you introduce a bad change to your code. If you were working for a company, and you accidentally broke something by introducing a bug, it could end up costing them over thousands, tens of thousands, or even hundreds of thousands of dollars depending on how bad the bug is. These are called outages and as a software developer you should avoid these at all costs. Just like a construction site, software developers have safety tools ⛑ to help us avoid costly accidents. The biggest safety tools we have in our belt include Unit Tests and Integration Tests. In this chapter, we are going to walk through what these tests are and how to write them.
What is a unit test?
A unit test is code that you write to test a unit of code written within the program. You could ask many different developers what a “unit” means to them and you will probably get many different answers. If you were to ask me, as a general rule of thumb:
Every condition within your program should have a unit test proving that condition works as expected.
What do I mean by that? Anytime you have if, else if, or else statements in your program, you should have a unit test for each of those conditions where the condition is made true so you can test those lines of code. You also should have a unit test for any exception that you know could occur to make sure your code handles the exception correctly. If you go by this guideline, a unit can be defined as a group of lines of code that follow a particular conditional path in your program.
A unit test has three important parts to it that we will discuss in this chapter. At a high level those phases are:
Test setup
Some tests require you to simulate a real world scenario in order to make certain conditions occur in your code. You simulate this scenario using test setup. This includes creating test data and mocking certain parts of your code. We will see an example of this in a minute.
Test execution
This involves actually running your code that you want to test. At a bare minimum, anytime you have a public function in your code, you should be calling that function with at least one unit test.
Test Verification
After you run the code, you make assertions on what the program did to make sure it behaved the way you expected. An assertion is code that checks the outcome of a test using a boolean condition. Again, we’ll see an example of this when we write some tests.
Writing your first unit test
For our example, we are going to make a sentence translator. This simple program will translate any sentence into the equivalent Australian, Canadian, or Californian sentence. We are going to test our code using a common JavaScript testing library called jest. This is an open source testing library developed by Facebook.
First, in your terminal create a directory called translator inside of your codebro directory.
mkdir translator
cd translator
Then you are going to create a package.json file in your directory. As we discussed in chapter 2.1 this file will be used to save our project dependencies.
code package.json
Paste the following into your package.json file then save the file:
After this is set up, you will need to install the two testing libraries into your translator project, run the following command:
npm install jest --save-dev
In case you’re wondering, the --save-dev option tells npm that this is a developer dependency. This means that this library should not be included with your project when running on a server. The reason we do this is because this is a testing library. It is used to test code while we are developing it, not when it is running in a production environment. Keeping this testing library in our dev dependencies makes our final production package much smaller which can improve the performance of our final application.
Confirm you now have a node_modules directory in your project using the ls command:
ls
# output should show files similar to this
node_modules package-lock.json package.json
Next you need to create a translator.js file where we will put our translator logic:
code translator.js
Here is the code we want to add to our translator.js file and then save the file:
Pretty awesome translator, right? (Slight disclaimer: I am not Australian, Canadian, or Californian so these translations may or may not be accurate). You will notice that we have three functions, one for each translation type. We export each of these functions in the module.exports section.
Now it’s time to test it. Go ahead and create a test directory and a test file in that directory. Make sure you name the directory test, since jest runs all tests in the test directory by default:
mkdir test
cd test
code translator.test.js
Notice the test file, by convention, matches the name of the file it is testing followed by .test.js. This helps you figure out which file is testing what. Once you have your test file open, add the following testing code:
CHECKPOINT
const {
translateSentenceIntoAustralian,
translateSentenceIntoCalifornian,
translateSentenceIntoCanadian,
} =require("../translator.js")
test("should translate the sentence into Australian.", () => {
lettestSentence="Hello"letresult=translateSentenceIntoAustralian(testSentence)
expect(result).toBe("Crikey mate, Hello")
})
test("should translate the sentence into Canadian.", () => {
lettestSentence="Bonjour"letresult=translateSentenceIntoCanadian(testSentence)
expect(result).toBe("Bonjour eh")
})
test("should translate the sentence into Californian.", () => {
lettestSentence="What's up"letresult=translateSentenceIntoCalifornian(testSentence)
expect(result).toBe("Dude, What's up man")
})
So, there are a couple of new keywords here used by jest. Let’s walk through this code together:
Above here we are importing our translator functions into the test file so we can call, or execute, the functions in our tests.
test("should translate the sentence into Australian.", () => {
In case it’s not obvious, the test keyword is used to create a unit test in jest. It is a special function that takes two arguments. The first argument is the name of the test. The name should make it easy to tell what the test is checking for. The second argument, () => {, is an inline function where we write the actual unit test code.
These are the three parts to a unit test I was talking about earlier: test setup(let testSentence = "Hello"), test execution (let result = translateSentenceIntoAustralian(testSentence)), and test verification (expect(result).toBe("Crikey mate, Hello")). The test setup for this test is creating a test sentence that we will pass into the translator. The test execution for this test is calling the Australian translator function with the test sentence and saving the test result in the variable result. Finally the test verification for this test is asserting the the result is equal to our expected sentence. We use the expect function from jest. You can basically read this part like English
That’s the basic outline of a unit test, notice the three parts of the test are separated from each other by a blank line. This helps developers to see what part of the testing code is doing what. That may not seem important now, but when you start writing more complicated unit tests it helps you keep track of the testing logic. Sometimes a unit test may not require any setup, and you will just have the test execution and verification.
This test file has three unit tests, one for each function we exported from the translator file. Once you have the code typed in the file and saved the file, let’s go ahead and run the tests. To do this, run the following command:
npmtest
This will use jest to run your unit tests. You should see output to your terminal similar to the following:
If this is your first time writing and running unit tests, congratulations! 🎉 These are some contrived tests but they do outline the basic concepts of unit testing.
Test Driven Development (TDD)
In programming, there are certain practices which everyone says are good but very few developers actually do them. Test Driven Development, or TDD for short, is one of those practices. The concept of TDD is actually really simple, you should write your tests first before your actual program and use your tests to guide you. In other words:
your tests drive the development of your code by describing what your code is trying to accomplish.
There are 4 steps to TDD:
Write new test and make sure it fails. (RED)
Write simplest solution to get the test to pass. (GREEN)
If needed, repeat steps 1 and 2 for any other features you need to test. (RED -> GREEN)
Once you’re done adding new tests, clean up, or refactor your code without letting the tests fail. (Keep it GREEN)
Let’s walk through these steps using another coding example. In our last example, if you were following Test Driven Development we would have written the tests first. Let’s add some more features to our translator code using the TDD approach.
Imagine your manager tells you:
“we need a new feature for this translator, it should be able to translate a sentence into southern. The way it does that is by removing all of the spaces between the words of the sentence. We need it done by yesterday.”
Think we can do that? Let’s tackle it using TDD. First we need to write a new unit test. The test should verify that the southern translator method removes all the spaces. Here’s an example of what that unit test could look like:
test("should remove spaces from southern sentence.", () => {
lettestSentence="That really burns my grits!"letresult=translateSentenceIntoSouthern(testSentence)
expect(result).toBe("Thatreallyburnsmygrits!")
})
This looks like a reasonable test, it checks that when a sentence is translated into southern, all the spaces are removed, which is what our manager asked for. Go ahead and add this test in the translator.test.js file.
After the test has been written, the next step is to run your tests… “but wait, we haven’t even written the function translateSentenceIntoSouthern yet, won’t the test fail if there is no code?” YES! And that is exactly what we want. Remember step 1:
Write new test and make sure it fails. (RED)
So run the tests and you will see that the new tests fails:
Not the best solution, but is was the simplest solution I could think of for now to get the test to pass. We will refactor it later on. Remember to add the new function to your exports:
Write simplest solution to get the test to pass. (GREEN)
Let’s review step 3:
If needed, repeat steps 1 and 2 for any other features you need to test. (RED -> GREEN)
For our example, we don’t really have any other features to add, but if we did, this would be the time to add more unit tests that fail at first and then write code to get them to pass.
Time for the last step:
Once you’re done adding new tests, clean up, or refactor your code without letting the tests fail. (Keep it GREEN)
I wasn’t really happy with my first solution to the southern translator. I think I can make it much cleaner using a regular expression. Regular expressions let you define patterns that you can look for in strings and replace them with other strings. They are also useful for finding things (like spaces for example) and removing them. After looking up a solution on stack overflow, I found we can update our southern translator method to use the following code instead:
The replace function uses regular expressions to replace any characters in a string that you tell it to with something else. Here we tell it to get all the spaces in the sentence and replace them with nothing ('' has no character between the quotes). Here is the link to stack overflow if you want to read more about it: https://stackoverflow.com/a/6623263
Now that we have refactored the code, let’s rerun the tests to make sure we didn’t break anything:
Great, the tests are all still passing. This helps give us confidence that our code still works the way we expect even after making that change.
If this was your first time adding a feature using the TDD process, congratulations! 🎉 Even though this was a simple example, if you are able to apply these concepts in any of your projects you will find that your code will be much less prone to bugs and you will actually be able to finish adding features much quicker instead of trying to figure out why stuff isn’t working. Don’t get me wrong, you will still have to work through issues with your code, but you will have a better understanding of where you are trying to end up.
Often developers find that they are not sure what they are testing for… this is a sign that you do not fully understand the requirements of the code (i.e. what is the problem you are actually trying to solve). If that is the case, you shouldn’t be writing code until you get that figured out! Or you will end up with a steaming pile of 💩 (many ‘professional’ developers still don’t get this… which is why we have so much garbage code in the industry. Figure out what you want before hacking together a solution).
Obviously there are exceptions to this, such as when you are working with a new language or library and are trying to figure out how it works so it is difficult to write tests for your program. In those scenarios I recommend you create a proof of concept (poc) in a separate file before adding any code to your actual project. A proof of concept is code written to show that a new idea or technology can be successfully used in a project but is not actually added to the project itself. You should prove out your ideas in a separate file first, then once you have a better grasp on the technology, add unit tests to the project before adding any production code to the project. In this context, production code refers to the code in your project that runs the final product used by your users.
Alright, onto the more interesting bits of unit testing.
Mocking and Awkward Collaborators
So far in our testing example, our translator code has been pretty simple compared to actual projects. Many projects use code written by others that you cannot test. To see what I’m talking about, suppose your manager comes in with another request:
“we need another feature for this translator, but this one is a little more complicated. When translating a sentence into Australian we want our translator to say “G’day mate,” before the sentence if the time is between 6 am and 7 pm, else it should just say the usual “Crikey mate,” like it does already. We need this done by last week.
Man, where are they getting these translations from?! Oh well, a job’s a job. Luckily for us we can use the TDD approach to tackle this problem.
So this feature introduces a new problem for us that we haven’t had up to this point… tracking time. Turns out this is a really, really difficult problem to write code for. Fortunately for us, someone has already done it. We can use the Date object to get the hour of the day. Here is an example of how to do that:
The Date class is a built-inclass, meaning it is included as part of Node.js itself and you don’t have to import any modules to use it. It has a method, getHours that will return a number 0 - 23 depending on what hour of the day it is when the program runs.
Great so now that we know how we can solve this problem, let’s write a test that shows we translate the expected Australian sentence. Here’s what that test looks like:
test("should say g'day mate when translating Australian sentence in daytime.", () => {
lettestSentence="Let's go for a walk"letresult=translateSentenceIntoAustralian(testSentence)
expect(result).toBe("G'day mate, Let's go for a walk")
})
Go ahead and add this test to the test file. If you already see the problem with where this is going, congrats you’re ahead of the crowd 🥳. Either way I’m going to walk through the TDD steps so everyone can see the issue.
Run the tests and the new one should fail:
npmtest>translator@1.0.0test>jestFAILtest/translator.test.js
✓ shouldtranslatethesentenceintoAustralian. (3ms)
✓ shouldtranslatethesentenceintoCanadian. (1ms)
✓ shouldtranslatethesentenceintoCalifornian. (1ms)
✓ shouldremovespacesfromsouthernsentence. (1ms)
✕ shouldsayg'day mate when translating Australian sentence in daytime. (6 ms)
● shouldsayg'day mate when translating Australian sentence in daytime.expect(received).toBe(expected) // Object.is equality
Expected:"G'day mate, Let's go for a walk"Received:"Crikey mate, Let's go for a walk"43|letresult=translateSentenceIntoAustralian(testSentence)
44|>45|expect(result).toBe("G'day mate, Let's go for a walk")
|^46| })
47|atObject.toBe (test/translator.test.js:45:18)
TestSuites:1failed, 1totalTests:1failed, 4passed, 5totalSnapshots:0totalTime:0.548s, estimated1sRanalltestsuites.
Ok we expected this failure, it still says “Crikey mate” instead of “G’Day mate” because we haven’t changed the code yet. Let’s go ahead and add code to the Australian translation method:
And your test file should look something like this:
CHECKPOINT
//translator.test.js
const {
translateSentenceIntoAustralian,
translateSentenceIntoCalifornian,
translateSentenceIntoCanadian,
translateSentenceIntoSouthern
} =require("../translator.js")
test("should translate the sentence into Australian.", () => {
lettestSentence="Hello"letresult=translateSentenceIntoAustralian(testSentence)
expect(result).toBe("Crikey mate, Hello")
})
test("should translate the sentence into Canadian.", () => {
lettestSentence="Bonjour"letresult=translateSentenceIntoCanadian(testSentence)
expect(result).toBe("Bonjour eh")
})
test("should translate the sentence into Californian.", () => {
lettestSentence="What's up"letresult=translateSentenceIntoCalifornian(testSentence)
expect(result).toBe("Dude, What's up man")
})
test("should remove spaces from southern sentence.", () => {
lettestSentence="That really burns my grits!"letresult=translateSentenceIntoSouthern(testSentence)
expect(result).toBe("Thatreallyburnsmygrits!")
})
test("should say g'day mate when translating Australian sentence in daytime.", () => {
lettestSentence="Let's go for a walk"letresult=translateSentenceIntoAustralian(testSentence)
expect(result).toBe("G'day mate, Let's go for a walk")
})
When we run the tests… we find something interesting:
If you are running these tests between 6 am and 7 pm, the new test is now passing, but our original test that checks for ‘Crikey mate’ is now failing. If you happen to be running this code after 7 pm and before 6 am, the new test will still fail and the original one will pass.
We now have a huge problem… our new test only passes if you run it at a certain time of day, and our old test fails whenever the new one passes because it is checking for the opposite case 🤦♂️. We need tests for both, since our manager clearly said it should say one or the other depending on the time of day. So how can we write opposite tests that pass at the same time of day!
My friends, this is where the wonderful world of mocking comes into play.
When talking about unit tests, mocking is the process of replacing code that you cannot or should not test with a mock. A mock is a replacement for real code that is used to control behavior in your code in order to test your logic. It is best practice to only mock what are known as awkward collaborators. An awkward collaborator is anything that performs an action which cannot be controlled using your code. In other words, they can behave differently and have different results even when your code looks exactly the same.
Let’s take this example of time ⏱, time is an awkward collaborator since it continues to change even though your code stays the same. Any code that works with time should be mocked when testing because you cannot control it.
Other common awkward collaborators include:
code that generates random values
code that makes calls over the internet
code that creates, updates, or deletes files
This is the cardinal rule of testing: Your tests should be controlled in a way that if your code does not change, your tests should always keep passing if they were passing before.
I repeat:
Your tests should be controlled in a way that if your code does not change, your tests should always keep passing if they were passing before.
Now that we have identified that time is an awkward collaborator that needs to be mocked, how do we actually mock something? In our case, we need to mock the Date object that is getting the hour of the day. jest has a special function used to mock code called jest.fn. We can use it to fix the hour of the day to be the same every time the test is run, no matter what time it actually is when the test is run.
Let’s add the following code to our new unit test so that the mock time is always set to 6 am when the test is run:
test("should say g'day mate when translating Australian sentence in daytime.", () => {
constmockDate=newDate()
mockDate.setHours(6)
jest.spyOn(global, 'Date').mockImplementation(() =>mockDate)
lettestSentence="Let's go for a walk"letresult=translateSentenceIntoAustralian(testSentence)
expect(result).toBe("G'day mate, Let's go for a walk")
})
Walking through the new mock code:
constmockDate=newDate()
mockDate.setHours(6)
Here we create a variable called mockDate which is an instance of Date. We then set the hour of the date to always be 6, no matter what the time actually is. Then we have this line:
Alright, we have a lot of concepts packed into this one line 🤔. Let’s take it slow and break it down. jest.spyOn is a special function used to track a specific piece of code. The first parameter to jest.spyOn() is the object that contains the method or property that you want to mock, and the second parameter is the name of the method or property. In this case, because Date is a built-in class, we use the special global object as the first parameter. This tells jest that you are mocking code that is included in Node.js. The second parameter, 'Date', tells jest you are mocking the Date constructor (jest expects this parameter to be a string, so you always put ‘’ around it).
After we tell jest what code we want to track, we then tell it how we want to mock it using the .mockImplementation() method. This method takes an inline function that is called in place of the real code. This means when we create the date object (const date = new Date()) in our code, jest will use our mockDate instead of the real time. This way when we run the test our code will execute the code path that adds the phrase G'day mate since the code will see that the time is 6 am.
We also need to mock the time for our original Australian translator test so that the translator says ‘Crikey mate’ instead of ‘G’day mate’. Let’s update the first original Australian test with this new setup:
test("should translate the sentence into Australian.", () => {
constmockDate=newDate()
mockDate.setHours(2)
jest.spyOn(global, 'Date').mockImplementation(() =>mockDate)
lettestSentence="Hello"letresult=translateSentenceIntoAustralian(testSentence)
expect(result).toBe("Crikey mate, Hello")
})
This time, we are mocking the time to set the hour to 2 am. This will allow us to test the else block in our code. The name of this test should be changed to be more specific, 'should translate sentence into Australian.' is too generic, because we have more than one test checking for that now, let’s rename it to something like 'should say crikey mate when translating Austrailian sentence at night.'.
One more thing… whenever you use mocks, you need to make sure to unset the mock behavior after each test finished so your mock behavior doesn’t accidentally cause other tests to fail. This is the second rule about mocking: When you create a mock for a test, do not let that mock behavior impact other tests! Mocks should be isolated to each test where the mock is needed.
Fortunately for us, jest provides an easy way to do this. It looks like this:
afterEach(() => {
jest.restoreAllMocks()
})
afterEach is a special jest method that jest runs after each test finishes (there is also a beforeEach method that you can use to run common setup code before each test starts). We can use it to unset any mock behavior that we set using jest.spyOn() by calling the jest.restoreAllMocks() method.
I should point out that is this just one of many ways to create mocks in your tests. There are other ways that use different keywords, and every testing library is different. We will see examples of some of those other ways when we get to the project at the end of part 2. As you gain more experience with unit testing, you will find your preferred way of mocking.
Go ahead and add this afterEach code in your test file (it usually goes above all of your tests). Once you have made these changes, your test file should look something like this:
CHECKPOINT
//translator.test.js
const {
translateSentenceIntoAustralian,
translateSentenceIntoCalifornian,
translateSentenceIntoCanadian,
translateSentenceIntoSouthern
} =require("../translator.js")
afterEach(() => {
jest.restoreAllMocks()
})
test("should say crikey mate when translating Austrailian sentence at night.", () => {
constmockDate=newDate()
mockDate.setHours(2)
jest.spyOn(global, 'Date').mockImplementation(() =>mockDate)
lettestSentence="Hello"letresult=translateSentenceIntoAustralian(testSentence)
expect(result).toBe("Crikey mate, Hello")
})
test("should translate the sentence into Canadian.", () => {
lettestSentence="Bonjour"letresult=translateSentenceIntoCanadian(testSentence)
expect(result).toBe("Bonjour eh")
})
test("should translate the sentence into Californian.", () => {
lettestSentence="What's up"letresult=translateSentenceIntoCalifornian(testSentence)
expect(result).toBe("Dude, What's up man")
})
test("should remove spaces from southern sentence.", () => {
lettestSentence="That really burns my grits!"letresult=translateSentenceIntoSouthern(testSentence)
expect(result).toBe("Thatreallyburnsmygrits!")
})
test("should say g'day mate when translating Australian sentence in daytime.", () => {
constmockDate=newDate()
mockDate.setHours(6)
jest.spyOn(global, 'Date').mockImplementation(() =>mockDate)
lettestSentence="Let's go for a walk"letresult=translateSentenceIntoAustralian(testSentence)
expect(result).toBe("G'day mate, Let's go for a walk")
})
Running your tests, you should see that they all pass now:
npmtest>translator@1.0.0test>jestPASStest/translator.test.js
✓ shouldtranslatethesentenceintoAustralian. (6ms)
✓ shouldtranslatethesentenceintoCanadian. (1ms)
✓ shouldtranslatethesentenceintoCalifornian.
✓ shouldremovespacesfromsouthernsentence.
✓ shouldsayg'day mate when translating Australian sentence in daytime.TestSuites:1passed, 1totalTests:5passed, 5totalSnapshots:0totalTime:0.427s, estimated1sRanalltestsuites.
If this is your first time mocking time ⏱, Congratulations! 🎉 You are now able to write tests that check different time conditions in your code at the same time.
Remember the last thing we need to do now that the tests are passing is to refactor our code and make sure the tests still pass. In this case, the only thing I really see worth cleaning up is this if conditional:
if (currentHour>=6&¤tHour<19) {
We should label these numbers to make it easier for developers to read. Let’s add two constants, SIX_AM and SEVEN_PM and use them in place of the numbers in our conditional:
constSIX_AM=6constSEVEN_PM=19
if (currentHour>=SIX_AM&¤tHour<SEVEN_PM) {
This makes it easier to read what the condition is checking for so it is a good refactor. After you make this change your translator file should look like this:
Run your tests one more time and make sure they still pass:
npmtest>translator@1.0.0test>jestPASStest/translator.test.js
✓ shouldtranslatethesentenceintoAustralian. (5ms)
✓ shouldtranslatethesentenceintoCanadian.
✓ shouldtranslatethesentenceintoCalifornian. (1ms)
✓ shouldremovespacesfromsouthernsentence.
✓ shouldsayg'day mate when translating Australian sentence in daytime.TestSuites:1passed, 1totalTests:5passed, 5totalSnapshots:0totalTime:0.415s, estimated1sRanalltestsuites
Nice work, you’ve added the needed features for the translator using TDD. If the concepts around mocking seem a little confusing for now, don’t sweat it 😓. We will be walking through plenty of examples of mocking at the end of part 2 when we add unit tests to our choose your own adventure game.
Debugging your Code with Breakpoints
While we are on the subject of unit testing, there is one skill in particular that is nice to know when you are working with complicated code, and that is how to use breakpoints. Breakpoints are a feature provided by most IDEs you can use to walk line by line through your code while it is running so you can see the results of each line. This is useful for debugging, or finding the problems in your program’s logic so you can fix them.
VS Code actually has a plugin extension for running jest tests in debug mode called Jest. Click on the extensions button in VS Code (The one with the four squares) and search for Jest. It should be one of the first options that pops up:
Install the plugin and then open your translator directory in VS Code (make sure your terminal is in your codebro directory before running this command):
codetranslator
Once the new window pops up, you will notice a new science beaker button has shown up on the side bar, click on it:
You can then run your unit tests by clicking on the play button. Tests that pass will show up green, any tests that fail will show up red (click on the drop-down arrow to show all the tests).
We are going to add a breakpoint to show you how you to walk through code line by line. Open your translator.js file in VS Code and find the line of code that says const date = new Date() (line 5 if you followed the checkpoint). Click between the line number and the sidebar so that a red dot shows up like this:
This red dot is your breakpoint. If you run the tests in debug mode the code will pause on this line. Let’s go ahead and do that now. Go back to the test menu by clicking the science beaker. Then hover your cursor over the test until you see a little bug icon. Click the button to start debug mode:
You will see the code stops at the breakpoint and highlights the line of code:
From here, you can use the debug bar to walk through line by line:
I will briefly cover what some of these buttons do. The first “continue” button (play icon) will cause the code to continue running until it hits another breakpoint. The second “step over” button (arching arrow icon) will cause the code to go to the next line. The “step into” button (down arrow icon) will force the debugger to go into a function if the line is calling another function. The “step out” button (up arrow icon) will force the code to exit the current function to wherever the function is being called from. The “restart” button (the green circle arrow icon) will restart the code from the beginning (go figure).
I’m not sure what that last button does… I don’t really use it 🤷♂️. Feel free to try it out I guess.
As you step through the code, you can see what the variables are being set to on the left side bar. This lets you check to make sure the values match what you would expect for your test. Most of the time when you are debugging, you will find that the problem is caused by one of your variables is not being set like you think it is, or your conditions in your if statements may be incorrect:
And that covers the basics of debugging. You can learn more about debugging and VS Code through other online tutorials if needed. Other languages and IDEs will have their own way of debugging, but most of them are similar to this process.
Integration Tests
Unlike unit tests, which can be used to test all kinds of code. integration tests are specific to the web and mobile development industries (there may be other industries that use them, but I personally have only seen them used there). I want to briefly introduce the basic concept here, and the concept is this: integration tests run actual web or mobile apps that make real calls over the internet to other systems to make sure the code integrates, or plays nicely, with all the other moving parts in the real world. These tests are run before you release or publish your code changes to your customers to start using. Integration tests are a critical tool for protecting bad code changes from impacting your web or mobile app customers. There are many different libraries you can use to write integration tests, and every team has a different way of doing them, so you will likely adopt whatever pattern your team is using or do your own research.
Final Thoughts on Software Testing
The difference between a professional software developer and a mediocre developer is not so much about their intelligence as it is their process, or the tools and steps they use to complete their work. Your process for not only delivering a feature to the customer, but actually making it safe for other developers to work on the code with you, will define your reputation as a developer worth working with. Many people can write code the “works” the first time you use it, that’s not the hard part about this job. The hard part about this job is keeping the old code working while constantly adding new stuff to it.
Writing unit tests should be an essential part of your process. If you are developing professional code for a company or client, unit testing should not be considered optional (unless of course your client says they don’t want you wasting time writing tests, in which case I recommend you kindly hand in your resignation and find another job ASAP, since you are in for a world of pain trying to maintain projects like that long term).
Ok, I’m getting off of my soap box now 📦. Next chapter, we are going to dig into some deeper concepts around OOP, and then onto databases. Get ready to break your brain 🤯.
Chapter 2.5: Object Oriented Programming Part 2 - Inheritance and Composition
In part one of OOP, we looked at the basic syntax and concepts for creating classes, using constructors and adding methods. There are many techniques you can use to enrich your design when working with OOP. This chapter covers some concepts you need to be familiar with to hang with the cool kids 😎 and why using the right design patterns makes a difference.
For this chapter, we will be continuing where we left off in chapter 1.7, which means we will be working with the same school.js file. To make sure we start off in the same spot, run the following commands in your terminal
Windows:
cd ~\Desktop\codebro\oop
code school.js
MacOS or Linux:
cd ~/Desktop/codebro/oop
code school.js
With the file open in VS code, we are ready to talk about inheritance.
Inheritance
When talking about OOP, these are a couple of very important concepts you will hear about from developers, before I dive into the technical jargon, let’s start an example and then talk about it.
In OOP part 1, we had an example student directory program that had a student class with studentName, address, and phone properties. We now need the ability to add a directory of teachers as well as students. Teachers are a lot like students. They have a name, an address, and a phone number. But there is one key difference with teachers… teachers get paid to be stuck in school! So yeah they have a payment amount which our directory needs to track. Let’s write a class for our new teacher object type. Just like the Student class, we need to add a method to the Teacher class that prints their information with labels. Here’s an example of the Teacher class:
Man… this looks a lot like our student class. The only big differences are replacing the word student with teacher and adding a payment property. If only there was a way that we could combine the properties that were similar so we don’t have to retype the same lines multiple times…
Lucky for us, there is exactly a way to do that. It is called inheritance. Inheritance is a way to design your code so that classes inherit similar properties from a common class. In our case, both teachers and students are people, right (some teachers might be aliens in disguise, sure, but let’s not try to code that feature in for now 👽)? We can create a common class, called Person, which will hold all of the properties that are similar between students and teachers. Here is what that common class looks like:
There is one thing I want to point out in our Person class here. Notice everywhere we had the word student or teacher has been removed, in order to make the code more generic. This means the properties can apply to more than one type of object, so it can be used in more situations and still make sense.
This Person class is known as a parent class, or a super class in OOP terms. It is a parent because it is the common class that our Student and Teacher classes will inherit properties from. Any class that inherits from another class in known as a child class. In our example, both the Student and Teacher classes are child classes of the Personparent class.
Putting the common properties in this Person parent class means we don’t have as much duplicate code in our Teacher and Student classes. Let’s rewrite these classes so that they are child classes that inherit from the Person class:
This is our student class from before… but now we have added extends Person to the line. The extends keyword is used in JavaScript to tell the program you are creating a child class, it is immediately followed by the name of the parent class you are inheriting from, in this case Person. Let’s look at the whole Student class code:
Here is our Student constructor from before… but it’s much smaller with just one line. What’s up with the super function? Where did that come from? Remember how I said another name for a parent class is a super class? The super keyword tells the program you want to use the code that is written in the parent, or super class. In this case, all the constructor code we need is already written in the parent Person class, so we don’t need to write it again. We just call the constructor of our parent Person class and pass in the same values that were passed in to the Student constructor so the name, address, and phoneNumber get set as expected.
You may also notice that the printStudentInfo method has been completely removed. Why? The code has been written in the Person class as printInfo so we don’t need or want to have it written twice (Number one principle in writing good code: D.R.Y - Don’t Repeat Yourself). Now let’s take a look at the Teacher Class.
We call the super constructor super(name, address, phoneNumber) just like the Student class, but then we also have a line to set the payment property for that is specific to the Teacher class. This allows us to add more properties to our child class that we did not inherit from the parent class.
Next thing you might notice is the fact that the Teacher class has a printInfo() method in it. Because the method has the same name as the method in parent class, this is referred to as an overridden method, since its behavior overrides the behavior of the parent class method. Let’s take a close look:
Interestingly, the first line, super.printInfo(), is calling the printInfo code that is written in the Person super class, then the next line adds additional behavior, in this case to print out the payment information that is not a part of the Person class.
In OOP design terms, using inheritance allows you to define what is called an IS A relationship between classes. For example:
A student is a type of person.
A teacher is a type of person
Thinking about these relationships can help you organize your code in a way that is guided by the world you are trying to model. It can help you reason about how these classes should work together to achieve the goals of your program.
We have succeeded in moving the duplicate code between the two classes into one class. But… could we have done that another way without creating a parent class? Without using inheritance?
Composition
Unlike inheritance, where a child class inherits code from a parent class, composition is when you add code to a class by adding other classes to it. In this way, your class becomes composed of one or more other classes. Let’s take a look at our previous example using composition instead of inheritance:
These are pretty simple classes. UserInfo just holds basic information about a user, such as name, address, and phone. JobInfo holds basic info about a job, such as payment. Sound good so far? Here is where things really changed:
You will notice that we got rid of the Student and Teacher classes altogether and kept a single Person class. You may also notice that the constructor looks quite different, constructor(userInfo, jobInfo = null) {. What’s going on here? This is composition. The Person class is now composed of two other classes, UserInfo and JobInfo, which we pass into the constructor so it can have the code it needs to work.
The UserInfo is always required to be passed in, since a person must have a name, address, and phone to be registered in the system. However, not every person has a job at the school, so jobInfo does not always need to be passed in to create a person. The jobInfo = null tells the program that if a Person object is created without providing jobInfo, use a default value of null (null is a special keyword that means there is no value set for that variable. A default value is a value that is automatically set for a parameter if you do not provide one when calling the function. This helps us combine the Teacher and Student classes into one Person class.
You will notice we don’t get the name, address, phone, and payment values directly from a Person or Teacher class anymore. We are using the UserInfo and JobInfo classes to get that information. This is incredibly useful concept when designing software that can be more flexible to future changes. For example, Instead of tying, or coupling, the concept of a payment value directly to a Teacher class, we are creating a class that will take care of that responsibility for us. In this way, the Person class is now decoupled from the concept of a payment variable.
In OOP design terms, using composition allows you to define what is called a HAS A relationship. In this example of our school registry system:
A person has a job with JobInfo (payment)
A person has user info (name, address, phone number)
Looking at software design using these IS A and HAS A relationships, you can answer the question, “how am I going to model my code after the world I’m trying to create”?
Why do any of these design choices matter? Is it really that big of a deal if I use inheritance or composition as long as it gets the job done? If you want to make quality software that isn’t a pain in the butt to add new stuff to… YES! The best code is designed out of building blocks that can be easily moved and swapped throughout your program as needed. Let’s walk through some scenarios in just this simple example alone where this change of using composition will help us:
Let’s say we need to start tracking other types of employees in the school beside just teachers (ie principals, coaches, janitors, etc) each with their own unique properties in our program. With our previous inheritance design we would have to create classes for each of these employee types and figure out which class we need to move the payment variable into so that it could be used by all employees (a bit of a pain… but working people gotta get paid you know! 💰). With the composition approach we could just introduce a EmployeeInfo object and start passing that into the Person class.
Another scenario that is just as likely, let’s say we find out that half of the teachers in the school are actually aliens from other planets 👾, and you need to track certain information about them that is different from the human teachers (you know, like what galaxy they are from, the usual stuff 🛸). Unfortunately you still need to pay them so they need access to the payment variable as well as the human teachers. With the inheritance approach, this gets harder to pull off since you either have to have to add more parent classes to handle sharing the payment variable or have duplicate code between the two classes. With the composition approach, you can create a new Alien class and just pass in JobInfo class into it so it has access to payment information. The JobInfo class is now your building block to use with any class that needs to track payment information without having to tie a bunch of classes together through inheritance.
These examples may seem ridiculous, but they point out a harsh reality about code - when you work with code that is constantly changing, your design can either make it easy for you to add those changes, or it can make it painful.
As a general rule, your design should focus on composition over inheritance. There are many reasons for this, I’ll highlight a couple:
It is much easier to write tests for code that is using composition compared to inheritance, since you can more easily mock classes that are passed in a constructor (we will see an example of this at the end of part 2).
It allows you to design features without having to figure out a hierarchal structure that may have to be changed in the future to add more features.
This doesn’t mean you should never use inheritance. There are times where it makes sense to create a hierarchy of classes. Speaking from personal experience, I have used composition way, way more than inheritance in my OOP designs because it is much more flexible to changes. But inheritance is useful when you have classes that you want to enforce to all behave a similar way. Using inheritance you can set rules in your parent class that will make sure all the child classes are following the rules or suffer the consequences (just like a real parent does with their kids 🧒🥊).
Final Thoughts
Alright, I’m sure your brain is fried by now 🍳🧠. I think that’s enough coverage for OOP design theory. If later on you are wanting to do more research into advanced software design I recommend you search the internet for ’software design patterns’ and read up on things like ‘factories’, ‘singletons’, and ‘facades’ (among many others). These are patterns created by amazingly smart people and if you can get your head wrapped around the concepts, they can help you design and build efficient code. What we have covered in this book should be enough to get your through most smaller projects though.
In the next chapter, we are going to dive into one of my favorite technologies, databases, and why they are much better than using files for storing information.
Chapter 2.6: Databases Part 1 - Relational Databases
In part 1 of this book, we talked about how to use files as a way of storing information for a program. Using files is an easy way to get familiar with the concepts of reading and writing data, but you don’t often just use text or json files for data storage in a professional project. In this chapter, we are going to talk about the next level of storing information for programs using databases. Like the name suggests, a database is a place where data is stored and used by a program to read and write information.
Why use a database over files? Here are a couple of reasons I can think of off the top of my head:
It makes it easier for you to organize and move your data around. Think back to our game example, we had to have a separate file for each story page. If we were to create a long story, this could be hundreds of files we would have to keep in our folder. This becomes a beast to work with 🐲. With a database, all of the story pages could be stored in a single table (more on that word in a minute), so you wouldn’t need to create hundreds of files.
It makes it easier for you to make changes to your data. Back in our game example, imagine we had hundreds of pages in our story and we wanted to make a change to everywhere it had the option “go into the woods” to say “go into the forest”. With a database, you could make a query to find all of these options and then make the needed change.
It’s so, so much faster to read data from a database than a file. Databases are specialized to find data at insane speeds. Think about grocery stores that have millions of items to track. They need databases that can find the needed data as fast as possible in order to make as many sales in a day as possible.
There are of course many other reasons, but hopefully this is enough to show that when we are building real world applications, we generally need to use a database to store our information, rather than files.
Ok, great. So we want to use a database, but how do we do that? First of all, we need to talk about the different types of databases. There are two types of databases I am going to talk about, relational databases (this chapter) and document databases (in part 3). We’re starting with relational databases since they have been around longer. “How long?” You may ask. Let’s just get into our time machine⏳ and head to the 1970’s.
The Beginning of Relational Databases
The year is 1970. I’m not going to pretend to know anything about this year since it was over half a century ago (an eternity when talking about computer science technology). The one thing I can tell you is in this year a man named Edgar F. Codd published a paper titled "A Relational Model of Data for Large Shared Data Banks”. This paper was revolutionary to the world of data storage. In this paper he proposed how data could be organized using relationships in a way that models relationships of data in the real world (hmm… this sounds similar to the concept of Object Oriented Programming we discussed in chapter 1.7). He proposed organizing similar items of data into collections called tables. A table holds information about an entity. Tables are made out of rows and columns. A table column defines a particular attribute of the entity. A table row defines a particular record, or in other words instance, of the entity.
There are some similarities between relational database tables and object oriented programming (OOP). To help you wrap your head around this… you can think of entities like OOP classes. A row in the table is like an instance of the class, and the columns of the table are like the properties of the class.
As an example, let’s look back at the Person class we created in Chapter 2.4. In that example, the person class was used to hold information for a person in a school directory program:
Here we have a class with three properties: name, address, and phone. Now say we wanted to create a relational database that could save any person objects created by our program. We could create a person table that represents our Person class like this:
Let’s talk about the different parts of this diagram. Up top we have our table name, person. Below that you will see the letters PK, this stands for Primary Key, which is a really important piece when talking about relational tables. We will cover this concept later in this chapter. For now, note that person_id is the Primary Key, it is an integer (int), and it must not be null (NOT NULL) which is another way of saying you must always have a person_id for every person in your database.
Underneath that you will see our three column names: name, address, and phone. Each one is a string (TEXT here is the same as string in our JavaScript example). All three of these attributes must always have a value for every person in the database (NOT NULL).
Now that we have modeled our Person class in a relational table, let’s suppose we had a program that created three instances of the Person class:
If we were to store these three instances in a relational database, this is how it would look in our person table:
This is a screenshot from an actual relational database table I created, which I will show you how to create on your own in a minute. The main thing to notice here is we have three rows (labeled 1, 2, and 3).
We have our columns that show the different person attributes.
And in each cell, or individual rectangle, in the middle of the table we show the attribute values specific to each person record:
Ok… so what’s the big deal? We had all of this data in the JavaScript objects. What do we need this database table for? Well dear reader, one of the main benefits you get from organizing your data like this is you can query it, or in other words you can search for specific information. The way you query your database is through a language known as SQL (pronounced sequel, or s-q-l if you like to annoy me). This stands for structured query language, but nobody ever spells that out. All we care about is SQL is the language we use to get data from our database.
Creating your First Table
Alright, enough theory. Time to get your feet wet to help get these concepts to stick. We are going to create a relational database together with the person table I described above. We will then use some SQL to work with our simple three records from the JavaScript example. To throw you into this without scaring you off too much (you’re not nervous are you? 😬 DON’T BE NERVOUS!), we are going to use a program called “DB Browser for SQLite”, which gives us a decent graphical user interface to see our all of the data we will be working with in this chapter. This tool can be downloaded at https://sqlitebrowser.org/dl/.
If you are using Windows, you will likely want to select the option that says
DB Browser for SQLite - Standard installer for 64-bit Windows
Unless of course your computer is friggin’ old and is still using 32-bit. In which case you would select the DB Browser for SQLite - Standard installer for 32-bit Windows.
If you are a MacOS user, when I last checked they only had one download link on that page named DB Browser for SQLite
Just select the specific download for you computer type and install it. Once you have installed go ahead and open the app (note the colors on the app may be different than what is shown here, since I’m using the dark style):
In the top left corner you should see a button labeled New Database, click it:
The program will ask you what you want to save your database file as:
In this case, we will be creating a database to store school information, so call the file school.db. It doesn’t really matter where you save it, I just saved mine in my codebro folder to make it easier for me to keep track of. Once you create the file, the program will let you create a table:
Here we will create our person table. You can select the button labeled Add to add a new attribute to the table. Fill out the page here so that it looks like the following image:
Walking through what all of these settings mean, the first attribute is our person_id. It is a INTEGER type. NN means NOT NULL, which is what we want for all of our attributes. As mentioned previously, PK means Primary Key. A Primary Key is, or at least should be, a unique id that allows you to identify any row of your table so that you always have a way of tracking specific records in your database. The AI option means auto-incrementing. You often want to make primary keys auto-incrementing integers, meaning that they automatically increase as you add more records to the database. This means you don’t have to worry about telling the database what the value of the Primary Key should be when creating new records, it will figure that out for you. Finally, the U option means Unique. This enforces that every row in the table must have a unique person_id. If you try to add two people with the same person_id, the database will start screaming at you
“DUDE, YOU ALREADY HAVE A PERSON IN HERE WITH THAT ID! DON’T DO THAT BRO!”
Which is what you want it to do. Because if you ever use the same primary key value for two records, you have no way of knowing which record that id number really belongs to, and that’s bad. Why is it bad? As an example, imagine one of the student’s left the school and you needed to delete their record from the database. If their student id was the same as another student, you could accidentally delete the wrong student record.
Ok, the rest of the attributes are TEXT types and we just check the NN box since we don’t want any of them to be null. It’s worth noting that sometimes you want to allow attributes to be null if they are optional. For example, our person table could include an optional age column which doesn’t have to be specified for a person in the program but may be included.
Once you have filled in the table attributes select the OK button. You should now see that the main menu shows your person table, along with a bunch of other things:
If you are really curious, the sqlite_sequence table is used by your database to track your auto-incrementing numbers. You don’t need to mess with it. The other lines you see here: Indices, Views, and Triggers are advanced database concepts beyond the scope of this book. You can read up on them from other sources.
If this is your first time creating a relational database table, congratulations! 🎉 It took me over a year into my journey with software to get to this point.
With your person table created, we can now put some data into it. We are going to use SQL commands to do this. From this menu, select the button labeled Execute SQL:
From here we can put in some SQL commands to insert our person data. Here is the code you need to copy:
Paste these commands into the tool so it looks like this:
To briefly summarize what these commands are doing. The INSERT INTO keywords are used to insert new records into a table. In this case we are adding records to the person table, so we say INSERT INTO person. The ("name","address","phone") defines the order of the attributes that we will be putting in on the next line using the VALUES keyword. The VALUES keyword is how you set the attribute values for the record you are adding. Here we are setting the values from our JavaScript example.
To run the SQL commands you need to select the play button:
When you run this, you should see output near the bottom of the screen that looks similar to this:
Finally, to view the data in your table replace all of the previous SQL commands in the tool with the following:
SELECT*FROMperson;
Then run the command using the play button. After running the command your screen should look like the following:
The SELECT keyword is how you specify what data you would like to select out of the database. The * means everything, return all the attributes from the table. The FROM keyword specifies what table you are selecting the data from. In this case we are searching our person table, so we say FROM person.
If this is your first time inserting data into a table using SQL and then querying the table to see said data, congratulations! 🎉 You’re further along than many computer science college students. Next, we will discuss how to make our query commands more interesting.
Btw, if you ever close the DB browser app and then want to reopen it later. You will need to remember to open the school.db file you created earlier.
Querying for Specific Data
There is so much stuff we could talk about here. People have written massive +1000 page books that talk about all the things you can do with SQL. I’m going to try to boil down the most common SQL features in a few pages… and then if you want to dig deeper I highly recommend the internet.
The first thing I want to point out is there are many different flavors of SQL, meaning SQL has been around for so long many people have branched off of the original language and made their own variations of it. This includes things like PostgreSQL, MySQL, and many others. For the most part, these variations are so, so similar that once you learn the basic concepts of one it is usually easy to transition to the specific quirks of another. I’m going to try to keep these queries as generic as possible.
Alright ready to do some querying of our people here? To start let’s talk about how to grab specific columns in a table. So our last query we ran was this:
SELECT*FROMperson;
And I told you the * meant “give me all the columns from the table”. What if we only want specific data? We can replace the * with the names of the columns we want. Replace the previous query in the tool with this one:
SELECTnameFROMperson;
Then run the query using the play button, you should see something like the following:
Notice how the displayed table is smaller now. It is only showing the name column since that’s what we queried for. You can query for any columns in a table you want using a comma separated list, for example use the following query in the tool:
SELECTname,addressFROMperson;
Run it, and notice that the table shows the two columns we asked for:
In tables where you may have hundreds of columns, it helps to filter down to the specific attributes you want your program to work with.
So that is how to filter columns, but what about filtering rows? What if we only want to see records that match certain criteria? For that, we use the WHERE clause.
Put this query into the tool and run it. Notice that we only return one row this time:
What’s all this mumbo jumbo? Well if we look at the query we can almost read it like english.
Select the name and address of every person where the person’s name is like “Nihon “ followed by any characters.
The WHERE clause allows us to filter rows based on the criteria we set. The LIKE keyword can be used to do string comparison on an attribute. The % is a wildcard character, it is used to match any characters that may show up in text so you can search for specific text without having to know what the full text says (see https://www.w3schools.com/sql/sql_wildcards.asp). Though if you want to get specific, you could also search for exact matches:
If you run this query, you will see one person is returned whose phone number exactly matches this query:
Notice we don’t actually see the phone number in the results, since we only asked for the name and address columns.
There are many, many ways to use the WHERE clause to filter your data. I recommend reading up on it as you find the need to make specific queries.
Creating Tables with Relationships
So far, we have only been working with one table. That’s nice… but it doesn’t actually show you the PHENOMENAL COSMIC POWER that can be yours using a relational database. To show this technology’s TRUE, FINAL FORM (dang it, my caps lock and bold keys keep locking up for some reason…) we need to introduce a second table and have the two tables relate to each other using Foreign Keys.
For this database, suppose we wanted to keep track of classes and the students that were attending particular classes. We also want to know what time these classes start so we can show a student’s daily schedule. To keep our example simple, we will say every class in the school starts at the beginning of the hour, so we don’t need to track minutes. Let’s illustrate how these students and classes will relate to each other in our database using an Entity Relationship Diagram, or ERD:
We have introduced two new tables. Let’s talk about them first. The class table keeps track of our class data. Each class must have a class_id, to help us track classes in the database. It must also have a class_name, which is a text attribute. Finally, a class must also have a time, which we will store as an integer to show what hour of the day the class starts (using 24 hour time).
Next, we have the class_student table. This tracks which students are enrolled in specific classes. This table is known as a linking table or a join table, because it allows our database to join together information from multiple tables. You’ll notice this table has a primary key (PK) of class_student_id which is used by the database to track new records that are added to the table. Notice the two FK markers below this. The FK stands for foreign key. A foreign key is a primary key from another table that helps us uniquely identify a record from that table. In our example, the class_student table has two foreign key attributes, person_id and class_id. The person_id is a foreign key because it refers to the primary key of the person table. Likewise the class_id is a foreign key because it refers to the primary key of the class table. Having these relationships set up between students and classes will allow us to do some interesting queries once we put the data in.
The next thing I want to point out is the lines pointing from one table to the next. You may have noticed the funny fork looking shapes pointing into the class_student table:
These lines are known as crows feet, since I guess they kind of look like cartoon representations of bird feet. They are used to show the relationship between the tables. In this case, what we are seeing here is a one-to-many relationship. The best way to explain what this means is in English:
One class can have many class students
One person can be a class student inmany classes
We’ll dive more into relationships later in this chapter. For now, let’s actually setup these tables in this database.
Going back to the SQLite browser tool, let’s create the class table first. Click the Create Table button again:
Fill out the class table with the class_id, class_name, and class_time attributes:
Then select the OK button. Finally we will create the class_student table. Click the Create Table button one more time and fill out the class_student table so it looks like this (note you will need to widen the table window in the tool to see the Foreign Key section. For some reason, you have to double click on the foreign key section for the row to edit it):
The SQL snippet that is generated should look like this:
Notice it now includes two lines with FOREIGN KEY. This shows that an attribute in this table ("person_id") references an attribute from another table (the ("person_id") from the "person" table). If you can’t get the tool to add the foreign keys for whatever reason, you can just copy this SQL snippet and run it in the Execute SQL section of the tool that we used earlier.
Now that we have created our tables, let’s add some class data. Go to the Execute SQL section of the tool and run the following SQL commands (remember to hit the play ▶️ button after typing out the commands):
Since we are just using ids, it’s a little difficult to read which students are being enrolled and which classes they are being enrolled in. Normally, you would have code performing these SQL commands, so you don’t have to write out commands like this by hand. Once you run these commands we can start querying for the data we care about.
Let’s start off by showing the class schedule for all of the students. To do this, we are going to use a new keyword, INNER JOIN:
SELECT person.name, class.class_name, class.class_time
FROMclassINNERJOIN
class_student
ON class_student.class_id =class.class_id
INNERJOIN
person
ON person.person_id = class_student.person_id
Running this query returns the following data:
Name
class_name
class_time
Randy Tidilywinks
English 101
9
Randy Tidilywinks
Graphic Design 300
13
Randy Tidilywinks
Statistics 666
13
Joe John
Graphic Design 300
13
Joe John
Anime 9001
15
Nihon Jin
Anime 9001
15
Nihon Jin
English 101
9
I knew there was something strange about Randy… why else would he take that statistics class 👹?
Ok, looking over this query, we start by asking for the name of the student (person.name) the name of the class (class.class_name) and the time it starts (class.class_time). We use the FROM class clause to show we are starting our query from the class table. Then we start getting trippy:
INNERJOIN
class_student
ON class_student.class_id =class.class_id
Here we are performing a join. A join combines rows of data from two different tables using those foreign keys we talked about. Here, we are joining rows of data from our class table with rows from our class_student table where the class_id of a class equals the class_id for a class_student row. Once we have joined that data, we then bring the person table into the mix:
INNERJOIN
person
ON person.person_id = class_student.person_id
Here we are joining all of the rows from the person table where the person_id is equal to the person_id in the class_student table.
Now let’s try querying for all of the classes of a particular person, say Joe John:
SELECT class_name, class_time
FROMclassINNERJOIN
class_student
ON class_student.class_id =class.class_id
INNERJOIN
person
ON person.person_id = class_student.person_id
WHERE person.name="Joe John";
Here, we are only asking for the class_name and class_time, since we know the student name already. The join logic is the same, and then we add a filter condition:
WHERE person.name="Joe John";
Here, we are saying we only want to see the class_name and class_time if the person’s name is Joe John.
Through this example, hopefully you can start to see the power behind these table relationships. Using joins you can quickly search through millions of rows of related data and query for all kinds of information. Relational databases are the technology that have driven the world of software for decades and are still going strong. Now let’s talk about the different types of relationships you can create using relational databases.
Types of Relationships
Human relationships may be complicated 💔, but fortunately database relationships are more straightforward. Here I will cover the most standard types.
one-to-one: This is the most simple relationship to understand. One record in one table relates directly with another record in another table. Example: A person has one passport, and a passport can only be owned by one person.
one-to-many: When talking about this relationship, the ordering of your nouns matters. One record in a table relates to one or more records in another table. Meanwhile, the records in the other table relate to only one record. Example: A school has many students, but a student only goes to one school (unless your parents hate you and send you to extra schools I guess, in which case you don’t fit into our example here 😞. But you should get the idea since you go to so many schools).
many-to-many: In a many-to-many relationship. One record in a table relates to one or more records in another table, and the records in the other table relate to one or more records in the first table. This relationship is interesting. It is interesting because you do not create a relationship like this using only two tables. Take the example I gave you earlier with students and classes
Technically, this actually illustrates a many-to-many relationship. A person can take many classes, and a class can have many students. So why have the third class_student table in the middle? Without the join table, we would have to store a list of person_id keys within a single class record, and a list of class_id keys within a person record. A relationship stored in this way cannot be queried naturally by SQL and introduces data integrity issues in your database. Long story short, don’t do it like that bro! By introducing the third table we solve this problem and make it easier to query for specific data we need using SQL.
Working with Relational Databases in JavaScript
Ok, to finish up this chapter, let’s create some actual SQLite database tables and then query them using JavaScript Code instead of this other tool. We will create a simple program that acts like an ATM that the user can deposit or withdraw money from. This ATM will use a database that has two tables labeled user and card. The user table tracks info about the users in the bank and the card table tracks card balances. A user can have one to many cards (hopefully not too many, that’s how my Grandma ended up on the streets 💳💳🏚💳💳👵🏼. Don’t be like my g-ma guys). Meanwhile, a card belongs to one and only one user. Think we can write a program for this? Let’s give it a shot.
First cd into your codebro directory. Then we will create a new subdirectory called database-practice:
mkdir database-practice
cd database-practice
Then make a new npm project using the npm init command and select all the default values by pressing the enter key a bunch:
npm init
Press ^C at any time to quit.
package name: (database-practice)
version: (1.0.0)
description:
entry point: (index.js)
test command:
git repository:
keywords:
author:
license: (ISC)
About to write to /Users/shumway/Desktop/codebro/database-practice/package.json:
{
"name": "database-practice",
"version": "1.0.0",
"description": "",
"main": "index.js",
"scripts": {
"test": "echo \"Error: no test specified\" && exit 1"
},
"author": "",
"license": "ISC"
}
Is this OK? (yes)
Once this is setup, we need to download a library called better-sqlite3 (since, you know… it’s better than the original I guess 😎). This library makes it easier for us to create the tables and work with them using JavaScript.
npm install better-sqlite3
Next, we need to create a index.js file in this directory:
code index.js
Then add the following code to it and save the file (If you prefer, you can first read ahead and see the explanation of all the different keywords, then come back and add the code. Whatever works best for you. Notice that this code uses a lot of back ticks `, not single quotes'):
CHECKPOINT
constDatabase=require("better-sqlite3")
constreadline=require("readline/promises").createInterface({
input:process.stdin,
output:process.stdout,
})
classAtmDb {
constructor() {
this._db=newDatabase("atm.db")
this._createTablesIfTheyDontExist()
}
_createTablesIfTheyDontExist() {
this._db.exec(` CREATE TABLE IF NOT EXISTS user ( "user_id" INTEGER NOT NULL UNIQUE, "username" TEXT NOT NULL UNIQUE COLLATE NOCASE, "first_name" TEXT NOT NULL, "last_name" TEXT NOT NULL, PRIMARY KEY("user_id" AUTOINCREMENT) ); CREATE TABLE IF NOT EXISTS card ( "card_id" INTEGER NOT NULL UNIQUE, "user_id" INTEGER NOT NULL, "balance" REAL NOT NULL, PRIMARY KEY("card_id" AUTOINCREMENT) FOREIGN KEY("user_id") REFERENCES "user"("user_id") ); `)
}
getUserByUsername(username) {
constresult=this._db.prepare(
` SELECT * FROM user WHERE username = ?; `
)
.get(username)
returnresult
}
createAccount(firstName, lastName, username) {
constresult=this._db.prepare(
` INSERT INTO user (first_name, last_name, username) VALUES (?, ?, ?) `
)
.run(firstName, lastName, username)
console.log(result)
returnresult.lastInsertRowid
}
getCardsForUser(userId) {
constresult=this._db.prepare(
` SELECT card_id as cardId FROM card WHERE user_id = ?; `
)
.all(userId)
returnresult
}
createCard(userId, startingBalance) {
constresult=this._db.prepare(
` INSERT INTO card (user_id, balance) VALUES (?, ?) `
)
.run(userId, startingBalance)
returnresult.lastInsertRowid
}
_getCurrentBalance(cardId) {
constresult=this._db.prepare(
` SELECT balance FROM card WHERE card_id = ?; `
)
.get(cardId)
returnresult.balance
}
_updateBalance(cardId, balance) {
this._db.prepare(
` UPDATE card SET balance = ? WHERE card_id = ?; `
)
.run(balance, cardId)
}
deposit(cardId, amount) {
constcurrentBalance=this._getCurrentBalance(cardId)
this._updateBalance(cardId, currentBalance+amount)
}
withdraw(cardId, amount) {
constcurrentBalance=this._getCurrentBalance(cardId)
if (amount>currentBalance) {
console.log("You don't have the money bro!")
} else {
this._updateBalance(cardId, currentBalance-amount)
}
}
_getCardUser(cardId) {
constresult=this._db.prepare(
` SELECT user.first_name as firstName, user.last_name as lastName FROM user INNER JOIN card ON card.user_id = user.user_id WHERE card_id = ?; `
)
.get(cardId)
returnresult
}
showCardBalance(cardId) {
constuser=this._getCardUser(cardId)
constcurrentBalance=this._getCurrentBalance(cardId)
console.log(` User: ${user.firstName}${user.lastName} Current balance for card is ${currentBalance.toFixed(2)} `)
}
}
asyncfunctionmain() {
constatm=newAtmDb()
constusername=awaitreadline.question("Enter username: ")
constuser=atm.getUserByUsername(username)
varuserId=nullif (!user) {
constfirstName=awaitreadline.question(
"User not found. Creating new user. Please enter first name: "
)
constlastName=awaitreadline.question("Please enter last name: ")
userId=atm.createAccount(firstName, lastName, username)
} else {
userId=user.user_id
}
constcards=atm.getCardsForUser(userId)
varcardId=nullif (cards.length===0) {
console.log("No cards exist for this user, creating card")
cardId=atm.createCard(userId, 0)
} else {
// This example just always uses the first card for the user,
// you can add code to handle multiple cards as a challenge
cardId=cards[0].cardId
}
constoperation=awaitreadline.question(
"enter w to withdraw, or any other key to deposit: "
)
constamount=awaitreadline.question("enter amount: ")
if (operation.toLowerCase() ==="w") {
atm.withdraw(cardId, Number(amount))
} else {
atm.deposit(cardId, Number(amount))
}
atm.showCardBalance(cardId)
readline.close()
}
main()
Yeah… this isn’t a real legit ATM program or anything, so don’t think about swiping this code and trying to sell the program to your local bank. This just shows a basic example of how you can use a database in a JavaScript program. Let’s go over the sections and explain what they mean:
Here we are importing a Database object from the better-sqlite3 library we installed previously. This object will be used to actually create a connection to a SQLite database file. We also import the "readline/promises" module which will allow us to ask the user for input through the terminal when interacting with the ATM. That should look familiar from part 1 of the book.
Next we define a class to hold all the logic for interacting with our database:
classAtmDb {
constructor() {
this._db=newDatabase("atm.db")
this._createTablesIfTheyDontExist()
}
_createTablesIfTheyDontExist() {
this._db.exec(` CREATE TABLE IF NOT EXISTS user ( "user_id" INTEGER NOT NULL UNIQUE, "username" TEXT NOT NULL UNIQUE COLLATE NOCASE, "first_name" TEXT NOT NULL, "last_name" TEXT NOT NULL, PRIMARY KEY("user_id" AUTOINCREMENT) ); CREATE TABLE IF NOT EXISTS card ( "card_id" INTEGER NOT NULL UNIQUE, "user_id" INTEGER NOT NULL, "balance" REAL NOT NULL, PRIMARY KEY("card_id" AUTOINCREMENT) FOREIGN KEY("user_id") REFERENCES "user"("user_id") ); `)
}
Here we have the constructor for this class, which creates a variable for connecting with the database:
this._db=newDatabase("atm.db")
The "atm.db" is how we specify the name of the database file we want to work with. The first time this is run, the file will be created since it doesn’t exist yet. Every time the program is run after that, it will use the existing atm.db file with all the data inside of it.
As part of the constructor, we also call the _createTablesIfTheyDontExist() method to setup the tables of the database:
_createTablesIfTheyDontExist() {
this._db.exec(` CREATE TABLE IF NOT EXISTS user ( "user_id" INTEGER NOT NULL UNIQUE, "username" TEXT NOT NULL UNIQUE COLLATE NOCASE, "first_name" TEXT NOT NULL, "last_name" TEXT NOT NULL, PRIMARY KEY("user_id" AUTOINCREMENT) ); CREATE TABLE IF NOT EXISTS card ( "card_id" INTEGER NOT NULL UNIQUE, "user_id" INTEGER NOT NULL, "balance" REAL NOT NULL, PRIMARY KEY("card_id" AUTOINCREMENT) FOREIGN KEY("user_id") REFERENCES "user"("user_id") ); `)
}
Here we create two tables needed for our program to work. We use the database object (this._db) to execute some SQL commands on the atm database using the this._db.exec() method. Notice the IF NOT EXISTS clause in each statement, which means if the table already exists it will not be recreated. With this method we make sure that the database is always set up with the needed tables before the program attempts to write any data to it. Let’s walk through the user table configuration so we can understand how it’s working:
Our user table has a user_id, which is an auto-incrementing integer. This means every time we add a new user to the database they will get the next unused number for their id number. A user will also have a username, which is how they will “login” to our program (to keep things simple, we won’t be tracking passwords. We’ll talk more about real user authentication when we get to part 4 of the book). We make sure that every username in the database is unique and case insensitive (COLLATE NOCASE is how you make an attribute case insensitive in SQLite, other databases will do this differently). As you might expect, we also have first_name and last_name attributes that is required for every user. If this were a real application, we would likely have many other attributes about our users we would be tracking (mmm, mmm delicious personal data 👁🔎😑-“stop watching me dude!”).
You may wonder why we are using the user_id as our primary key and not the username. I mean, we are making sure that every username is unique, so it could be used as a primary key right? This could actually work if you never allow your users to update their username in the system, but many apps allow you to do update usernames, so you don’t want your primary key to be something that might change in the future. It is generally safer to use a generated id that will never change as the primary key, rather than something picked by your users.
Ok, that covers the user table, what about the card table:
Pretty simple, we have a card_id, which is our primary key. This will also be auto generated by the database every time we add a new card. Next we have the user_id, which helps us figure out which user this card belongs to. This is a foreign key that references the primary key of our user table:
FOREIGNKEY("user_id") REFERENCES"user"("user_id")
This line tells the database that any user_id I try to use in the card table must exist in the user table or an error should be thrown (we don’t want to create a card for a user that doesn’t exist in the database). Finally we have the balance attribute which tracks how much money is on the card. Notice the type is REAL instead of INTEGER, because we need to track floating point numbers for the cents.
So those are our tables, now let’s look at some of the SQL queries we are using on them to get our program working:
getUserByUsername(username) {
constresult=this._db.prepare(
` SELECT * FROM user WHERE username = ?; `
)
.get(username)
returnresult
}
In our first method, we are searching our database for a particular user by username. I’ve purposefully broken up the SQL statement on several lines to make it easier to read in the book. . You could write it all on one line but I prefer breaking them up. The SQL query itself is really basic:
SELECT*FROMuserWHEREusername=?;
“Select all the attributes of the user from the user table where the username equals ?”… wait hol’ up the ? is new. What’s up with that? Well, the ? is a placeholder that means we are going to replace the ? with the variable we are using in the JavaScript code:
constresult=this._db.prepare(
` SELECT * FROM user WHERE username = ?; `
)
.get(username)
See how are passing in username as an argument into .get(username)? The ? will be replaced with whatever the value of username is when we run the code. So if I typed in landizzle for my username when running the program, the query will end up looking like this:
SELECT*FROMuserWHEREusername='landizzle';
The .get() function returns the first record that is matched by the query. This record is returned as a JSON object with all the attributes you ask for in the query. If I had a user in the database with the username of landizzle, the code would return an object like this:
If you run a query that does not match any records in your database, the .get() function will return undefined. This is a special type in JavaScript which means the value you are looking for doesn’t exist, or is undefined. To help show this in action, let’s look at how we are using this method in the main() function:
When we first start the program, we make an instance of the AtmDb class const atm = new AtmDb(), which runs the constructor to create a connection with the database file and create the tables. Then we ask the user for their username and search for any users in the database that have this username const user = atm.getUserByUsername(username). Because the username might not exist in the database, we must check for it using a conditional. Let’s take a look at that section of code:
varuserId=nullif (!user) {
constfirstName=awaitreadline.question(
"User not found. Creating new user. Please enter first name: "
)
constlastName=awaitreadline.question("Please enter last name: ")
userId=atm.createAccount(firstName, lastName, username)
} else {
userId=user.user_id
}
If the database returns undefined for the user, the condition if (!user) will be true, because undefined is a false value in JavaScript. We then create a new user by asking for a first name and last name and then calling the createAccount method (which we will look at next). If the user does exist, we get the user_id from the object that was returned from the database.
Let’s take a look at the createAccount method for creating a new user in the database:
Here we are using the INSERT SQL command to add a user into the user table. Notice this time we have three ? placeholders. You may have already guessed this but the order of the arguments must match the order of the ?. In this case, firstName will replace the first ?, lastName will replace the second, and username will replace the third. When you are performing a write command such as INSERT, you use the .run() method rather than .get(). Finally, after you insert the item the database returns the id of the item that was just added, which you can get using the .lastInsertRowid property. We return the new user id so we can use it later in the program.
Once we have a user id, the next thing we do in the program is check for any cards that belong to the user. If the user doesn’t have a card we create one for them. If they do have any cards we just grab the first one in the list. Let’s look at that code in the main() function:
constcards=atm.getCardsForUser(userId)
varcardId=nullif (cards.length===0) {
console.log("No cards exist for this user, creating card")
cardId=atm.createCard(userId, 0)
} else {
// This example just always uses the first card for the user,
// you can add code to handle multiple cards as a challenge
cardId=cards[0].cardId
}
Let’s look at the .getCardsForUser method in the AtmDb class:
getCardsForUser(userId) {
constresult=this._db.prepare(
` SELECT card_id as cardId FROM card WHERE user_id = ?; `
)
.all(userId)
returnresult
}
This is similar to the other SELECT query, with two key differences. Notice the first line of the query:
SELECTcard_idascardId
We have a new keyword here, as, and it looks like we are using it to change card_id to be cardId. This is known as an alias, and they are used to put specific labels on the data that is returned from a query. In our example here, we want variable names in JavaScript to be camel case, but database attribute names are often written in snake case (all lowercase words separated by _ characters). We can use aliases to transform the variable names from snake case to camel case, as just one simple example.
The next difference to point out is we are using the all() method rather than the .get() method. all() returns all the records in the database that match the query as a list of objects. If I had a user that had several cards linked to their user account, the query result could look like this:
[{cardId:1}, {cardId:2}, {cardId:3}]
If a user does not have any cards, the query will return an empty list []. Let’s briefly look at the code for creating a new card in the database:
Similar to createAccount, only this inserts items into the card table. We then return the id of the new card that was created.
Once we have a card selected, the next thing we do is ask the user if they want to withdraw or deposit from that card:
constoperation=awaitreadline.question(
"enter w to withdraw, or any other key to deposit: "
)
constamount=awaitreadline.question("enter amount: ")
if (operation.toLowerCase() ==="w") {
atm.withdraw(cardId, Number(amount))
} else {
atm.deposit(cardId, Number(amount))
}
Pretty straightforward. Obviously we should be checking the amount entered by the user to make sure it is a real number, but for this example we’re keeping it simple. Let’s take a look at the withdraw and deposit methods:
deposit(cardId, amount) {
constcurrentBalance=this._getCurrentBalance(cardId)
this._updateBalance(cardId, currentBalance+amount)
}
withdraw(cardId, amount) {
constcurrentBalance=this._getCurrentBalance(cardId)
if (amount>currentBalance) {
console.log("You don't have the money bro!")
} else {
this._updateBalance(cardId, currentBalance-amount)
}
}
In both methods, we first get the current balance for the card using the private _getCurrentBalance method (no new syntax in that method, so we won’t dive into it here). Then if we are withdrawing money, we check to make sure the card has enough money for the user to withdraw the requested amount. Finally we call the private _updateBalance method to update the new balance amount. Let’s take a look at that method:
_updateBalance(cardId, balance) {
this._db.prepare(
` UPDATE card SET balance = ? WHERE card_id = ?; `
)
.run(balance, cardId)
}
This is a new command keyword, UPDATE. You use it to update existing items in a database table. The syntax works like this:
UPDATE <table name>
SET <attribute name> = <new value><optional WHERE clause>
In our example, we want to update a card balance, which is in the card table. We set the balance of the card to be whatever was passed in from the JavaScript code. We use the WHERE clause because we only want to update the balance of the card that matches the specific cardId. Without the WHERE clause, all of the balances in the card table would be updated to match the new value… yikes 😨. This is why you should almost always have a WHERE clause when running an UPDATE command or stuff can get wrecked in your database.
While we’re on the subject of wrecking stuff in your database, let’s talk about the DELETE command. You have to be so… so careful when deleting stuff from your database guys. There is no worse feeling than accidentally deleting items from a production database (don’t ask me how I know 😅). Hopefully you don’t have to delete stuff often, but here is the syntax for deleting items from a database table:
DELETE FROM <table name>
WHERE <condition>;
Always double… no triple check your conditions on these. You want to make sure that there is no possible way for stuff to get deleted when it shouldn’t be. That’s all I’ll say about that. Let’s get back to our program. After we have updated the balance, the last thing we do is show the resulting balance to the user, close the terminal connection, and exit the program:
atm.showCardBalance(cardId)
readline.close()
Let’s take a look at the showCardBalance method:
showCardBalance(cardId) {
constuser=this._getCardUser(cardId)
constcurrentBalance=this._getCurrentBalance(cardId)
console.log(` User: ${user.firstName}${user.lastName} Current balance for card is ${currentBalance.toFixed(2)} `)
}
We get the data of the user that owns the card, the balance on the card, and then display a pretty message to the user (the toFixed(2) function is often used when showing a money value with cents, the number 2 tells the program to only show two numbers after the decimal). Let’s take a closer look at the _getCardUser method:
_getCardUser(cardId) {
constresult=this._db.prepare(
` SELECT user.first_name as firstName, user.last_name as lastName FROM user INNER JOIN card ON card.user_id = user.user_id WHERE card_id = ?; `
)
.get(cardId)
returnresult
}
Here, we need user information, but all we have is the card id. To get the user info, we perform a join on the user and card tables. We can find out which user owns the card using the join condition INNER JOIN card ON card.user_id = user.user_id and the WHERE clause WHERE card_id = ?. This will match the specific user whose id matches the user_id associated with the card and return their first and last name so we can display it.
And that’s about it… if you haven’t already go ahead and run the program by typing node index.js into your terminal and create a new user:
node index.js
Enter username: landizzle
User not found. Creating new user. Please enter first name: landon
Please enter last name: shumway
No cards exist for this user, creating card
enter w to withdraw, or any other key to deposit: d
enter amount: 500
User: landon shumway
Current balance for card is 500.00
You may notice after running the program a file called atm.db shows up in your directory:
ls
atm.db index.js node_modules package-lock.json package.json
Now if you run the program again and login with the same user name, the program will load your card from the database:
node index.js
Enter username: landizzle
enter w to withdraw, or any other key to deposit: w
enter amount: 250
User: landon shumway
Current balance for card is 250.00
If this is your first time working with a relational database in JavaScript, congratulations! 🎉 You have now built a basic working example of a SQLite database with tables that can store data for your program!
Final Thoughts
Relational databases are one of the most powerful technologies in the world of software. This skill is a must have for most professional developers. As of this time of writing, the most popular open-source relational databases in the industry are MySQL, PostgreSQL, and SQLite. There are also proprietary relational databases which you could likely work with as well, though these are harder to experiment with when you’re first starting out. If you are interested in learning more about this concept, I recommend looking up some tutorials on Postgres or MySQL and try to set up your own local database. Experiment with creating tables and using foreign keys to create relationships between them. In the last couple of chapters in part 2 we will work heavily with SQLite to add a relational DB to our choose your own adventure game.
Phew… I’m just throwing these crazy concepts at you left and right. Let’s do something a little more simple next chapter and give ourselves a breather 😤.
Another important practice in software that will save your bacon (mmm… bacon 🥓) when done well is having a logger in your project. No, we are not talking about lumberjacks here🌲. In software terms, a log is information that is recorded 📒while the program is running and can be read later by a developer to help figure out the cause of issues. These logs are critical to finding out what went wrong when a program was running so that you can fix the problem. In practice, logs are generally written to either a file (what we’ll be doing together in this chapter) or sent to a location over the internet (we’ll see working examples of this when we get to part 4 of the book).
Speaking of logs, have you noticed that every time we print information to the terminal we use the command console.log? That is a form of logging. We are recording information to the terminal that can then be read by you. In this chapter, we will create a logger that records information to a file, rather than the terminal.
Before we make our own logger, we need to cover some basic concepts of logging, namely log levels and markers.
Log Levels
As you can imagine, some logs are more important for solving a problem than others. For example if I have an error in my code that breaks my program, I want to log that information with a different level of importance than a log that is just telling me information while the program is running normally. The way we label the importance of these messages is by using log levels. Common types of log levels include the following:
error
warn
info
debug
Let’s take a brief look at each of these:
Error Logs
These are messages you log when something happens in your program that prevents your program from working (think of exceptional paths that we talked about in the exception handling chapter). Logging messages with the error level helps you quickly identify where the program hit a major issue that needs to be investigated and fixed.
Warn Logs
Warn level logs are used to tell developers that while your program didn’t have an error, there is something going on in the code that could become a problem in the future. The biggest place I see these being used is when you are using 3rd party libraries and they are ending support for certain features in the library at a certain date. The library development team will warn you that you are using certain parts of their library that they are getting rid of and you need to update your code to stop using it if you want to get their latest features (this happens quite a bit, since developers are pushing new stuff out all the time).
Info Logs
This is perhaps the most common log level. Info level logs are used to log information about the program as it is running. The purpose of these messages is to leave a trail of breadcrumbs for you as a developer to follow the flow of your program before it hit an error. You often log info messages at the start of a program so you can see that the program at least started correctly. Then you can log at important points of your code to show how far the code ran before it hit an issue. This can help you navigate your code to a specific area and, with the error logs, help you figure out what went wrong.
Debug Logs
Personally, I don’t use these but many developers do. Debug level logs are messages that you only log if you are running the program in a debug mode. You usually turn on debug mode for your program using an environment variable after an error has occurred and you are trying to get more information about the problem. Debug logs give you way more information about the program than you care to know when it is running normally, but may give you more clues as to what went wrong.
Like I said, I don’t really use debug logs in my apps for one simple reason. In practice, by the time I find out about an error, the issue that caused the error often cannot be re-created and if I didn’t log the information I need to figure out the problem when the issue happened, then too bad for me! 😞 You should be logging the needed information to figure out the problem before the problem occurs, not after! Are there exceptions to my opinion? Of course, there are exceptions to everything. Debug logs are useful when you build libraries or command line tooling and you want your users to get more information if they need it.
It is worth mentioning that you can also create your own custom log levels… but I would argue that it is generally best to stick with these conventional levels unless you have a specific need for a custom log level in your application.
Ok that covers log levels, now let’s talk about markers.
Log Markers
When hiking a trail, people often leave markers on the trail, like rocks stacked on each other, to help others figure out where to go to get to their destination. Here is a picture of some rocks I randomly stacked in my back yard to give you a visualization (I know, I could have found a much better one on the internet, but can’t a guy have daydreams of being a professional photographer?!)
Anyways… when hiking through our logs, we want to leave markers for developers to figure out how to solve the problem. Log markers give you information to help you find a solution to the issue in your program. The most common form of markers is a JSON object that has a bunch of key-value pairs. These key-value pairs can include information such as who was using the program when the problem occurred, what action they were trying to perform, etc.
As part of these markers, logs generally include a timestamp. A timestamp shows the date and time that the log was written. These timestamps can be used to view the ordering of events as they occurred (this gets really important when you are working on large applications that have many moving parts).
Enough with the theory, let’s walk through an actual example by creating a logger that logs messages to a file.
Creating a Logger
Ok, so we want to make a logger that writes logs to a file. We could write all the code to do this ourselves… or, we could use a logging library written by someone else. I’m a pretty lazy guy, so let’s just use a library. I searched for one on the internet
Node logging library
And found this pretty popular library called Winston. It should work nicely for our exercise here. Let’s create a new folder called logging in our codebro directory:
Windows
mkdir ~\Desktop\codebro\logging
cd ~\Desktop\codebro\logging
code .
Everyone else
mkdir ~/Desktop/codebro/logging
cd ~/Desktop/codebro/logging
code .
Once you have the folder open in VS Code, let’s go ahead and start an npm project (use all of the default values by repeatedly mashing the enter key):
npm init
This utility will walk you through creating a package.json file.
It only covers the most common items, and tries to guess sensible defaults.
See `npm help init` for definitive documentation on these fields
and exactly what they do.
Use `npm install <pkg>` afterwards to install a package and
save it as a dependency in the package.json file.
Press ^C at any time to quit.
package name: (logging)
version: (1.0.0)
description:
entry point: (index.js)
test command:
git repository:
keywords:
author:
license: (ISC)
About to write to /Users/shumway/Desktop/codebro/logging/package.json:
{
"name": "logging",
"version": "1.0.0",
"description": "",
"main": "index.js",
"scripts": {
"test": "echo \"Error: no test specified\" && exit 1"
},
"author": "",
"license": "ISC"
}
Is this OK? (yes)
Once the project is initialized, install the winston dependency:
npm install winston
create a file, index.js:
code index.js
And Add the following code:
CHECKPOINT
//index.js
const { createLogger, format, transports } =require('winston');
const { combine, timestamp } =format;
constlogger=createLogger({
format:combine(
timestamp(),
format.json()
),
transports: [new transports.File({filename:"logs.log"})]
});
functionmain() {
constmarkers= {serviceName:"lameNameService"}
logger.info("starting program", markers)
varargs=process.argvvarname=args[2]
markers.nameInput=namelogger.info('Reading name input from user', markers)
if (!name) {
logger.error("User didn't type in a name argument, what a schmuck!", markers)
return
}
if (name.toLowerCase() =="karen") {
logger.warn("warning, Karen is using our system. She'll complain about how lame it is", markers)
}
}
main()
The program itself is pretty lame (hence the warning that Karens will complain about it 🤦♀️). But let’s walk through the interesting bits with the logger:
Here we are importing functions and objects from the winston library. We then extract a couple more functions combine and timestamp from the format winston object which we will use to define the formatting of our log messages when we create the logger here:
The createLogger function will create a logger variable for us that we can use in our program to log data. This function takes in several parameters, let’s look at the format parameter first. Here we tell it to always include a timestamp which has the date and time the message is logged (I believe it uses the UTC timezone by default, which is a pretty common standard. This could be changed to be your local timezone if you wanted). We also tell the logger to output logs in a json format.
Next we have the transports parameter, this is where we tell the logger where we want to write messages to. Winston can write logs to multiple locations including the console, files, or even a database. Here we are going to send the logs to a file called logs.log (very original, no? 😆). Once we have our logger configured, we get to our main function that uses the logger:
functionmain() {
constmarkers= {serviceName:"lameNameService"}
logger.info("starting program", markers)
varargs=process.argvvarname=args[2]
markers.nameInput=namelogger.info('Reading name input from user', markers)
if (!name) {
logger.error("User didn't type in a name argument, what a schmuck!", markers)
return
}
if (name.toLowerCase() =="karen") {
logger.warn("warning, Karen is using our system. She'll complain about how lame it is", markers)
}
}
main()
First thing to point out is the markers variable. Often at the start of your program you will set up your markers with a list of default values that you want to be included in every log message. One of those is the name of the service that is running the code. The service name helps you pinpoint where the code is running that is logging the messages. This becomes useful when your app becomes flippin’ huge with a bunch of files and classes running code.
Next we use the logger to log an info message:
logger.info("starting program", markers)
The logger object has a method called info which takes the message you want to log as the first argument, and the markers as the second argument (winston refers to these markers as meta. Fun fact: Metadata is the term for data that describes other data. Have fun wrapping your head around that for a minute 🤕).
Next we get the input from the command line and add the name argument to the markers:
Because markers is a JSON object, we can add key value pairs to them as we collect more data. Often as your program runs you will gain more context that you can include in your markers to help you recreate the problem. Once we add the nameInput marker, we log another info message:
logger.info('Reading name input from user', markers)
This message will include the nameInput marker. Next we check to make sure the user actually passed in a name argument and if not, we log an error message:
if (!name) {
logger.error("User didn't type in a name argument, what a schmuck!", markers)
return
}
Here we call the error method to log an error message if the user didn’t type in a message and exit the program. Notice the error method also takes in a message and markers just like the info method. As one more example, we check for a certain condition and log a warning message:
if (name.toLowerCase() =="karen") {
logger.warn("warning, Karen is using our system. She'll complain about how lame it is", markers)
}
If Karen is using the program, we better log a warning cause you know she’s going to complain about something (if your name is actually Karen, please know that I’m mostly joking. I’m sure you are a nice person, not like all the other Karens I know).
Save the index.js file and run the program, first type in you name when you run it:
nodeindex.js"Landon"
You will notice a new file gets created logs.log with the content similar to the following (if your name is actually Karen, you will also see the warn log):
{"level":"info","message":"starting program","serviceName":"lameNameService","timestamp":"2022-10-18T15:49:37.757Z"}
{"level":"info","message":"Reading name input from user","nameInput":"Landon","serviceName":"lameNameService","timestamp":"2022-10-18T15:49:37.758Z"}
Here you can see from the timestamp that I ran this program on Oct. 18, 2022 at T15:49:37.757Z which I believe is 3:49pm UTC time. The level key tells you the log level. In this case, both of these messages are are info level logs. Each log also has a message property which is the first parameter we passed in when calling the info method. We also see any markers we included added to the log objects.
Now let’s run the program again, this time don’t put in a name:
nodeindex.js
Looking at the logs.log file, you will see a couple of new logs get added to the end of the file, one of them with an error level:
{"level":"info","message":"starting program","serviceName":"lameNameService","timestamp":"2022-10-18T16:00:30.292Z"}
{"level":"info","message":"Reading name input from user","serviceName":"lameNameService","timestamp":"2022-10-18T16:00:30.293Z"}
{"level":"error","message":"User didn't type in a name argument, what a schmuck!","serviceName":"lameNameService","timestamp":"2022-10-18T16:00:30.294Z"}
Here you can see the program ran at T16:00:30.292Z. We see our error message was logged since the if (!name) statement was true.
Lastly, if you feel like it, run the program typing in karen as the name and you will see the warn log added to the file.
Ok, so this is a pretty contrived example, but this gives you the general idea of how logs help you track your apps as they are being used.
Final Thoughts
Logging may not seem super helpful when creating small programs that run on your computer, but they become incredibly useful when you start creating web apps that can be used by thousands of people on the internet. If something goes wrong with your app, and you don’t have any idea what went wrong because you don’t have any logs, then it will be much harder for you to fix it. At the end of part 2, we will be using a logger in our choose your own adventure game to log events within the program.
But before that, let’s take some time to talk about a skill that separates the script kiddies from the professionals, and that is refactoring.
At this point, the choose your own adventure game we built in chapter 1.9 works as designed, and it has all the features that we wanted to include. Honestly, we could just leave it at that. But if you truly want to become a high quality developer, there is another concept in programming that you need to get familiar with. That is refactoring.
Let’s face it, you will never design your project perfectly the first time. There is always ways to improve the code to make it easier to work with. We don’t want to change what the code is doing (the behavior), we just want to improve how it’s doing it (the design). The process of improving the design of the code without changing the behavior is called refactoring. In this chapter, we are going to walk through some examples of refactoring to improve the quality of code. We will also refactor some of the code for our choose your own adventure game that will help us when we add more features to it at the end of part 2.
Refactoring - The Hallmark of a Professional Developer
Why would I dedicate a whole chapter on refactoring? Because, surprisingly, so few developers actually do it. And yet this is a skill that if practiced, will make your life as a developer so much easier. If you end up starting a career in programming, you will find that one of your main jobs is maintaining, or working with, code that has been around for years. As part of this work, you will curse the idiot who wrote the code that you have to take care of (spoilers, you find that you are often the idiot).
Garbage code is unavoidable in this industry, but there are certain things we can watch for that make it less garbage 🚮. Let’s walk through an example of how we can refactor our current program and why the refactor improves the quality of the code.
Code Smells
Speaking of garbage code, there is a term we use in the industry to describe code that has issues. We call these code smells. Code smells are things that make code difficult to work with and slow down your ability to add new features. There are many types of code smells, but there are some in particular that are easy to point out right away:
Variable names that are too short or do not explain what the value is for (one letter variables are the devil, Bobby 😈)
Functions or methods that are really big with many lines of code
Functions or methods that take in a bunch of parameters
Passing data around that should be kept private
Code that is “clever” but hard for anyone else to understand
To help avoid code smells, there are best practices that your projects should follow. I will highlight the three I believe to be the most important:
Code should never repeat itself (the “Don’t Repeat Yourself”, or D.R.Y., principle).
Variable and Function names should explain what the code is doing (the self-documenting code principle).
Functions should require as few parameters as possible to perform a task (the building block principle).
Let’s take a look at these principles and how they can be applied to our project.
Keep Your Code D.R.Y.
This was one of my very first lessons after I graduated college. I was writing up code for a professional project. I was pretty proud of it until the senior developer reviewed it and tore it to shreds. His biggest complaint was that I was retyping the same lines of logic in multiple places. “This is not D.R.Y. at all!” He told me. I had no idea what he was talking about. “It means don’t repeat yourself. The more you duplicate lines of code the harder it becomes to maintain over time.” Over the years I came to realize that this was probably the most important concept I could learn, which is why I put it first on the list.
Why is it such a big deal to write the same lines of code in multiple places? First of all, more lines means more work! Think about it, the bigger a project becomes in terms of lines of code, naturally the more work it will take to maintain all those lines. Anytime you can reduce duplicated logic by creating a reusable function means less work for you in the long run.
Second of all, if you duplicate lines of logic, and you end up having a bug in that logic, rather than just fixing one spot of code, you have to fix the bug everywhere you repeated that code! Which again, is more work!
Even if you don’t have a bug, but just need to change some code as part of adding a new feature, if you have repeated that code you will have to change all those spots in the code to add the feature rather than changing one thing. I worked at a company where this was a serious problem and it cost us weeks to make simple changes because the code had been duplicated in over 20 projects. So yeah, there is a reason I’m a big advocate of the D.R.Y. principle.
Let’s look at an example. Suppose we had some code that finds the sum total of all the numbers in two different arrays:
This code works fine… but it breaks the DRY principle Because we have duplicate lines of code that are doing the same thing, adding all the numbers in an array together. We can fix this by creating a common function like this:
By reducing the number of for loops we have to write, we reduce the number of bugs we can introduce into this code. We also now have a useful function we can call in the future if the code needs to add any more arrays to the totalSum.
This concept not only applies to duplicate lines of code, it also applies to something known as magic values. A magic value is when code has a number or string that is used in multiple places without labeling it with a variable name. Take a look at this example:
In this snippet, we have a magic value, 0.076, that is repeated in multiple spots. Not only do magic values make it harder to understand the code, they are a major code smell. If I ever have to change this magic value for whatever reason, I will have to search all throughout my project for where it is being used and update every spot.
The way we address this issue is by replacing the magic value with a constant. Let’s fix up our example to show what this looks like:
We use const instead of var, like we first saw in chapter 1.6. This is a special type of constant known as a global constant, which means it can be used anywhere in the file or anywhere that we import it. Because it is a global constant, we name it using all uppercase letters separating words with a _. This isn’t required but it helps developers identify constants that are intended to be used globally.
We actually have a magic value in our choose your own adventure game used in two different files. We should replace it with a global constant. Let’s see if you can spot the magic value. The first spot is in our index.js file:
//index.js
if (selectedOption=="save") {
And the second spot is in our story-reader.js file:
Do you see where we are duplicating a magic value? It’s the string "save". This is a code smell because if we ever decided to change this magic value we would have to change the two files. How do we refactor and improve the code? With a consta… oh wait, but where do we put that constant so that it could be used by two different files? Different languages have different solutions for this. In my professional JavaScript experience, we generally introduce a constants file. A constants file can be used to store any global constants that we know shouldn’t be changed and are intended to be imported into any file that needs them. Make sure you are in the story-game directory and then run the following command in a terminal:
Now we have a central place to define our constants and export them so they can be used by other files. Open the story-reader.js file, import the constant from the constants file, and replace the "save" magic value with the constant:
This may seem like an insignificant change, but it highlights the main purpose of the D.R.Y. principle. Anytime I only need to make one change instead of two changes, I have made life easier. Anytime I only need to make one change instead of 2000 changes (yes, this can happen in the real world), I have made the work possible by one person instead of 20. That is the miracle of software.
How to Name Stuff
I had a coworker that would always tell me the two most challenging problems in software are handling caching (don’t worry, we won’t be messing with caching in this book, maybe the next one 😅) and naming stuff. The reason naming stuff is so important is because the names you give your variables, classes, and functions impact the readability of your code. Take a look at this code:
Can you guess what this function is doing? The function and variable names don’t really help you understand the code… Let’s try to make it a little more readable:
If you were maintaining a project with this code, which function would you prefer to see, doStuff, addStuff, or addFractions? When you name your code in a way that explains what it is doing, it makes the project easier for yourself and other developers to work with and understand how everything is working. This is known as self-documenting code. Code that speaks for itself, it does not need to have a bunch of comments explaining how it works.
I find it interesting that so many of my college professors used one letter variable names in their programs. This tells me that they have either never worked on major real world software projects, or they have never had to maintain their own sloppy mess! Anyone who has had to maintain projects for a long period of time knows the pain of code that provides zero context into what it is actually doing. Don’t be like my college professors 👨🏫🚫, name your stuff in a way that provides clues into what the code is doing.
Now to be honest, I personally have always been one to make my variable and function names longer to provide context, maybe too long (several coworkers have complained to me about having to constantly type out the names). If we were still in the 90’s and code editors had terrible auto-complete, I would agree. But by this point our editing tools have made it really easy to auto-complete long variable names just by hitting the tab key, so the argument doesn’t really hold up. My personal philosophy in code naming is code should read as much like English as possible. You should be able to look at a function and read the algorithm out loud in English sentences. But like all things in programming, everyone has their own opinion of what is considered “best practice”, so if you work for a company they will likely have their own naming conventions. Just please… don’t use one letter variable names 🤢.
Reduce your Parameters
Do any of you remember the old A/V cables that we used on gaming consoles back in the 90’s and early 2000’s? You had a red jack, a white jack, and a yellow jack. You had to plug each of them into your t.v. in the right order to set everything up. Here’s one I found in my closet:
Then… out of nowhere, one day we were introduced to HDMI cables and our lived were improved forever.
Why is HDMI so much better? Aside from the obvious improvements in video and audio quality, you now only have to plug one cable instead of three cables into your t.v. and you’re good to go. Much easier and quicker.
Parameters in a function can be thought of like cables to an electronic device. The more parameters you add to a function, the harder it is going to be for you to use that function anywhere you find it useful to use. This highlights the building block principle. Functions should be like building blocks that you can use in multiple locations of your code. Anytime you can reduce the number of parameters you require for your function to work, you are making your code more flexible and reusable. If, however, you are adding functions that take 4+ parameters, you should step back and consider how you can break the function down into smaller functions that need less parameters. Sometimes your functions will simply need that many parameters, if you are working with large objects that have many properties for example, but many times you’ll find that you can redesign your functions to make them easier to use.
Along with that, sometimes you end up passing too much information into a function. Maybe you are passing in an object as a parameter when really all you need is one piece of data from that object. This is a code smell as well because you are creating entanglement of data, or a coupling, between functions. Just like tangled up wires are hard to unravel, when you entangle your data between functions it makes it harder for you to make changes to one part of the code without having to update other parts of your code. Generally speaking, the less information you have to pass between two classes, the easier it will be for you to make changes to one of them without having to change the other in the future.
As an example of these two concepts, we are going to refactor our project to clean up the code a bit. It has been really bugging me how we are passing the StoryPage object all over the place in our program. When I first designed it I thought it would work well, but now it looks like I created an unnecessary coupling between the classes that will make it harder to add features to the code in the next couple of chapters. The StoryPage class only needs to be used by the StoryReader class. We need to make the StoryPage class private so that it is only used in the story-reader.js file.
Let’s walk through an example of refactoring this code smell.
To start, make sure you cd into the story-game directory in your VS Code terminal and open the index.js file:
(Windows)
cd ~\Desktop\codebro\story-game
code index.js
(Everyone else)
cd~/Desktop/codebro/story-game
code index.js
Looking at the code, notice we are using the currentPage object all over this file. Most of the functions don’t need the full object, so we are going to modify the code to stop passing it all over the place and reduce the number of parameters our code needs to work. To do this, we are going to add a member variable to the StoryReader class to track the currentPage for us.
Open your story-reader.js file and in the StoryReader class, add a constructor like this.
We are going to track the currentPage using this variable. We mark the _currentPage variable as private since we don’t want any of the other classes using it (remember the _ before the name tells other developers that it is not intended to be used by any other class). Now, instead of returning a StoryPage object for other classes to use, we will use this variable to track what page we are on. Anywhere we are returning a new StoryPage object, replace the word return with this._currentPage = . For example:
Now that we are making the StoryPage object private, we need to add some getter methods to allow the other classes to get the specific pieces of data that they need. The SavepointTracker will need the page name in order to create the savepoint, and the UserInputValidator will need the options to create the menu for the user. These getters give us control over how other classes get the data that they need. This control will make it easier for us to introduce changes to this class without having to change other places.
The last change we need to make is to update the exports line at the bottom of the file to look like this:
module.exports= { StoryReader }
Here we are enforcing that the StoryPage class is private by not including it in the module.exports. This will make it impossible for other files to import the class using the require keyword.
Once you have made all these changes, the story-reader.js file should look like the following:
Now that the StoryPage class has been made private, we need to stop using the currentPage variable in our other classes. Open the savepoint-tracker.js file and take a look at the saveCurrentStoryLocation method:
Here we are using the currentPage as a parameter, but we only need it for the file name. Let’s change the contract so that instead of passing in the whole currentPage object we just pass in the pageName and remove the var pageName = currentPage.getPageName() line:
Not only did this decouple, or remove, our dependency on that object, it also reduced the number of lines of code in this function. Win-Win 🎉.
Next we need to update the user-input-validator.js file. The getMenuSelection is using the currentPage object:
asyncgetMenuSelection(currentPage) {
varoptions=currentPage.getOptions()
varformattedOptions=""for (vari=0; i<options.length; i++) {
formattedOptions+=`${i+1}) ${options[i].displayText}\n`
}
varselection=awaitthis.getInput(formattedOptions)
while (!this._optionIsValid(selection, options)) {
console.log("Do you know how to count? That ain't a valid option bro! Try again!")
selection=awaitthis.getInput(formattedOptions)
}
// subtracting 1 since arrays start with 0 index
constselectedOption=options[Number(selection) -1]
returnselectedOption.optionValue
}
In this method, we really only need the options from the currentPage object, so just pass those in instead and remove the var options = currentPage.getOptions() line:
Here is another case where we decoupled the dependency on the object and reduced lines of code.
To complete the refactor, we need to update our index.js file to stop using the currentPage variable. Open your index.js file and change the first line:
Now that we are not exporting it, we don’t need to be importing it. Did you notice StoryPage was a different color in VS Code than StoryReader? This is because the constructor was not actually being used anywhere in the code, so we really didn’t need to be importing it anyway. This brings up another code smell known as dead code, which is any lines of code in your project that are not actually being used. Dead code should be cleaned up from a project when you find it, to make it easier for you to navigate (this gets really important as your project gets older and more stuff keeps getting added to it by a team of developers).
Next starting around line 17, you will want to remove the var currentPage variable and all references to it so that this code:
asynchandler() {
console.log("Choose your own adventure game")
if (this._savepointTracker.savepointExists()) {
constpageName=this._savepointTracker.getSavepointPageName()
this._storyReader.loadStoryPage(pageName)
console.log("Story savepoint loaded...")
}
else {
console.log("Starting story...")
this._storyReader.loadFirstPage()
}
Next in the while loop remove all use of the currentPage variable so that this:
while (userStillPlaying) {
console.log(this._storyReader.getStoryPageText(currentPage))
varselectedOption=awaitthis._userInputValidator.getMenuSelection(currentPage)
if (selectedOption==SAVE_OPTION) {
userStillPlaying=falsethis._savepointTracker.saveCurrentStoryLocation(currentPage)
console.log("Story progress saved. See you later!")
}
else {
currentPage=this._storyReader.loadStoryPage(selectedOption)
}
}
Becomes this:
while (userStillPlaying) {
console.log(this._storyReader.getStoryPageText())
varoptions=this._storyReader.getPageOptions()
varselectedOption=awaitthis._userInputValidator.getMenuSelection(options)
if (selectedOption==SAVE_OPTION) {
userStillPlaying=falsethis._savepointTracker.saveCurrentStoryLocation(this._storyReader.getPageName())
console.log("Story progress saved. See you later!")
}
else {
this._storyReader.loadStoryPage(selectedOption)
}
}
When all of these changes are complete, the file should look like the following:
CHECKPOINT
// index.js
const { StoryReader } =require('./story-reader.js')
constSavepointTracker=require('./savepoint-tracker.js')
constUserInputValidator=require('./user-input-validator.js')
const { SAVE_OPTION } =require('./constants')
classHandler {
constructor() {
this._storyReader=newStoryReader()
this._savepointTracker=newSavepointTracker()
this._userInputValidator=newUserInputValidator()
}
asynchandler() {
console.log("Choose your own adventure game")
if (this._savepointTracker.savepointExists()) {
constpageName=this._savepointTracker.getSavepointPageName()
this._storyReader.loadStoryPage(pageName)
console.log("Story savepoint loaded...")
}
else {
console.log("Starting story...")
this._storyReader.loadFirstPage()
}
varuserStillPlaying=truewhile (userStillPlaying) {
console.log(this._storyReader.getStoryPageText())
varoptions=this._storyReader.getPageOptions()
varselectedOption=awaitthis._userInputValidator.getMenuSelection(options)
if (selectedOption==SAVE_OPTION) {
userStillPlaying=falsethis._savepointTracker.saveCurrentStoryLocation(this._storyReader.getPageName())
console.log("Story progress saved. See you later!")
}
else {
this._storyReader.loadStoryPage(selectedOption)
}
}
// NOTE the line to close the terminal here
this._userInputValidator.closeTerminalConnection()
}
}
newHandler().handler()
At this point, you should be able to run the game using the node index.js command in your terminal.
node index.js
Choose your own adventure game
Story savepoint loaded...
Once there was an ugly bear, he was so ugly everyone died. The end
1) read it again
2) save and exit program
1
Once there was an ugly bear, he was so ugly everyone died. The end
1) read it again
2) save and exit program
2
Story progress saved. See you later!
We have successfully refactored this project by improving the quality of the code without changing its behavior. If you were able to get the project to successfully run, congratulations! 🎉 This may seem like a lot of work for nothing since the program behavior didn’t change, but when we get to the end of part two and update the project to use a relational database it will be easier for us to introduce those changes thanks to this refactor (I would know, because when I started actually writing that chapter I realized what a pain it was going to be without this change. So I figured, why not just show you how I would refactor it rather than doing it by myself).
Final Thoughts
It’s worth noting that the point of this exercise was not to make the code “perfect”. There is no such thing as “perfect” code. I guarantee there are developers out there much smarter than me 🤓who could refactor this project to be much better (in fact I would love to see what people come up with now that I said that). The point of this exercise is to show you that there is always things you can do to improve the quality of your code by refactoring. At some point, however, your code will become “good enough” in the sense that any more time spent on improving it will not actually benefit you in terms of time saved in the future. You will have to decide for yourself when you’ve reached that point.
In a professional setting, you rarely get time to refactor code, and this is because many managers have this “if it works, why mess with it?” mentality. If you work for a manager that understands the importance of improving code quality from time to time to avoid technical debt, you’ve landed in a great position. Technical debt occurs when the quality of your project starts impacting your ability to add new features to it, and the debt must be paid by improving the quality.
In my personal experience, the best time to refactor a project is when you have to revisit code to add new features to it. It helps to have a mentality of “leave the code better than you found it”. In this way you can improve the quality of the code while still meeting the demands of your managers. Many developers who know they won’t be with a company for long decide to just “get it working” without much thought for the future developers that have to maintain the project. Don’t be like them! We need more developers that actually take pride in the quality of their work. The small things you do to improve quality will help build your reputation as someone worth working with.
Alright, with that covered, we are ready to add some new features to our choose your own adventure game.
Chapter 2.9: Choose your own Adventure Game Design Part 2 - Updating the Design
Ok, here we are. We’re about to take all the concepts we covered in part 2 of the book and combine them to improve our choose your own adventure game from part 1. I want to give you a ⚠️fair warning⚠️ that the rest of part 2 has some of the hardest exercises in the book. Consider this section the gauntlet ⚔️. If you decide for whatever reason that you would rather skip the headache 🤕, feel free to jump ahead to part 3 where we dive into full stack web development.
The thing is, we will be updating our existing choose your own adventure program while adding unit tests, which is a ton of work. This is probably why many bootcamps don’t even mess with testing, it’s a beast to get everything set up and walk through🐲. I’m expecting these chapters to take you at least a week to finish if all this stuff is new to you.
“Why are you doing this to us?” I hear some of you complaining 😫. Let me answer that with story time 📖.
It’s 2018, I just landed an internship with a large non-profit organization. I was super excited. I get there my first day, and you know what happens? The senior developer for the team throws a bunch of code at me and says:
“There’s a bug somewhere in this code we need to fix, here’s a stack trace, I have a meeting I needed to be at like 5 minutes ago. Good luck!”
Wait what? It’s my first day and you’re just throwing me into the ocean (there’s sharks in there! 🦈 The project had over 10,000 line of code btw)!? Yeah… this is basically the life of a software developer, when you land your first job most likely you are going to be given a bunch of code and either told to fix it or add stuff. The senior developers will not possibly have time to walk you through every single line of code and explain it to you. Many times the guy who originally wrote it isn’t with the company anymore to explain it. Your ability to figure out what code is doing on your own will set you apart from other junior developers.
That is the point of this exercise. I will walk through some of the new syntax as we add it, but I can’t explain every line of code in the project. By the end of part 2 you will have more experience with designing a project with a database, adding features using test-driven development (TDD), and tracking your changes with Git.
I’m assuming you worked through the exercises in chapters 1.8 and 1.9 of part 1 as well as the refactoring chapter in part 2. If not, go back and work through them so we will be on the same starting point.
New Requirements
Looks like our ground-breaking choose your own adventure game has done so well that it as gotten the attention of some big wigs that want to invest in our project (these are known as venture capitalists, or VCs for short). Before they start hurling bricks of cash at us though 💵👋, they have a few requirements they want to see added to make the game more legit. This is the list they have given us:
The user should be able to pick from a list of stories when they start the game, and the game should track save points for each game.
The game must allow users to create stories or add pages to an existing story (i.e. a story editor mode)
The game must allow users to go back to a previous page
The game must use a SQLite database to store the program data.
The code must be unit tested.
The program needs to include a logger that logs all interactions with the database and any errors that occur.
Changes to the code must be tracked and documented using a version control system.
Alright, not a small list of changes, but not impossible either. First let’s go through the design for these requirements.
Mock-Ups
We first want to design the user experience for these new features using more mock-ups. We will keep our features from part 1 the same, so we don’t need to recreate the mock-ups for those again. The first new feature is letting the user pick from a list of stories, where before we just had a single story. They also need to be able to add their own stories with story pages in a story editor mode. Let’s show what it might look like when the user first turns on the game:
Choose Your Own Adventure
1. Read a story
2. Create a new story
Reading a story
Let’s say they just want to read a story for now, so they select option 1. Then this menu shows up:
Choose a story to read
1. mock story 1
2. some other story
#... all stories from database displayed
The user can select a story using the number selection. Once they select a story, the program will check to see if a savepoint exists for the selected story. At this point, the game will use all of the code we wrote in part 1 to either load the story from the save point or start the story from the first page and the user can read through the story. The only difference is we will allow the user to add a page at any point in the story as they are reading it. Every page will have an “add an option” option they can select to add a new story page. If they select this option they will be shown a page editor mode:
Once there was a beautiful unicorn, he was so beautiful everyone died. The end
1) read it again
2) add an option
3) save and exit program
2
Page Editor Mode
When a user is adding a page to a story, they will be shown a page editor mode. This will let the user enter information about the page.
Enter option display text (example: Go to library):
# user enters option display text
go to your mom's house
Enter option page name (example: library-1):
# user enters the page name
your mom's house 1
Enter the page text for 'your mom's house 1':
# user enters page text for 'your mom's house 1'
Mock page text about your mom's house
Once a page is created, the user will be shown that new page in story reader mode:
Mock page text about your mom's house
1) go back to previous page
2) add an option
3) save and exit program
Notice that there is another option 1) go back to previous page that the user can select to go back to the page they came from. This option will be shown on every page that isn’t the first page.
If the user puts in a page name that already exists for a story, the program will re-use that existing page for that option.
Enter option display text (example: Go to library):
# user enters option display text
Mock option 2
Enter option page name (example: library-1):
# user enters the page name
your mom's house 1
The page 'your mom's house 1' already exists for this story. Reusing it for this option
Story Editor Mode
Let’s say the user wants to create a new story, so they select option 2 from the main menu. In story editor mode, we let the user create the first story page. Once the first page is created the user will enter story reader mode for that story and the user can then add pages one at a time using the “add an option” option.
Enter a title for this story:
# user enters a title
Mock Title
Enter the page text for 'first' page:
# user enters the first page text
Once upon a time... Some mock story text
# first page is then displayed in story reader mode.
Starting Story...
Once upon a time... Some mock story text
1) add an option
2) save and exit program
That’s it for the mock-ups. Let’s walk through the flow charts.
Flow Charts
Since we are adding a couple new features to our game, it would be helpful to create a couple of new flow charts to walk through the steps of our program. We need two new flowcharts, one for the main menu flow and one for the page editor mode.
Here is the flow chart for when the user first starts the program:
And here is a flow chart for the story editor mode:
Now for the really interesting parts of the design.
The Database Design
For this project, we are going to be using a SQLite database to save the story data needed for our game. We will name this database adventure, since it tracks choose your own adventure data (plus I just think it sounds awesome 😎). Let’s describe the relationships between our game objects:
A story page belongs to one story. A story can have many story pages. (one-to-many relationship)
An option takes a user to one story page. A story page can have many options for the user to select. (one-to-many relationship)
a savepoint tracks a location for one story page. A story page may have one savepoint (one-to-one relationship)
Based on these relationships, we will use the following database tables:
story: this table will be used to track the title and any savepoint data for the story. It will have a story_id (auto-incrementing primary key), title, and a user_page_history, which will be an array of story pages the user has visited (this will let the user navigate back to previous pages), stored in a string format .
story_page: This table will have story_id (so we know which story it belongs to, a page_name, and page_text
The primary key is going to be a little different than what we have used so far. So far we have just used auto-incrementing numbers, but in this case what we want is a composite key. A composite key is a primary key that is composed, or made up of, multiple attributes from a table to make a unique id for a record. In this case, the primary key will be composed of a story_id and a page_name, since we make sure that every story page name in the same story must be unique. The reason we are using a composite key is it will make it easier for us to check story pages in the story editor mode, which you will see when we start implementing the design.
page_option: This table will store the page options a user may select for a story page. It will have an option_id (auto-incrementing primary key). It will use the story_id and parent_page_name to identify which story page the option belongs to. It will also have a page_name that identifies which page should be displayed if the user selects the option. Finally, it will have a display_text attribute which will be displayed to the user when they are choosing an option.
Let’s show these relationships using an ERD
Now that we have that design, let’s talk about the classes we will use to implement these features.
The Code Design
We want to reuse as much of our code from part 1 as possible. So we will keep the StoryReader, UserInputValidator, and SavepointTracker classes in the program. Now that we are working with a database, we will need a class that will handle all of the SQL commands and queries. It will read the story data from the database and transform the data into JavaScript objects. A class that works with a database in this way is commonly known as a data access object, or DAO for short. We will call this class the AdventureDao, since it will be working with the adventure database. We also need a new class for writing story data that the user creates. We will add a class called StoryWriter that will collect the story data from the user and send the story data to the AdventureDao to save in the database. We will also need a Logger class which will hold all of the logging related logic.
Here is a simple CRC diagram showing the classes and how they work together ( I didn’t include the Logger class in this diagram, because logging is not usually a central part of your design):
API Contracts
Now that we have defined some new classes, we need to define the public methods for them. Let’s start with the AdventureDao class.
This class will have methods for writing all the different items to our database, as well as reading information and mapping it into our JavaScript objects.
This class has methods that will be used by our main index.js file to create new stories, pages, and pageOptions. It will handle the story editor flow.
Not much to say here, just a simple logger that logs info and error level messages. Now let’s talk about dependencies.
Dependencies
We didn’t have a design section for this in part 1 because we didn’t have any external dependencies at that point. Now that are project is becoming a little more complicated, we should note in our design all of the third party libraries we plan on using to make this upgrade possible.
To start off, we need libraries for our unit testing. For our project we will be using jest since we used that in our previous chapter on unit testing. Next we need a logging library to log information to a file. We will reuse the winston library that we used in our chapter on logging.
For working with our SQLite database, we will be using better-sqlite3 (since, you know… it’s better 😎).
All of these libraries are available under the MIT license, so we shouldn’t have to worry about anyone suing us by using them in our project 💼 📃 (then again, I’m no lawyer, so maybe ask your personal lawyer 🤷♂️ if you actually have one of those that is).
Setup the Project
Let’s start by setting up our npm project with our needed dependencies. First, we need to open up our story-game directory in VS Code. First cd into your codebro directory and then run the following command
code story-game
This should open a new window in VS Code for that specific directory. The very first change we are going to make is creating a git repository for this project. Open a terminal and run the following command:
git init
You should notice all of the files in your directory have turned green:
Before we do anything else, let’s commit all of these files as they are now. That we you can always come back to this point in the project’s history, you know, in case you feel like feeling nostalgic over your old code 😳. Select the source control icon, commit the changes, and label the commit message with whatever you want. Then commit the changes (if you’re not familiar with saving code changes using git, go check out chapter 2.3 👀 where we walk through how to use git):
Ok, we’ve add a git repo and started committing to it, next task is to initialize an npm project. Run the following command:
npm init -y
The -y will set up all the defaults for you without you having to press the enter key a bunch of times.
Wrote to /Users/shumway/Desktop/codebro/story-game/package.json:
{
"name": "story-game",
"version": "1.0.0",
"description": "",
"main": "index.js",
"scripts": {
"test": "echo \"Error: no test specified\" && exit 1"
},
"keywords": [],
"author": "",
"license": "ISC"
}
Before we install our project dependencies, we need to add a .gitignore file so we can tell git not to track any of third party code. In this example, we also do not want to track any log files or db files since those are not part of the code logic. Create the .gitignore file and add the following lines to it:
node_modules
*.log
*.db
Make sure the file is saved. Now it’s time to add all of our project dependencies, run the following commands:
npm install winston better-sqlite3
npm install jest --save-dev
Next, we need to update the "test" script in the scripts section of the package.json file to look like the following:
"scripts": {
"test": "jest"
},
This will allow us to run and debug our unit tests using the Jest plugin we installed during the unit testing chapter.
That completes our initial setup, let’s go ahead and commit these changes to our git repository. I’m using the following commit:
Setup npm project with dependencies
This project uses a SQLite DB along with
a Logger to track interactions with the DB.
Using npm to manage dependencies.
Once these changes are committed, we are ready to start adding the new classes. In the next chapter, we will add the Logger and AdventureDao classes for working with the SQLite database. Then we will update our current project to start using a SQLite database instead of JSON files for saving the story data. Finally we will add the new story and page editor features to the project to complete part 2. Let’s dive in 🤿 🦈
Chapter 2.10a: Choose your own Adventure Game Coding Part 2 - The SQL
Welcome to the gauntlet! ⚔️ These next few chapters are probably the thickest part of the rainforest we are going to walk through together in this entire book🌴🌴🌴. Some of the less faint of heart might get lost somewhere along the route, especially the part where we climb up the rock wall with scorching flames below us 🧗♀️🔥. I would apologize in advance for any headaches you will experience here, but you’re the one who decided to torture yourself by learning how to code, so you’ve brought this on yourself 😝.
Seriously though, there is so much to cover in this chapter and a schmuck ton of code to write ⌨️ so I’ll I can say is buckle up dudes! We are going to be bringing together all of these concepts we covered in previous chapters to build a choose your own adventure game using a legit relational database. The point of this chapter is exposure and practice! You will be introduced to a lot of new syntax and keywords as we add unit tests and code. This exposure will help you become more familiar with code you would see in a real project, and the more code you write, the better you get at understanding it.
Remember to take breaks so you don’t burn yourself out trying to learn all of this in one sitting 🤯. You will probably need to revisit this chapter a couple times before all this information sticks in your brain 🧠.
Welp time to get started, make sure to watch out for the lion hiding somewhere in this chapter 😳 🦁. Best of luck to you all.
Adding the New Classes
To start, we will add the files for our new classes to the project. We have two new classes to add for this chapter: Logger and AdventureDao.
Logger
We’ll create a new file called logger.js in our story-game directory and add the following code to it:
This should look similar to the code we worked through in the logging chapter. The important thing to note here is we are creating a wrapper class for the winston logger. A wrapper is a light-weight class that doesn’t add much additional features to the original library, but makes it more convenient for us to work with (think of it like wrapping on a box, just makes it a little nicer to look at). We do this for two reasons:
It puts all the winston related code in one place, so our other classes don’t have to copy the configuration all over the place (Keeping it D.R.Y).
If we ever decide to use some other logging library than winston, we only have to change this one file and none of the other classes have to change.
This class is pretty simple, so I just added all the code from the beginning rather than using stubs. The constructor takes one optional parameter, which is the name of the file we want to write the logs in. This allows us to write to a different file if we want to for whatever reason.
Now onto the AdventureDao class.
Adventure DAO
This AdventureDao class, on the other hand, is much more complicated, so we’ll just start out by adding the stubs for it (along with a little extra). Create a file called adventure-dao.js in the story-game directory and add the following code to it:
CHECKPOINT
constDatabase=require('better-sqlite3')
constLogger=require('./logger')
classAdventureDao {
constructor(
database=newDatabase("adventure.db"),
logger=newLogger()
) {
this._db=databasethis._logger=loggerthis._createTablesIfTheyDontExist()
}
_createTablesIfTheyDontExist() {
this._db.exec(` CREATE TABLE IF NOT EXISTS story ( "story_id" INTEGER NOT NULL UNIQUE, "title" TEXT NOT NULL, "user_page_history" TEXT NOT NULL DEFAULT "[]", PRIMARY KEY("story_id" AUTOINCREMENT) ); CREATE TABLE IF NOT EXISTS story_page ( "story_id" INTEGER NOT NULL, "page_name" TEXT NOT NULL, "page_text" TEXT NOT NULL, PRIMARY KEY("story_id", "page_name"), FOREIGN KEY("story_id") REFERENCES "story"("story_id") ); CREATE TABLE IF NOT EXISTS page_option ( "option_id" INTEGER NOT NULL UNIQUE, "story_id" INTEGER NOT NULL, "parent_page_name" TEXT NOT NULL, "page_name" TEXT NOT NULL, "display_text" TEXT NOT NULL, PRIMARY KEY("option_id" AUTOINCREMENT), FOREIGN KEY("story_id", "parent_page_name") REFERENCES "story_page"("story_id", "page_name") ); INSERT OR IGNORE INTO story(story_id, title) VALUES (1, 'demo'); INSERT OR IGNORE INTO story_page(story_id, page_name, page_text) VALUES (1, 'first', 'Once upon a time... yada yada yada'); INSERT OR IGNORE INTO page_option(option_id, story_id, parent_page_name, page_name, display_text) VALUES (1, 1, 'first', 'first', 'Read it again'); `)
}
createPage(storyId, pageName, pageText) {
}
createPageOption(storyId, parentPageName, pageName, displayText) {
}
createStory(title) {
return"fakeId"
}
getPage(storyId, pageName) {
return {}
}
getPageOptions(storyId, pageName) {
return []
}
getStory(storyId) {
return {}
}
getStories() {
return []
}
updateUserPageHistory(storyId, pageHistory) {
}
}
module.exports= { AdventureDao }
As I mentioned before, this class will make all of our interactions with the database. This includes creating the database file itself and all of the tables. Let’s break down the interesting parts:
Here we are importing a Database class from the better-sqlite3 library we installed earlier. We are also pulling in our Logger class that we just added:
Here we have the constructor, which takes in two optional parameters. The first, database, is the database instance we will use. The second, logger, is an instance of the logger. These parameters provide a testing seam which will allow our unit tests to override what database file we are working with for testing. Next we do some setup for our database by creating tables if they don’t already exist:
_createTablesIfTheyDontExist() {
this._logger.info("creating tables if they don't exist")
this._db.exec(` CREATE TABLE IF NOT EXISTS story ( "story_id" INTEGER NOT NULL UNIQUE, "title" TEXT NOT NULL, "user_page_history" TEXT NOT NULL DEFAULT "[]", PRIMARY KEY("story_id" AUTOINCREMENT) ); CREATE TABLE IF NOT EXISTS story_page ( "story_id" INTEGER NOT NULL, "page_name" TEXT NOT NULL, "page_text" TEXT NOT NULL, PRIMARY KEY("story_id", "page_name"), FOREIGN KEY("story_id") REFERENCES "story"("story_id") ); CREATE TABLE IF NOT EXISTS page_option ( "option_id" INTEGER NOT NULL UNIQUE, "story_id" INTEGER NOT NULL, "parent_page_name" TEXT NOT NULL, "page_name" TEXT NOT NULL, "display_text" TEXT NOT NULL, PRIMARY KEY("option_id" AUTOINCREMENT), FOREIGN KEY("story_id", "parent_page_name") REFERENCES "story_page"("story_id", "page_name") ); INSERT OR IGNORE INTO story(story_id, title) VALUES (1, 'demo'); INSERT OR IGNORE INTO story_page(story_id, page_name, page_text) VALUES (1, 'first', 'Once upon a time... yada yada yada'); INSERT OR IGNORE INTO page_option(option_id, story_id, parent_page_name, page_name, display_text) VALUES (1, 1, 'first', 'first', 'Read it again'); }
Here we create our three tables needed for our program to work. We use the database object to execute some SQL commands on the adventure database using the this._db.exec( method. Notice the IF NOT EXISTS clause in each statement, which means if the table already exists it will not be recreated. We then add some demo story data into the database so the user has something to look at the first time the program is run. The INSERT OR IGNORE statement means that if the item already exists in the database with a matching id, it won’t be added a second time (also make sure to put single ' quotes around the string values you insert, and not double " quotes or back ticks `. You’ll get some weird errors that are hard to debug).
Most of these keywords in the SQL commands should look similar to what we saw in the chapter on relational databases, so I won’t regurgitate them here (this chapter is already going to be so flippin’ huge! 🤯). The only difference in this example is the DEFAULT keyword, which can be used to set a default, or preselected, value for an attribute. This is useful when you know the value for an attribute will always start off the same for every item when it is first created. We are using this to tell the database to set a default value for the user_page_history to "[]", since a new story won’t have any user page history.
The rest of the methods are just stubs of methods that we laid out in our design, so we don’t need to review them again.
Before we add any major code to the AdventureDao, we want to set up unit tests so we can use test driven development (TDD) to flesh out our code. But first, let’s commit our code up to this point. This is the commit message I used:
Add Logger and AdventureDao files
These are mostly just stubs for now. We will be adding
more logic using TDD.
With our changes committed, we are ready to start adding unit tests.
Adding SQL Queries to AdventureDao Using Test Driven Development
Let’s create a test directory in our project and add a new file called adventure-dao.test.js. Make sure you are in your story-game directory before running these commands:
mkdirtestcdtestcodeadventure-dao.test.js
Once you have done that, add the following test code to the file and save the file:
CHECKPOINT
const { AdventureDao } =require("../adventure-dao.js")
constDatabase=require("better-sqlite3")
constfs=require("fs")
constLogger=require("../logger")
jest.mock("../logger")
constDEMO_STORY_TITLE="demo"constDEMO_STORY_ID=1constMOCK_STORY_TITLE="Mock Title"constMOCK_STORY_ID=2constTEST_DB_FILEPATH="test-adventure.db"consttestAdventureDao=newAdventureDao(
newDatabase(TEST_DB_FILEPATH),
newLogger()
)
afterAll(function () {
//delete test database file
try {
fs.unlinkSync(TEST_DB_FILEPATH)
} catch (err) {
console.error(err)
}
})
test("should create story and return story id", function () {
letresult=testAdventureDao.createStory(MOCK_STORY_TITLE)
expect(result).toBe(MOCK_STORY_ID)
})
Let’s briefly discuss some new concepts here:
jest.mock("../logger")
Here we are using a new testing function, jest.mock(). This function is used to replace all the classes, methods, and functions in a file with mocks so we can control and spy on their behavior. In this case, we don’t want to actually log anything when running tests, so we mock our logger. You will see many more examples of mocking code like this throughout the project.
Here we are using some test constants. These test constants will be used by several tests, so we define them up here in one place rather than having to retype it multiple times throughout the test file. We are also using a test database file for testing our SQL queries.
Here we are creating an instance of the AdventureDao class for testing. We are using the testing seam constructor I mentioned last chapter to give it a test database as well as the mock logger. This makes sure we don’t mess with the production database while running the tests or log anything (Many times, we would mock the Database object as well since it is usually considered an awkward collaborator, but in this case I want to use an actual test SQLite database so you can make sure your SQL code is working the way we think it’s working. This would be harder to do if we mock the database).
The afterAll function is known as a tear down function. It runs after all the tests have run. We are using it here to delete the test database file at the end of the test run so that the tests start with a clean slate every run. Now let’s look at our first unit test:
test("should create story and return story id", function () {
letresult=testAdventureDao.createStory(MOCK_STORY_TITLE)
expect(result).toBe(MOCK_STORY_ID)
})
This test checks that we are can successfully insert a story and then get the story id for that story from the database. We expect that if the new story is successfully created, it will have a story id of 2, since the demo story was the first story put in with the id of 1.
Now that we have our first unit test, we can run it using the following command:
As expected, our test is failing since we haven’t written any code for this method yet. The output tells you why the test failed and even shows you the difference between what we expected to see and what was actually returned.
We have now finished the first step of TDD:
write a new test and make sure it fails (RED).
Now let’s add code to the createStory method to get the test to pass:
createStory(title) {
this._logger.info("creating story", { title })
constresult=this._db.prepare(
` INSERT INTO story (title) VALUES (?); `
)
.run(title)
returnresult.lastInsertRowid
}
This method takes a title, logs a message with markers, inserts a story item into the story table, and returns result.lastInsertRowid, which is the auto generated id of the story that was created in the database (this syntax should look familiar from chapter 2.6, if you haven’t read that chapter go back and check it out 👀).
Running the npm test command again, we see that the test now passes:
If this is your first time unit testing JavaScript code working with a SQLite database, Congratulations! 🎉 This is a momentous occasion! take a moment to enjoy the accomplishment…
Ok, breaks over 😰. We have completed step 2 of TDD and are ready for step 3:
Write simplest solution to get the test to pass. (GREEN)
If needed, repeat steps 1 and 2 for any other features you need to test. (RED -> GREEN)
First, let’s commit the change for our first unit test. Here’s my commit message:
Add first unit test and code for creating stories
Time to add our next unit test. Add this below our first unit test in the adventure-dao.test.js file:
Here we are testing that we can get all stories from the database. In our test example, we only have two stories, the demo story and the mock story we created in the previous test, so we can expect what the data will look like when we call the getStories method. We expect the title to match what we put in when the stories were created, and the userPageHistory will be empty lists, since when a story is first created the user doesn’t have a page history.
If you run the tests, you will see this test fails since we are just returning [] from the getStories method:
Let’s add some code to the AdventureDao class to get this test to pass. In the adventure-dao.js file, find the getStories method and add the following code to it:
getStories() {
this._logger.info("fetching all stories from database")
conststories=this._db.prepare(
` SELECT story_id AS storyId, title, user_page_history AS userPageHistory FROM story; `
)
.all()
returnstories
}
Here, we run a SELECT query to get all of the stories from our database. The _db.prepare method sets up the query, and the all() method runs the query and returns all of the matching rows. Because the casing between what is returned from the database (snake_case) is different from what we want to use in JavaScript (camelCase), we are using aliases like we discussed in chapter 2.6.
Ok, now that we’ve added the code, let’s run the tests again:
Ok, so looks like we have one more issue to solve. The user page history is returned as a stringified array, but we want it to be just an array. To fix this, we are going to loop through each story object and deserialize the value of userPageHistory to transform it from a string to an actual array. Go back to the getStories method and add this code:
getStories() {
this._logger.info("fetching all stories from database")
conststories=this._db.prepare(
` SELECT story_id AS storyId, title, user_page_history AS userPageHistory FROM story; `
)
.all()
stories.forEach((story) => {
story["userPageHistory"] =JSON.parse(story["userPageHistory"])
})
returnstories
}
So, you should know in JavaScript there are a million different ways to do the same thing (probably explains why most JavaScript code is so hard to read 🤨). Here we use a different syntax for a for loop, the forEach method, to loop through each story object in the list and deserialize the userPageHistory property. The forEach method can be used with any array in JavaScript, in this case the stories array, to loop through the items in the array.
Ok, this is it. It’s finally going to pass now ✅. Let’s run npm test one more time:
😖 WHAT THE FETCH!!! IT SAYS THEY’RE NOT EQUAL BUT IT DOESN’T SHOW US ANY DIFFERENCE 😬!
Ok, so this is a good introduction to the difference between referential equality and deep equality when comparing objects. The reason the test is still failing is because our test assertion is using referential equality (notice the toBe()):
When comparing objects, referential equality means this only passes if the result object is literally using the same location in your computer’s memory as the object between the parenthesis in the toBe() function. 99.9% of the time, this is not the type of equality you want to check for. What we want is a deep equality check. Replace the toBe with toEqual:
This will pass if result has the same values as the object between the parenthesis in the toBe() function. You should use the toEqual() assertion whenever you are checking the contents of an object or array (jest actually gives you this hint in the failure message). Once you make this change and rerun the tests:
HALLELUJAH! 👼 We finally have the test passing! We can already see how this test has driven our coding decisions for getting the results we need.
Before we add any more tests, let’s commit our changes since we are in a working state. Here’s the commit message I used, leaving myself a reminder of why we use toEqual():
Add unit test for getting stories
The test uses a toEqual() assertion rather than just
toBe() because we want to make sure the content of the
objects are equal rather than checking that the two
objects reference the same location in memory.
With that committed, let’s go ahead and add the next one. Add the following test below the last one:
test("should get specific story", function () {
letresult=testAdventureDao.getStory(MOCK_STORY_ID)
expect(result).toEqual({
storyId:MOCK_STORY_ID,
title:MOCK_STORY_TITLE,
userPageHistory: [],
})
})
This test checks that we can get a single story by it’s id, we know that we have a story in the test database with an id of 2, so we can test with that. Run the test, make sure it fails, then add this code to the getStory method in the AdventureDao class:
getStory(storyId) {
this._logger.info("fetching story", { storyId })
conststory=this._db.prepare(
` SELECT story_id AS storyId, title, user_page_history AS userPageHistory FROM story WHERE story_id = ?; `
)
.get(storyId)
story["userPageHistory"] =JSON.parse(story["userPageHistory"])
returnstory
}
Here we’re taking the lessons learned from our getStories implementation to get a single story. This is the first SQL command we’ve added that includes a WHERE clause. We want to specifically get the story that matches the storyId that is passed in. Note that instead of getting all the matching rows from the table using .all, we use .get to get the first matching row.
test("should create story page", function () {
constpageName="mock page"constpageText="Once upon a time... yada yada yada"testAdventureDao.createPage(MOCK_STORY_ID, pageName, pageText)
letresult=testAdventureDao.getPage(MOCK_STORY_ID, pageName)
expect(result).toEqual({ storyId:MOCK_STORY_ID, pageName, pageText })
})
This new test, should create story page, is similar to the first. We pass in some mock data to our createPage method and then see if we can fetch the story page from the database. Go ahead and run npm test
Failing, great 😀. Let’s add some more logic to get the test to pass. Find the getPage method in the adventure-dao.js file and add the following code:
getPage(storyId, pageName) {
this._logger.info("fetching page", { storyId, pageName })
constpage=this._db.prepare(
` SELECT story_id AS storyId, page_name AS pageName, page_text AS pageText FROM story_page WHERE story_id = ? AND page_name = ?; `
)
.get(storyId, pageName)
returnpage
}
This is similar to the getStory method. We use a SELECT statement with aliases to get the page in the needed format from the database. Our SQL statement has a WHERE clause to grab the specific page that matches the storyId and pageName we are looking for. As a reminder, the ordering of the values we pass in to .get() or .all() must match the ordering of the ?s in the SQL.
Here we insert in a new story page, passing in the three pieces of data used by that table. Pretty straightforward. I’m hoping by the time we finish writing all the code for this class this syntax starts to becomes second nature for you to type out 😆.
Amazing, that was way easier to get it to pass! We were able to take all of our lessons learned from the previous tests and apply them to this next piece. You can either commit your changes now or wait until we’re done with the rest of the tests. We’re going to quickly add two more happy path tests to the adventure-dao.test.js file. Here’s the first one:
The first thing I want to point out is the expect.any(Number) syntax. Sometimes in your tests, you don’t know what a value is going to be and you don’t really care. In this case, we don’t need to know what the database is going to generate for the optionId, that number is just for the database to track it’s stuff, we won’t be using it in our code. Because we don’t care, we can tell jest to pass as long as the optionId is any type of number. Use this syntax wisely, some developers get lazy and put expect.any( all over their tests so they pass even when there are issues in the code that the tests should be checking for.
The other thing I want to point out with this test is the optionValue: pageName section of the assertion. In part 1, we set up page options to looked like this:
{
"displayText": "read it again",
"optionValue": "first.json"
}
We are using a property with the name of optionValue which tells us the page to load when the option is loaded. We need to keep using that property name or we will break several parts of the program, so the AdventureDao must return the page name under the alias of optionValue. Fortunately, we know how to use aliases! Add the code to the getPageOptions method:
getPageOptions(storyId, storyPageName) {
this._logger.info("fetching page options", { storyId, storyPageName })
constpageOptions=this._db.prepare(
` SELECT option_id AS optionId, story_id AS storyId, parent_page_name AS parentPageName, page_name AS optionValue, display_text AS displayText FROM page_option WHERE story_id = ? AND parent_page_name = ?; `
)
.all(storyId, storyPageName)
returnpageOptions
}
Notice we are selecting page_name AS optionValue, which will keep our program working as expected.
To get this test to pass, we just need to add code to the last stub method, updateUserPageHistory:
updateUserPageHistory(storyId, pageHistory) {
this._logger.info("updating user page history", { storyId, pageHistory })
this._db.prepare(
` UPDATE story SET user_page_history = ? WHERE story_id = ?; `
)
.run(JSON.stringify(pageHistory), storyId)
}
This SQL command uses the UPDATE keyword to update the page history for the specific story that matches the passed in storyId. We must stringify the array of page names before storing them, or else the database will blow chunks (it can store strings, but not arrays).
Now all of our stubs have been filled out with code, and we have tests in place to make sure the code works as expected. The tests also help us make sure we don’t accidentally break something if we add more code in the future. Go ahead and commit these new changes to your git repo. Here’s my commit message:
Addedhappypathadventuredaotests
Testing Exceptions
We have covered the happy path test cases, but we also need to test for exceptional cases. For example, what if we try to get a story page that doesn’t exist in the database? What should the code do? We don’t want to just fail silently and pretend like everything’s ok. We should explicitly throw an exception so that we can log that exception and try to handle it. We will create a custom exception for this called ItemNotFoundException that gets thrown whenever we try to get something from the database that does not exist. Let’s write a unit test for this scenario. Add the following test to the adventure-dao.test.js file:
test("should throw exception if page does not exist", function () {
expect(() =>testAdventureDao.getPage(MOCK_STORY_ID, "some-fake-page")).toThrow(
ItemNotFoundException
)
expect(() =>testAdventureDao.getPage(MOCK_STORY_ID, "some-fake-page")).toThrow(
"Story page does not exist in database."
)
})
This test uses the toThrow() function to check for our exception. The first except line makes sure the error matches the type of exception and the second makes sure the message matches what we expect.
Running the tests, we hit our first roadblock:
ReferenceError:ItemNotFoundExceptionisnotdefined
We need to create an ItemNotFoundException exception class and export it from the adventure-dao.js file. Add the following code just above the class AdventureDao { line:
Then use it in the getPage method so it looks like this:
getPage(storyId, pageName) {
this._logger.info("fetching page", { storyId, pageName })
constpage=this._db.prepare(
` SELECT story_id AS storyId, page_name AS pageName, page_text AS pageText FROM story_page WHERE story_id = ? AND page_name = ?; `
)
.get(storyId, pageName)
if (!page) {
this._logger.info("caller asked for page that does not exist", {
storyId,
pageName,
})
thrownewItemNotFoundException("Story page does not exist in database.")
}
returnpage
}
If the page does not exist in the database, .get() returns undefined. So we can check if page does not have a value (!page returns true if page is undefined). If the condition is true, we log an info message with markers and throw our exception since we are not able to return the requested page. The code that requested the non-existent page will have to figure out how they want to handle this exception by catching it.
You may have expected us to log an error level message here… but the reason we log an info message instead of an error is because this issue is not caused by the AdventureDao’s code. You only want to log an error if the code in the method caused the problem and something needs to be fixed in the code. In this case, we searched the database for the requested page, and it just so happens that the page that was requested does not exist, with no fault on our part.
Because there is nothing that needs to be fixed with this code, we don’t want to log an error message here. We just log what happened as an info level message and throw an exception.
Finally, export the exception at the bottom of the file:
Ok, we have now added tests for happy path as well as one exceptional test. We could add more, but now that you have some working examples I’ll leave that up to you to explore.
At this point, your adventure-dao.test.js file should look similar to the following:
CHECKPOINT
const { AdventureDao, ItemNotFoundException } =require('../adventure-dao.js')
constDatabase=require("better-sqlite3")
constfs=require("fs")
constLogger=require("../logger")
jest.mock("../logger")
constDEMO_STORY_TITLE="demo"constDEMO_STORY_ID=1constMOCK_STORY_TITLE="Mock Title"constMOCK_STORY_ID=2constTEST_DB_FILEPATH="test-adventure.db"consttestAdventureDao=newAdventureDao(
newDatabase(TEST_DB_FILEPATH),
newLogger()
)
afterAll(function () {
//delete test database file
try {
fs.unlinkSync(TEST_DB_FILEPATH)
} catch (err) {
console.error(err)
}
})
test("should create story and return story id", function () {
letresult=testAdventureDao.createStory(MOCK_STORY_TITLE)
expect(result).toBe(MOCK_STORY_ID)
})
test("should get stories", function () {
letresult=testAdventureDao.getStories()
expect(result).toEqual([
{ storyId:DEMO_STORY_ID, title:DEMO_STORY_TITLE, userPageHistory: [] },
{ storyId:MOCK_STORY_ID, title:MOCK_STORY_TITLE, userPageHistory: [] },
])
})
test("should get specific story", function () {
letresult=testAdventureDao.getStory(MOCK_STORY_ID)
expect(result).toEqual({
storyId:MOCK_STORY_ID,
title:MOCK_STORY_TITLE,
userPageHistory: [],
})
})
test("should create story page", function () {
constpageName="mock page"constpageText="Once upon a time... yada yada yada"testAdventureDao.createPage(MOCK_STORY_ID, pageName, pageText)
letresult=testAdventureDao.getPage(MOCK_STORY_ID, pageName)
expect(result).toEqual({ storyId:MOCK_STORY_ID, pageName, pageText })
})
test("should create page option", function () {
constparentPageName="mock page"constpageName="another mock page"constdisplayText="Go to the witches house!"testAdventureDao.createPageOption(
MOCK_STORY_ID,
parentPageName,
pageName,
displayText
)
letresult=testAdventureDao.getPageOptions(MOCK_STORY_ID, parentPageName)
expect(result).toEqual([
{
optionId:expect.any(Number),
storyId:MOCK_STORY_ID,
parentPageName,
optionValue:pageName,
displayText,
},
])
})
test("should update page history", function () {
constpageHistory= ["page-1", "page-2", "page-3"]
testAdventureDao.updateUserPageHistory(MOCK_STORY_ID, pageHistory)
letresult=testAdventureDao.getStory(MOCK_STORY_ID)
expect(result).toEqual({
storyId:MOCK_STORY_ID,
title:MOCK_STORY_TITLE,
userPageHistory:pageHistory,
})
})
test("should throw exception if page does not exist", function () {
expect(() =>testAdventureDao.getPage(MOCK_STORY_ID, "some-fake-page")).toThrow(
ItemNotFoundException
)
expect(() =>testAdventureDao.getPage(MOCK_STORY_ID, "some-fake-page")).toThrow(
"Story page does not exist in database."
)
})
And your adventure-dao.js file should look similar to the following:
CHECKPOINT
constDatabase=require("better-sqlite3")
constLogger=require("./logger")
classItemNotFoundException {
constructor(message) {
this.message=message
}
}
classAdventureDao {
constructor(
database=newDatabase("adventure.db"),
logger=newLogger()
) {
this._db=databasethis._logger=loggerthis._createTablesIfTheyDontExist()
}
_createTablesIfTheyDontExist() {
this._db.exec(` CREATE TABLE IF NOT EXISTS story ( "story_id" INTEGER NOT NULL UNIQUE, "title" TEXT NOT NULL, "user_page_history" TEXT NOT NULL DEFAULT "[]", PRIMARY KEY("story_id" AUTOINCREMENT) ); CREATE TABLE IF NOT EXISTS story_page ( "story_id" INTEGER NOT NULL, "page_name" TEXT NOT NULL, "page_text" TEXT NOT NULL, PRIMARY KEY("story_id", "page_name"), FOREIGN KEY("story_id") REFERENCES "story"("story_id") ); CREATE TABLE IF NOT EXISTS page_option ( "option_id" INTEGER NOT NULL UNIQUE, "story_id" INTEGER NOT NULL, "parent_page_name" TEXT NOT NULL, "page_name" TEXT NOT NULL, "display_text" TEXT NOT NULL, PRIMARY KEY("option_id" AUTOINCREMENT), FOREIGN KEY("story_id", "parent_page_name") REFERENCES "story_page"("story_id", "page_name") ); INSERT OR IGNORE INTO story(story_id, title) VALUES (1, 'demo'); INSERT OR IGNORE INTO story_page(story_id, page_name, page_text) VALUES (1, 'first', 'Once upon a time... yada yada yada'); INSERT OR IGNORE INTO page_option(option_id, story_id, parent_page_name, page_name, display_text) VALUES (1, 1, 'first', 'first', 'Read it again'); `)
}
createPage(storyId, pageName, pageText) {
this._logger.info("creating new page", { storyId, pageName, pageText })
this._db.prepare(
` INSERT INTO story_page (story_id, page_name, page_text) VALUES (?, ?, ?) `
)
.run(storyId, pageName, pageText)
}
createPageOption(storyId, parentPageName, pageName, displayText) {
this._logger.info("creating page option", {
storyId,
parentPageName,
pageName,
displayText,
})
this._db.prepare(
` INSERT INTO page_option (story_id, parent_page_name, page_name, display_text) VALUES (?, ?, ?, ?); `
)
.run(storyId, parentPageName, pageName, displayText)
}
createStory(title) {
this._logger.info("creating story", { title })
constresult=this._db.prepare(
` INSERT INTO story (title) VALUES (?); `
)
.run(title)
returnresult.lastInsertRowid
}
getPage(storyId, pageName) {
this._logger.info("fetching page", { storyId, pageName })
constpage=this._db.prepare(
` SELECT story_id AS storyId, page_name AS pageName, page_text AS pageText FROM story_page WHERE story_id = ? AND page_name = ?; `
)
.get(storyId, pageName)
if (!page) {
this._logger.info("caller asked for page that does not exist", {
storyId,
pageName,
})
thrownewItemNotFoundException("Story page does not exist in database.")
}
returnpage
}
getPageOptions(storyId, storyPageName) {
this._logger.info("fetching page options", { storyId, storyPageName })
constpageOptions=this._db.prepare(
` SELECT option_id AS optionId, story_id AS storyId, parent_page_name AS parentPageName, page_name AS optionValue, display_text AS displayText FROM page_option WHERE story_id = ? AND parent_page_name = ?; `
)
.all(storyId, storyPageName)
returnpageOptions
}
getStory(storyId) {
this._logger.info("fetching story", { storyId })
conststory=this._db.prepare(
` SELECT story_id AS storyId, title, user_page_history AS userPageHistory FROM story WHERE story_id = ?; `
)
.get(storyId)
story["userPageHistory"] =JSON.parse(story["userPageHistory"])
returnstory
}
getStories() {
this._logger.info("fetching all stories from database")
conststories=this._db.prepare(
` SELECT story_id AS storyId, title, user_page_history AS userPageHistory FROM story; `
)
.all()
stories.forEach((story) => {
story["userPageHistory"] =JSON.parse(story["userPageHistory"])
})
returnstories
}
updateUserPageHistory(storyId, pageHistory) {
this._logger.info("updating user page history", { storyId, pageHistory })
this._db.prepare(
` UPDATE story SET user_page_history = ? WHERE story_id = ?; `
)
.run(JSON.stringify(pageHistory), storyId)
}
}
module.exports= { AdventureDao, ItemNotFoundException }
For now, let’s commit these changes:
Finished initial test cases
This change introduce the ItemNotFoundException class,
which should be used in any case where an item was
requested in the database that could not be found.
If this is your first time adding a bunch of SQL code to an existing project using test driven development, congratulations! 🎉 Next chapter, we will use this class to swap out our JSON files with a SQLite database for saving our story data.
Chapter 2.10b: Choose your own Adventure Game Coding Part 2 - Replacing Files with a Database
This section is going to be an interesting challenge for us (mainly for me, since I have to figure out how to walk you through it 😥). Our program is currently using JSON files to store our story and savepoint data… we need to replace that with our relational database. This is going to be an exercise in backwards compatibility, meaning we want to change these methods without breaking the code in other classes that are using them (it should be compatible with our previous code, meaning we won’t have to change the other code that is using it to keep the program working).
To help us in this challenge, we are going to use test driven development. First we will update the StoryReader class, then the SavepointTracker.
Updating the Story Reader
We need to make a couple updates to the StoryReader. As part of our updated design, the StoryReader class not only needs to track which page the reader is currently on, but also which story has been selected. We will add a variable to this class called selectedStoryId, which we will use to track the id of the story the user has selected to read so we can find it in the database. This will be a public variable, meaning we intend it to accessed directly by other classes. For this chapter, we will always set the selectedStoryId to 1, which is the id of the demo story we put into the database last chapter.
Before we add the tests, do me a favor and add some constants to the constants.js file we created in chapter 2.8. Add the following constants so the file looks like this:
We will all of these over the next two chapters. With that out of the way let’s add another test file to our test directory called story-reader.test.js and add the following code to the file:
CHECKPOINT
//story-reader.test.js
const { AdventureDao } =require("../adventure-dao.js")
const { StoryReader } =require("../story-reader.js")
constLogger=require("../logger.js")
const {
SAVE_OPTION,
ADD_OPTION,
PREVIOUS_PAGE,
FIRST_PAGE_NAME,
} =require("../constants")
constSTORY_ID=1constFIRST_PAGE_TEXT="Once there was an ugly bear. The end"constPAGE_OPTION_DISPLAY_TEXT="Make the bear beautiful"constSECOND_PAGE_NAME="bear becomes beautiful"constSECOND_PAGE_TEXT="Ok... so turns out the bear was beautiful. The End"jest.mock("../adventure-dao.js")
jest.mock("../logger.js")
constmockDao=newAdventureDao()
constmockLogger=newLogger()
conststoryReader=newStoryReader(mockDao, mockLogger)
afterEach(function () {
jest.resetAllMocks()
})
functionwhenTestingFirstPage() {
mockDao.getPage.mockReturnValue({
storyId:STORY_ID,
pageName:FIRST_PAGE_NAME,
pageText:FIRST_PAGE_TEXT,
})
mockDao.getPageOptions.mockReturnValue([
{
displayText:PAGE_OPTION_DISPLAY_TEXT,
optionValue:SECOND_PAGE_NAME,
},
])
storyReader.loadFirstPage()
}
Ok, this test setup may look complicated, but we can break it down. First we have a bunch of test constants that we will use throughout our unit tests:
constSTORY_ID=1constFIRST_PAGE_TEXT="Once there was an ugly bear. The end"constPAGE_OPTION_DISPLAY_TEXT="Make the bear beautiful"constSECOND_PAGE_NAME="bear becomes beautiful"constSECOND_PAGE_TEXT="Ok... so turns out the bear was beautiful. The End"
These variables create a test “model” of the real program for us to test. In our model, we have one story with two pages. The first page has an option that will take you to the second page. Here is a visual of the model:
You usually want to keep your test models as simple as possible, with just enough mock data to test all the features of the code. Next take a look at these lines in particular:
Our StoryReader will need to use the AdventureDao class to interact with the database and get the story data, so we import that into the test file. We will also add a logger. You may remember in the testing chapter when I talked about awkward collaborators. As I mentioned before, awkward collaborators are dependencies with behavior that should be controlled in our tests. The AdventureDao class is a perfect example of this concept. We don’t want these tests writing actual data to a database. We already tested that in the tests we wrote last chapter, so we don’t need to test that again here (In case you haven’t noticed, I’m a really lazy person that doesn’t like repeating work 😴). The jest.mock function replaces all the classes in a file with mocks so we can control and spy on their behavior. Because we are mocking the "../adventure-dao.js" and the "../logger.js" files, when we call the constructors for the classes in those files (new Logger() and new AdventureDao()) we get back a special mock object that mocks all of the methods in the class for us.
Once we create these mock objects, we pass them into the constructor of the StoryReader class to create an instance to use in our unit tests:
We also have this afterEach block of code, let’s take a look at that:
afterEach(function () {
jest.resetAllMocks()
})
This function runs after each test completes and resets all of the mocks that were created using the jest.mock() function. This makes sure that mock behavior is isolated between our unit tests (I have wasted countless hours in testing due the behavior of a mock in one test causing unexpected problems in another, so you always want to make sure to reset the behavior).
We’re doing something a little different here. We are adding a function for setting mock behavior. This function will make it easier to set up certain scenarios in our tests so we can test the pieces we need to without retyping the same lines over and over. For example, we can call this function in any unit test where we want to test features related to reading the first page of a story. This can be useful if you know you want your mocks to behave a certain way for multiple tests.
This mockReturnValue( method can be used on a mock to always return the same value no matter what. Whatever you put between the () is what will be returned when the method is called. In this example, every time the adventureDao.getPage() method is called in the actual code, this same object will be returned. This is how we control the behavior of an awkward collaborator so our tests stay consistent.
With the setup finished, let’s add our first test:
test("should load first page from database", function () {
whenTestingFirstPage()
expect(mockDao.getPage).toBeCalledWith(STORY_ID, FIRST_PAGE_NAME)
})
Here we are checking that if we load the first page of our test story, we should be calling the AdventureDao.getPage() method with the expected parameters. In this test, when the first page of the story is loaded we expect get the story with an id of 1 and the page with the.
Let’s run the tests and make sure this new test fails:
The test is failing because we are not even using the AdventureDao class yet. To get the test to pass, we first need to update the constructor so it takes in the AdventureDao as a parameter. We also need to add a currentStoryId variable. This will help us make sure we are reading from the correct story. First add the imports at the top of the story-reader.js file:
Notice we have a default value for the adventureDao and logger parameters, meaning if we don’t pass them in the constructor will create them itself. This is a backward compatible change to the constructor since we don’t have to change any code outside of this file for everything to keep working. Now let’s fix up the loadFirstPage class so that it loads the first page from the database.
Find the loadFirstPage method and update it to use this code:
loadFirstPage() {
// The first page always has a name of 'first'
constpageData=this._adventureDao.getPage(this.selectedStoryId, FIRST_PAGE_NAME
)
pageData.options=this._adventureDao.getPageOptions(this.selectedStoryId, FIRST_PAGE_NAME
)
this._currentPage=newStoryPage(FIRST_PAGE_NAME, pageData)
}
Here we are using the adventureDao to read the first page data from the database. We also get the options for that page and add them to the page data. Let’s rerun the tests to see the next thing we need to change:
SyntaxError:UnexpectedtokenoinJSONatposition1atJSON.parse (<anonymous>)
at new StoryPage (story-reader.js:10:32)
at StoryReader.loadFirstPage (story-reader.js:70:29)
This tells us there is an error in the new StoryPage( constructor on line 10 (your line might be slightly different). Let’s take a look at the StoryPage class constructor:
Sure enough, we are still trying to deserialize the storyPageData parameter. We needed this when we were using files, but now that we are using a database, the library we are using deserializes the data for us. Remove the JSON.parse from that line so it just looks like this:
this._storyPage=storyPageData
Then run the tests and…
PASS test/story-reader.test.js
Voila! We have our first passing test for our story reader. I was going to suggest that we make a git commit here, but we shouldn’t commit anything until all of the story reader methods are using the database instead of files for loading data (you don’t want to commit when your updated code is half baked 🍠). Let’s add a couple more tests to the story-reader.test.js:
test("should load first page text for story", function () {
whenTestingFirstPage()
letresult=storyReader.getStoryPageText()
expect(result).toBe(FIRST_PAGE_TEXT)
})
test("should load options for first page of story", function () {
whenTestingFirstPage()
letresult=storyReader.getPageOptions()
expect(result).toEqual([
{
displayText:PAGE_OPTION_DISPLAY_TEXT,
optionValue:SECOND_PAGE_NAME,
},
{
displayText:"save and exit program",
optionValue:SAVE_OPTION,
},
])
})
Here we are testing that we get the expected story page text and options for the first page. Run the tests and you should see them pass. Now let’s add a couple more for testing the second story page:
functionwhenTestingSecondPage() {
mockDao.getPage.mockReturnValue({
storyId:STORY_ID,
pageName:SECOND_PAGE_NAME,
pageText:SECOND_PAGE_TEXT,
})
mockDao.getPageOptions.mockReturnValue([])
storyReader.loadStoryPage(SECOND_PAGE_NAME)
}
test("should load next page for story", function () {
whenTestingSecondPage()
letresult=storyReader.getStoryPageText()
expect(result).toBe(SECOND_PAGE_TEXT)
})
test("should add expected options to second story page", function () {
whenTestingSecondPage()
letresult=storyReader.getPageOptions()
expect(result).toEqual([
{
displayText:"save and exit program",
optionValue:SAVE_OPTION,
}
])
})
Here we are testing loading data for the second page of the story. This story does not have any other page options, so we only expect to see the save option in the list of options. If you run these tests, they will fail since we haven’t updated the loadStoryPage method to use the database, let’s go ahead and change that now:
We have now converted this class over to using the database instead of files, we can remove the fs import at the top of the file since it is not be used:
constfs=require('fs') //<- remove this
Alright, run the tests one more time to make sure we didn’t break anything:
PASS test/story-reader.test.js
PASS test/adventure-dao.test.js
Test Suites: 2 passed, 2 total
Tests: 12 passed, 12 total
Look at all that green! That’s cash money right there 💵! Now that we have added our needed tests for this section there is just one more step that I want to bring up here with TDD:
Once you’re done adding new tests, clean up, or refactor your code without letting the tests fail. (Keep it GREEN)
If you haven’t noticed, there is duplicate code between the two methods that load page data, loadFirstPage and loadStoryPage. Here is the duplicate logic:
Now we can use this in both of our other methods that load pages:
loadFirstPage() {
// The first page always has a name of 'first'
this._loadPageData(FIRST_PAGE_NAME)
}
loadStoryPage(pageName) {
this._loadPageData(pageName)
}
With the code refactored, run the tests and make sure they all still pass.
Let’s commit our tests and changes. Here is my commit message:
Convert StoryReader to use database
Rather than using files to store our data, we will
be using a SQLite database since this will be easier
for us to make updates to the data.
Updating the Savepoint Tracker
The StoryReader is now using the database, but we still need to update the SavepointTracker class to use it as well. Now, instead of using a json file to tell us what the savepoint is, we will keep a list of all the pages the user has visited while reading the story. This will allow the user to load their last page as well as go back to previous pages. In fact while we’re here we’ll just add that feature in the code for now to save us the trouble next chapter.
In the interest of keeping the chapter brief, I’m just going to give you all of the tests and code changes up front and then walk through each test and method that we added. I still encourage you to type them all out for the practice, but obviously if you get stuck you can copy and paste.
Let’s start off with the test file. Add a file to the test directory called savepoint-tracker.test.js then add the following code to it:
CHECKPOINT
//savepoint-tracker.test.js
const { AdventureDao } =require("../adventure-dao.js")
constLogger=require("../logger")
constSavepointTracker=require("../savepoint-tracker.js")
constSTORY_ID=1jest.mock("../logger")
jest.mock("../adventure-dao.js")
constmockDao=newAdventureDao()
constmockLogger=newLogger()
constsavepointTracker=newSavepointTracker(mockDao, mockLogger)
afterEach(function () {
jest.resetAllMocks()
})
functionwhenTestingUserHistory(pageHistory) {
mockDao.getStory.mockReturnValue({
storyId:STORY_ID,
title:"some-title",
userPageHistory:pageHistory,
})
}
test("should add page to history and update database", function () {
whenTestingUserHistory([])
savepointTracker.saveCurrentStoryLocation("some-new-page")
expect(mockDao.updateUserPageHistory).toBeCalledWith(STORY_ID, [
"some-new-page",
])
})
test("should return savepoint exists if story has a userPageHistory", function () {
whenTestingUserHistory(["first"])
letresult=savepointTracker.savepointExists()
expect(result).toBe(true)
})
test("should return savepoint does not exits if no userPageHistory", function () {
whenTestingUserHistory([])
letresult=savepointTracker.savepointExists()
expect(result).toBe(false)
})
test("should return latest page in user history", function () {
constlatestPage="latest"whenTestingUserHistory(["first", latestPage])
letresult=savepointTracker.getSavepointPageName()
expect(result).toBe(latestPage)
})
test("should remove page from history and return previous page", function () {
conststartingPage="first"constsecondPage="mockNextPage"whenTestingUserHistory([startingPage, secondPage])
letresult=savepointTracker.returnToPreviousPage()
expect(result).toBe(startingPage)
expect(mockDao.updateUserPageHistory).toBeCalledWith(1, [startingPage])
})
Nothing new here as far as the syntax goes. We create mocks for the AdventureDao and Logger classes similar to the other tests. Check out this function:
This is a test helper function similar to the whenTestingFirstPage() function in the StoryReader tests. Only here we are passing in a parameter pageHistory, which is the list of page names we want the mock database to start off with. This makes it much easier for us to control how the mock AdventureDao class behaves in our tests.
Let’s see how we are using this helper function in our first test:
test("should add page to history and update database", function () {
whenTestingUserHistory([])
savepointTracker.saveCurrentStoryLocation("some-new-page")
expect(mockDao.updateUserPageHistory).toBeCalledWith(STORY_ID, [
"some-new-page",
])
})
Our first test checks that when we save a page location, the database is updated with the new user page history. We simulate the user opening a new story, select a new page, and then saving their spot. Now the next couple of tests:
test("should return savepoint exists if story has a userPageHistory", function () {
whenTestingUserHistory(["first"])
letresult=savepointTracker.savepointExists()
expect(result).toBe(true)
})
test("should return savepoint does not exits if no userPageHistory", function () {
whenTestingUserHistory([])
letresult=savepointTracker.savepointExists()
expect(result).toBe(false)
})
The next two tests check the .savepointExists() method returns true if a story has any user page history or false if not. Next test:
test("should return latest page in user history", function () {
constlatestPage="latest"whenTestingUserHistory(["first", latestPage])
letresult=savepointTracker.getSavepointPageName()
expect(result).toBe(latestPage)
})
Here we check that the tracker gets the correct latest savepoint for a story by returning the last page in the user page history array.
To get these tests to pass, open the savepoint-tracker.js file and update the code so that it looks like the following:
CHECKPOINT
const { AdventureDao } =require("./adventure-dao")
constLogger=require("./logger")
classSavepointTracker {
constructor(adventureDao=newAdventureDao(), logger=newLogger()) {
this._adventureDao=adventureDaothis._logger=loggerthis.selectedStoryId=1
}
_getUserPageHistory() {
returnthis._adventureDao.getStory(this.selectedStoryId).userPageHistory
}
saveCurrentStoryLocation(pageName) {
constpageHistory=this._getUserPageHistory()
if (pageHistory[pageHistory.length-1] !==pageName) {
pageHistory.push(pageName)
this._adventureDao.updateUserPageHistory(this.selectedStoryId, pageHistory)
this._logger.info("Added page to history.", { userHistory:pageHistory })
}
}
savepointExists() {
returnthis._getUserPageHistory().length!==0
}
getSavepointPageName() {
constpageHistory=this._getUserPageHistory()
// get last page in the array
this._logger.info("getting last page in history.", {
pageHistory
})
returnpageHistory[pageHistory.length-1]
}
returnToPreviousPage() {
constpageHistory=this._getUserPageHistory()
this._logger.info("going to previous page.", {
pageHistory
})
pageHistory.pop()
this._adventureDao.updateUserPageHistory(this.selectedStoryId, pageHistory)
returnpageHistory[pageHistory.length-1]
}
}
module.exports=SavepointTracker
Here we’ve updated our SavepointTracker so it is no longer using files and is now using the database to load savepoint data. Let’s look at the new stuff that was added:
We’ve added a constructor that takes in the AdventureDao and Logger as parameters, with a public selectedStoryId variable to track the story the user is reading (we’ve hardcoded this to be the demo story for this chapter, this will be changed next chapter). The private _getUserPageHistory method will be called whenever we need to load the page history for a story from the database. Now let’s look at the code to create savepoints:
saveCurrentStoryLocation(pageName) {
constpageHistory=this._getUserPageHistory()
if (pageHistory[pageHistory.length-1] !==pageName) {
pageHistory.push(pageName)
this._adventureDao.updateUserPageHistory(this.selectedStoryId, pageHistory)
this._logger.info("Added page to history.", { userHistory:pageHistory })
}
}
We check to make sure the page we are saving isn’t already the last page in the history (no need to add it again if it’s already saved). We then add it to the list and make a call to the database to update the page history. The next method is much simpler to understand:
We check to see if a savepoint exists by checking if the user page history has any pages in it or not. If it does we return true or false if there are not pages currently in the history.
getSavepointPageName() {
constpageHistory=this._getUserPageHistory()
// get last page in the array
this._logger.info("getting last page in history.", {
pageHistory
})
returnpageHistory[pageHistory.length-1]
}
When the user loads a savepoint for a story, we just grab the last page name from the list of pages in the history, since that was the last page they were on when the exited the game. Now let’s look at the new method we added to support going to previous pages:
This page removes the last page from the list, updates the database, and then returns the previous page name.
At this point, now that we have removed all code related to reading and writing to our old files, we can delete the story directory entirely (you don’t have to, but I prefer to remove files if I know I’m not using them anymore so they don’t clutter my workspace). Now we can commit the changes for this class:
Update SavepointTracker to use database
Also added features for getting previous page. This will
allow the user to return to previous pages in the story
At this point, you should be able to run the program using node index.js and read the demo story from the database:
node index.js
Choose your own adventure game
Starting story...
Once upon a time... yada yada yada
1) Read it again
2) save and exit program
1
Once upon a time... yada yada yada
1) Read it again
2) save and exit program
2
Story progress saved. See you later!
Nice work! 👍 We have updated our project to use a SQLite DB instead of files. In the next chapter, we will add our story editor mode to allow the user to add new stories and pages. See you over there once you’ve caught your breath. 😤🥾
Chapter 2.10c: Choose your own Adventure Game Coding Part 2 - Adding Story Editor Mode
Great, we’ve now updated our game to use the SQLite database instead of files. In this chapter we will add the story editor mode and update the Handler class to include all the new features with unit tests.
Adding the StoryWriter Class
First Let’s add the stubs for our StoryWriter. Create a file called story-writer.js in your story-game directory and add the following code to it:
The StoryWriter constructor takes three parameters. The first is the userInputValidator, which we will use to get input from the user when creating stories and pages. The second is an instance of the adventureDao class we just added, which we will use to insert story data into the database. The third is a logger for logging messages. Notice the first parameter is required, meaning you always have to pass it in when calling the constructor. While the second and third are optional.
Before we add any major code to the AdventureDao and StoryWriter classes, we want to set up unit tests so we can use test driven development to flesh out our code. Create another file in the test directory named story-writer.test.js. Add the following code to it:
CHECKPOINT
//story-writer.test.js
const { AdventureDao, ItemNotFoundException } =require("../adventure-dao.js")
constUserInputValidator=require("../user-input-validator.js")
const { StoryWriter } =require("../story-writer.js")
jest.mock("../adventure-dao.js")
jest.mock("../user-input-validator.js")
constmockUserInput=newUserInputValidator()
constmockDao=newAdventureDao()
conststoryWriter=newStoryWriter(mockUserInput, mockDao)
constMOCK_STORY_ID=1constMOCK_OPTION_DISPLAY_TEXT="go to the library"constMOCK_PARENT_PAGE_NAME="mockParentPage"constMOCK_PAGE_TEXT="here is some mock page text"constMOCK_NEW_PAGE_NAME="mockNewPage"constMOCK_EXISTING_PAGE_NAME="mockExistingPage"afterEach(function () {
jest.resetAllMocks()
})
No new syntax here, just notice that now we are mocking the UserInputValidator now along with the others. The UserInputValidaor class is a perfect example of an awkward collaborator. It reads user input through a terminal, which we do not want to mess with in our unit tests. So instead of using the actual class, we are going to use a mock to control the behavior.
Once we create these mock objects, we pass them into the constructor of the StoryWriter class to create an instance to use in our unit tests.
Let’s add our first unit test to show how we can use these mocks to setup our tests. Add the following test:
test("should create story with first page", asyncfunction () {
constmockStoryTitle="Mock Title"constmockFirstPageText="Once upon a time..."mockUserInput.getInput// simulates user typing in title for story
.mockReturnValueOnce(mockStoryTitle)
// simulates user typing in text for first page
.mockReturnValueOnce(mockFirstPageText)
// simulates adventure dao creating the story in the db
// and returning 1 as the story id
mockDao.createStory.mockReturnValue(1)
letresult=awaitstoryWriter.runStoryEditorMode()
expect(result).toBe(1)
expect(mockDao.createStory).toHaveBeenCalledWith(mockStoryTitle)
expect(mockDao.createPage).toHaveBeenCalledWith(1, "first", mockFirstPageText)
})
In our first unit test, we use our mocks to control what user input is returned when the getInput method is called. We can use mocks to control what will be returned the first and second time the method is called:
mockUserInput.getInput// simulates user typing in title for story
.mockReturnValueOnce(mockStoryTitle)
// simulates user typing in text for first page
.mockReturnValueOnce(mockFirstPageText)
In this example, the first time the code calls the getInput() method the mock will return the value of mockStoryTitle, then the second time it is called the mock will return the value of mockFirstPageText. We can chain these together like this to control any number of calls to the mock.
We can also have a mock always return the same thing no matter how many times it is called like we saw last chapter:
mockDao.createStory.mockReturnValue(1)
In this example, any time we call the createStory() method the mock will always return a value of 1. This gives us full control over the behavior of our awkward collaborators!
This test is making an assertion that the AdventureDao methods were called with expected arguments when we created the story items. For example, when we create a new story we expect to pass in the story title that was given to us by the user so the story is created with the expected title. Likewise when we created the page we better give it the correct story id, page name, and page text in the correct order so the story page is created in the database as expected.
Last thing to point out is this unit test is an async function, this is because we have to use the await keyword when calling the runStoryEditorMode method since it uses the getInput method, which is also async.
We’re going to add the code to runStoryEditorMode to get the test to pass. Here is the code for the method:
asyncrunStoryEditorMode() {
this._logger.info("starting story editor mode.")
conststoryTitle=awaitthis._userInputValidator.getInput("Enter a title for this story:")
constfirstPageText=awaitthis._userInputValidator.getInput("Enter the page text for 'first page':")
conststoryId=this._adventureDao.createStory(storyTitle)
this._adventureDao.createPage(storyId, "first", firstPageText)
this._logger.info("successfully created story", {storyTitle, storyId})
returnstoryId
}
We have added the async keyword to this method since we have to wait to get the title and first page text from the user. We then use this data to create the story and the first page items in the database. Finally we return the storyId generated by the database.
If you run the test with this code change it should now pass. Now let’s add the next test to the story-writer.test.js file:
test("should create page with option data", asyncfunction () {
mockUserInput.getInput.mockReturnValueOnce(MOCK_OPTION_DISPLAY_TEXT)
// simulates user typing in page name
.mockReturnValueOnce(MOCK_NEW_PAGE_NAME)
// simulates user typing in new page text
.mockReturnValueOnce(MOCK_PAGE_TEXT)
letresult=awaitstoryWriter.runPageEditorMode(
MOCK_STORY_ID,
MOCK_PARENT_PAGE_NAME
)
expect(result).toBe(MOCK_NEW_PAGE_NAME)
expect(mockDao.createPage).toHaveBeenCalledWith(
MOCK_STORY_ID,
MOCK_NEW_PAGE_NAME,
MOCK_PAGE_TEXT
)
expect(mockDao.createPageOption).toHaveBeenCalledWith(
MOCK_STORY_ID,
MOCK_PARENT_PAGE_NAME,
MOCK_NEW_PAGE_NAME,
MOCK_OPTION_DISPLAY_TEXT
)
})
Similar to the previous test, we set up the mocks to return specific data to simulate the user typing input into the terminal. We run the method we are testing, and then make assertions that the mocks were called with expected parameters (as a side note, if the method I’m checking takes 3 or more parameters, I usually break them up on separate lines to make it easier to read). Let’s go ahead and add code to the runPageEditorMode method:
asyncrunPageEditorMode(storyId, parentPageName) {
this._logger.info("starting page editor mode.", {storyId, parentPageName})
constoptionDisplayText=awaitthis._userInputValidator.getInput("Enter option display text (example: Go to library):")
constpageName=awaitthis._userInputValidator.getInput("Enter option page name (example: library-1):")
constpageText=awaitthis._userInputValidator.getInput(`Enter the page text for '${pageName}':`)
this._adventureDao.createPage(storyId, pageName, pageText)
this._adventureDao.createPageOption(storyId, parentPageName, pageName, optionDisplayText)
returnpageName
}
This method collects page and option data from the user and creates items in the database from that data. Once you add the code, rerun the tests and they should pass. Now we need to add one more test to cover the scenario when the user picks a page name that already exists. Add the following unit test:
test("should use existing page when page is found in database", asyncfunction () {
mockUserInput.getInput.mockReturnValueOnce(MOCK_OPTION_DISPLAY_TEXT)
// simulates user typing in page name
.mockReturnValueOnce(MOCK_EXISTING_PAGE_NAME)
// simulates page with name existing in database
mockDao.getPage.mockReturnValue({ pageName:MOCK_EXISTING_PAGE_NAME })
letresult=awaitstoryWriter.runPageEditorMode(
MOCK_STORY_ID,
MOCK_PARENT_PAGE_NAME
)
expect(result).toBe(MOCK_EXISTING_PAGE_NAME)
// make sure new page was not created
expect(mockDao.createPage).toHaveBeenCalledTimes(0)
expect(mockDao.createPageOption).toHaveBeenCalledWith(
MOCK_STORY_ID,
MOCK_PARENT_PAGE_NAME,
MOCK_EXISTING_PAGE_NAME,
MOCK_OPTION_DISPLAY_TEXT
)
})
Here, we add mock behavior so that when we check to see if the page exists, we use it instead of creating a new one. Now let’s update our runPageEditorMode method to get this to pass:
asyncrunPageEditorMode(storyId, parentPageName) {
constoptionDisplayText=awaitthis._userInputValidator.getInput("Enter option display text (example: Go to library):")
constpageName=awaitthis._userInputValidator.getInput("Enter option page name (example: library-1):")
try {
constpage=this._adventureDao.getPage(storyId, pageName)
console.log(`The page '${page.pageName}' already exists for this story. Reusing it for this option`)
}
catch (error) {
if (errorinstanceofItemNotFoundException) {
this._logger.info("page with specified name does not currently exist. Creating new page", {storyId, pageName})
constpageText=awaitthis._userInputValidator.getInput(`Enter the page text for '${pageName}':`)
this._adventureDao.createPage(storyId, pageName, pageText)
}
else {
// rethrow the error since it was not an error we were expecting
throw (error)
}
}
this._adventureDao.createPageOption(storyId, parentPageName, pageName, optionDisplayText)
returnpageName
}
Let’s focus in on the new try/catch block we added:
try {
constpage=this._adventureDao.getPage(storyId, pageName)
console.log(`The page '${page.pageName}' already exists for this story. Reusing it for this option`)
}
Here we try to get the page from the database to see if one already exists with the pageName typed in by the user. If the AdventureDao returns the page, we know it already exists and don’t need to recreate it, we just add a page option pointing to it.
On the other hand, if the page doesn’t exist we know that the getPage method will throw a ItemNotFoundException. We need to be prepared to catch this or the program will exit with an error. In our catch block we check to make sure the error was a ItemNotFoundException and not something else:
catch (error) {
if (errorinstanceofItemNotFoundException) {
this._logger.info("page with specified name does not currently exist. Creating new page", {storyId, pageName})
constpageText=awaitthis._userInputValidator.getInput(`Enter the page text for '${pageName}':`)
this._adventureDao.createPage(storyId, pageName, pageText)
}
else {
// rethrow the error since it was not an error we were expecting
throw (error)
}
}
If the error is an ItemNotFoundException, we know the page doesn’t exist and we ask the user to enter page text for this new page we are creating. Finally we create the page with the data.
If the error was caused by something other than an ItemNotFoundException, we re-throw the exception, meaning that we’ll have to catch it somewhere else in the code or just let it crash the program altogether. We re-throw it simply because there is nothing we can do to deal with it here.
Ok, if you rerun the tests after adding these changes, you will notice something interesting about the StoryWriter tests:
● should create page with option data
TypeError: Cannot read properties of undefined (reading 'pageName')
The new test is passing, but our second test is failing… so what did we break? The problem is we added the try catch block to the runPageEditorMode method and we only create a page if the adventureDao throws an exception, which means we need to force the mockDao to throw an exception. Add the following line somewhere in the test setup of the unit test named should create page with option data (right below all the mockUserInput lines:
//simulates page not found in database
mockDao.getPage.mockImplementation(function () {
thrownewItemNotFoundException("page not found")
})
This line forces the mockDao to throw an ItemNotFoundException exception when the getPage method is called. Now rerun the tests:
TestSuites:4passed, 4totalTests:20passed, 20total
Awesome, we have used TDD to add features for 4 different classes with 20 unit tests, not bad! 👍(we really could add tests for the Logger and UserInputValidator classes, but for the sake of brevity I’ll let you tackle that on your own if you feel so inclined). Let’s commit these changes. Here’s my commit message:
Added Story Writer class
This class will allow the user to write new stories and
pages that will be added to the database.
Next, we need to add new options to our StoryReader class so the user can create new pages while reading a story.
Adding New Story Page Options
Ok, we want the user to be able to add a new story page at any point in a story while reading it, or to go back to previous pages. We are going to add the following options to the list of options displayed to the user:
1) go back to previous page
2) add an option
Let’s use TDD to add these features. Open the unit tests in the story-reader.test.js file, find the one named should load options for first page of story, and update the expected options so the test looks like this:
test("should load options for first page of story", function () {
whenTestingFirstPage()
letresult=storyReader.getPageOptions()
expect(result).toEqual([
{
displayText:PAGE_OPTION_DISPLAY_TEXT,
optionValue:SECOND_PAGE_NAME,
},
{
displayText:"add an option",
optionValue:ADD_OPTION,
},
{
displayText:"save and exit game",
optionValue:SAVE_OPTION,
},
])
})
The first page won’t have a previous page, so we don’t want to display the previous page option to them. Now find the test named "should add expected options to second story page" and update the expected options so the test looks like this:
test("should add expected options to second story page", function () {
whenTestingSecondPage()
letresult=storyReader.getPageOptions()
expect(result).toEqual([
{
displayText:"go back to previous page",
optionValue:PREVIOUS_PAGE,
},
{
displayText:"add an option",
optionValue:ADD_OPTION,
},
{
displayText:"save and exit game",
optionValue:SAVE_OPTION,
},
])
})
Run the tests to make sure these two fail. We need to add some code to the StoryPage class so that we include these other options:
Let’s add the code to the StoryPage constructor:
classStoryPage {
constructor(pageName, storyPageData) {
this._pageName=pageNamethis._storyPage=storyPageDataconstadditionalOptions= [
{
displayText:"add an option",
optionValue:ADD_OPTION,
},
{
displayText:"save and exit game",
optionValue:SAVE_OPTION,
},
]
if (this._pageName!==FIRST_PAGE_NAME) {
additionalOptions.unshift({
displayText:"go back to previous page",
optionValue:PREVIOUS_PAGE,
})
}
this._storyPage.options.push(...additionalOptions)
}
Here we take the storyPageData given to us and add some options to it. The add an option and the save and exit game options will always be added. If we are not on the first page, we add the go back to previous page to the front of the list (unshift() puts things in the front of the array, whereas push() puts things in the back). Finally we use what is known as the spread operator (…) to add all of the options from the additionalOptions array to the original list of story page options. The spread operator is super useful when working with arrays and objects. For example, it allows you to take all the items from one array and put them into another.
Once you have added this code, rerun the tests and they should all be passing. Just one more test remaining for this class. We need to add a method, loadStories(), that the handler will call to get all the stories from the database so we can display the story titles for the user to select. Here is the test for it:
test("should load all stories", function () {
constmockStories= [{ storyId:STORY_ID, title:"some-title", userPageHistory: [] },]
mockDao.getStories.mockReturnValue(mockStories)
constresult=storyReader.loadStories()
expect(result).toEqual(mockStories)
})
To get this test to pass, add the following method to the StoryReader class:
This new loadStories method is just a wrapper for the adventure dao’s getStories method. We are adding it to the StoryReader so that we don’t have to add the AdventureDao class as a dependency to the Handler class (it’s just easier for everyone if those two don’t mingle, they’d create unnecessary
drama 💔).
If you rerun the tests now, they should all pass. We have added all the code we need to the StoryReader class. At this point we are ready to tie everything together in the Handler class to finish this project.
The Home Stretch
We’ve come so far. I think I can see a light at the end of the tunnel (spoiler alert, it’s a train 🚆).
Now for the last part… we have to update the Handler class in our index.js file to support our story editor modes as well as allowing the user to go back to a previous page. This will require a handful more tests and some new methods, but once we finish these steps we are done with the project. Let’s do this!
Before we add tests, we need to fix up the index.js file. The imports should include the StoryWriter class, the Logger class, and new constants. The Handler constructor should include optional parameters for all the classes to allow us to pass them in for mocking. We also need to export the Handler class itself so we can import it into our tests. Most importantly, we need to add a special condition around the line that starts the program, new Handler().handler(), so that it only runs if we type in node index.js into the terminal (I’ll explain why this matters in a minute).
Let’s start with the import and constructor changes:
This will allow us to pass in all these dependencies in our unit test setup. Next we need to add an if statement around the line that runs the code and add this export at the bottom of the file:
if (require.main===module) {
newHandler().handler()
}
module.exports=Handler
This if (require.main === module) is only true if we call the index.js file directly using the node index.js command. Without this condition, any code that you write in a JS file will automatically run whenever you import it into another file! And because we have to import this file into our unit test file that means every time we run the tests it would also run the new Handler().handler() line (don’t ask me how long it took me to debug this problem when I was working on the unit tests… too long 😞 this is the kind of stuff you can only find through internet searching).
Here is the updated file in it’s entirety:
CHECKPOINT
//index.js
const { StoryReader } =require("./story-reader.js")
constSavepointTracker=require("./savepoint-tracker.js")
constUserInputValidator=require("./user-input-validator.js")
const { StoryWriter } =require("./story-writer.js")
constLogger=require("./logger")
const { SAVE_OPTION, ADD_OPTION, PREVIOUS_PAGE } =require("./constants.js")
classHandler {
constructor(
storyReader=newStoryReader(),
savepointTracker=newSavepointTracker(),
userInputValidator=newUserInputValidator(),
storyWriter=newStoryWriter(userInputValidator),
logger=newLogger()
) {
this._storyReader=storyReaderthis._savepointTracker=savepointTrackerthis._userInputValidator=userInputValidatorthis._storyWriter=storyWriterthis._logger=logger
}
asynchandler() {
console.log("Choose your own adventure game")
if (this._savepointTracker.savepointExists()) {
constpageName=this._savepointTracker.getSavepointPageName()
this._storyReader.loadStoryPage(pageName)
console.log("Story savepoint loaded...")
} else {
console.log("Starting story...")
this._storyReader.loadFirstPage()
}
varuserStillPlaying=truewhile (userStillPlaying) {
console.log(this._storyReader.getStoryPageText())
varoptions=this._storyReader.getPageOptions()
varselectedOption=awaitthis._userInputValidator.getMenuSelection(
options
)
if (selectedOption==SAVE_OPTION) {
userStillPlaying=falsethis._savepointTracker.saveCurrentStoryLocation(
this._storyReader.getPageName()
)
console.log("Story progress saved. See you later!")
} else {
this._storyReader.loadStoryPage(selectedOption)
}
}
// NOTE the line to close the terminal here
this._userInputValidator.closeTerminalConnection()
}
}
if (require.main===module) {
newHandler().handler()
}
module.exports=Handler
Ok, with those fixes in place, we are ready to add our handler unit tests. These will be our most complicated tests simply because we have all of these classes working together. I’m going to give you all the happy path unit tests up front so you can look through them and add your own if you want to try some out (Feel free to just copy and paste all this if you want, but obviously it will stick in your brain better if you type it out 🧠. The important thing is to get exposure to the test setup). Create a file in your test directory called index.test.js and add the following:
CHECKPOINT
//index.test.js
const { StoryWriter } =require("../story-writer.js")
const { StoryReader } =require("../story-reader.js")
constLogger=require("../logger")
constSavepointTracker=require("../savepoint-tracker.js")
constUserInputValidator=require("../user-input-validator.js")
constHandler=require("../index.js")
const {
SAVE_OPTION,
ADD_OPTION,
PREVIOUS_PAGE,
FIRST_PAGE_NAME,
} =require("../constants")
//turn off console.log messages in test output
jest.spyOn(global.console, "log").mockImplementation()
constEXISTING_STORY_ID="some-existing-id"constNEW_STORY_ID="new-id"jest.mock("../logger")
jest.mock("../savepoint-tracker.js")
jest.mock("../story-reader.js")
jest.mock("../story-writer.js")
jest.mock("../user-input-validator.js")
constmockStoryReader=newStoryReader()
constmockSavepointTracker=newSavepointTracker()
constmockUserInput=newUserInputValidator()
constmockStoryWriter=newStoryWriter()
constmockLogger=newLogger()
consttestHandler=newHandler(
mockStoryReader,
mockSavepointTracker,
mockUserInput,
mockStoryWriter,
mockLogger
)
beforeEach(function () {
// simulates story text loaded from db
mockStoryReader.getStoryPageText.mockReturnValue("mock story text")
})
afterEach(function () {
jest.resetAllMocks()
})
functionwhenTestingReadStory() {
mockUserInput.getMenuSelection// simulates user selecting 'Read a story' in main menu selection
.mockReturnValueOnce("read")
// simulates user selecting story
.mockReturnValueOnce(EXISTING_STORY_ID)
// simulates user selecting save option
.mockReturnValue(SAVE_OPTION)
// simulates story reader returning stories from database
mockStoryReader.loadStories.mockReturnValue([
{ storyId:EXISTING_STORY_ID, title:"hello world" },
])
}
functionwhenTestingCreateStory() {
mockUserInput.getMenuSelection// simulates user selecting 'Create a new story' main menu selection
.mockReturnValueOnce("create")
// simulates user selecting save option to exit
.mockReturnValue(SAVE_OPTION)
mockStoryWriter.runStoryEditorMode// simulates story writer creating story and returning story id of 1
.mockReturnValue(NEW_STORY_ID)
}
test("should run story editor mode", asyncfunction () {
whenTestingCreateStory()
awaittestHandler.handler()
expect(mockStoryWriter.runStoryEditorMode).toBeCalledTimes(1)
// make sure the story reader and savepoint tracker get the id of the created story
expect(mockSavepointTracker.loadStoryHistory).toBeCalledWith(NEW_STORY_ID)
expect(mockStoryReader.setCurrentStoryId).toBeCalledWith(NEW_STORY_ID)
})
test("should start story reader mode", asyncfunction () {
whenTestingReadStory()
awaittestHandler.handler()
// make sure the story reader and savepoint tracker get the id of the selected story
expect(mockSavepointTracker.loadStoryHistory).toBeCalledWith(
EXISTING_STORY_ID
)
expect(mockStoryReader.setCurrentStoryId).toBeCalledWith(EXISTING_STORY_ID)
})
test("should run page editor mode and load new page", asyncfunction () {
constnewPageName="newPage"whenTestingReadStory()
// simulates user selecting add option
mockUserInput.getMenuSelection.mockReturnValueOnce(ADD_OPTION)
mockStoryReader.getPageName=jest.fn()
.mockReturnValueOnce(FIRST_PAGE_NAME)
.mockReturnValueOnce(newPageName)
// simulates user creating new page
mockStoryWriter.runPageEditorMode.mockReturnValue(newPageName)
awaittestHandler.handler()
// make sure the story reader and savepoint tracker get called with the page name
expect(mockSavepointTracker.saveCurrentStoryLocation).toBeCalledWith(
newPageName
)
expect(mockStoryReader.loadStoryPage).toBeCalledWith(newPageName)
})
test("should go to previous page", asyncfunction () {
whenTestingReadStory()
// simulates user selecting add option
mockUserInput.getMenuSelection.mockReturnValueOnce(PREVIOUS_PAGE)
// simulates returning to first page
mockSavepointTracker.returnToPreviousPage.mockReturnValue(FIRST_PAGE_NAME)
awaittestHandler.handler()
// make sure the story reader loaded the previous page name
expect(mockStoryReader.loadStoryPage).toBeCalledWith(FIRST_PAGE_NAME)
})
test("should update page history as user progresses through story", asyncfunction () {
constsecondPage="second"constthirdPage="third"whenTestingReadStory()
//story starts on first page
mockStoryReader.getPageName.mockReturnValueOnce(FIRST_PAGE_NAME)
// user chooses second page
mockUserInput.getMenuSelection.mockReturnValueOnce(secondPage)
mockStoryReader.getPageName.mockReturnValueOnce(secondPage)
// user then chooses third page
mockUserInput.getMenuSelection.mockReturnValueOnce(thirdPage)
mockStoryReader.getPageName.mockReturnValueOnce(thirdPage)
awaittestHandler.handler()
// make sure the story reader loaded the pages
expect(mockStoryReader.loadStoryPage).toBeCalledWith(secondPage)
expect(mockStoryReader.loadStoryPage).toBeCalledWith(thirdPage)
// This asserts we are saving these pages in the expected order
expect(mockSavepointTracker.saveCurrentStoryLocation).toHaveBeenNthCalledWith(
1,
FIRST_PAGE_NAME
)
expect(mockSavepointTracker.saveCurrentStoryLocation).toHaveBeenNthCalledWith(
2,
secondPage
)
expect(mockSavepointTracker.saveCurrentStoryLocation).toHaveBeenNthCalledWith(
3,
thirdPage
)
})
This includes one test for each of the major features in our program. The first test covers story creator mode. The second test goes through story reader mode. The third covers page editor mode. The fourth tests going back to a previous page. The fifth test checks that we are updating the page history as the user progresses through the story. If we get these five tests to pass, we will have met the requirements for our project.
First, we have to add logic for displaying a main menu to the user. We can use the userInputValidator.getMenuSelection() method to do this, which means we need to create a list of objects that have displayText and optionValue properties. Just below the imports in the index.js file, add the following list of main menu options:
constREAD_OPTION="read"constCREATE_OPTION="create"constMAIN_MENU_OPTIONS= [
{
displayText:"Read a story",
optionValue:READ_OPTION
},
{
displayText:"Create a new story",
optionValue:CREATE_OPTION
}
]
This will be our main menu options that are first displayed when the user runs the program. Next we need to add a method in the Handler class that will handle the user’s main menu selection. Add the following method to the Handler class just above the handler() method:
asynchandleMainMenuSelection() {
constmainMenuSelection=awaitthis._userInputValidator.getMenuSelection(
MAIN_MENU_OPTIONS
)
letselectedStoryId=nullif (mainMenuSelection===READ_OPTION) {
conststories=this._storyReader.loadStories()
if (stories.length===0) {
console.log("No stories have been created yet! First create a Story")
selectedStoryId=awaitthis._storyWriter.runStoryEditorMode()
} else {
console.log("Choose a story to read\n")
letmenuOptions=stories.map((story) => {
return { displayText:story.title, optionValue:story.storyId }
})
selectedStoryId=awaitthis._userInputValidator.getMenuSelection(
menuOptions
)
}
} elseif (mainMenuSelection===CREATE_OPTION) {
selectedStoryId=awaitthis._storyWriter.runStoryEditorMode()
}
this._savepointTracker.selectedStoryId=selectedStoryIdthis._storyReader.selectedStoryId=selectedStoryIdreturnselectedStoryId
}
This will check what the user selected from the main menu and either let the user pick a story to read or walk them through creating a new story. If they choose to read a story then we load the stories and create a menu of story titles to pick from.
Next we need to call the handleMainMenuSelection method in handler() to display the main menu and get the selected story id from the user. Add this line just below the console.log("Choose your own adventure game") line:
To get the next tests to pass. We are going to add another method to the Handler class called handleStoryMode. Add this method just above the handler() method.
This adds code to handle the two new options in story mode, adding new options and going back to previous pages. Replace the current while loop in handler() with this new method so that the entire handler() method looks like this:
asynchandler() {
console.log("Choose your own adventure game")
constselectedStoryId=awaitthis.handleMainMenuSelection()
if (this._savepointTracker.savepointExists()) {
constpageName=this._savepointTracker.getSavepointPageName()
this._storyReader.loadStoryPage(pageName)
console.log("Story savepoint loaded...")
}
else {
console.log("Starting story...")
this._storyReader.loadFirstPage()
}
awaitthis.handleStoryMode(selectedStoryId)
this._userInputValidator.closeTerminalConnection()
}
Now if you run the tests, all of them should pass:
TestSuites:5passed, 5totalTests:26passed, 26total
We have now completed our happy path testing. We could just leave it at that, but there is one more piece I want to add to do some exception handling.
Catching Exceptions
In the event that the program hits a problem, we want to catch the error, log it, and gracefully exit the program rather than showing an ugly stack trace to the user. Let’s add a try catch block in the handler() method so it looks like this:
Now if we hit any problems while running the program, rather than blowing chunks in front of the user, we will log the error message so we can look at it later, and then notify the user we had a problem before exiting. This exception handling helps keep your program looking professional even when there is a problem. Then you can go look at the logs, determine the cause of the error, and fix the code if possible.
Your final index.js file should look something like this:
CHECKPOINT
//index.js
const { StoryReader } =require("./story-reader.js")
constSavepointTracker=require("./savepoint-tracker.js")
constUserInputValidator=require("./user-input-validator.js")
const { StoryWriter } =require("./story-writer.js")
constLogger=require("./logger")
const { SAVE_OPTION, ADD_OPTION, PREVIOUS_PAGE } =require("./constants.js")
constREAD_OPTION="read"constCREATE_OPTION="create"constMAIN_MENU_OPTIONS= [
{
displayText:"Read a story",
optionValue:READ_OPTION,
},
{
displayText:"Create a new story",
optionValue:CREATE_OPTION,
},
]
classHandler {
constructor(
storyReader=newStoryReader(),
savepointTracker=newSavepointTracker(),
userInputValidator=newUserInputValidator(),
storyWriter=newStoryWriter(userInputValidator),
logger=newLogger()
) {
this._storyReader=storyReaderthis._savepointTracker=savepointTrackerthis._userInputValidator=userInputValidatorthis._storyWriter=storyWriterthis._logger=logger
}
asynchandleMainMenuSelection() {
constmainMenuSelection=awaitthis._userInputValidator.getMenuSelection(
MAIN_MENU_OPTIONS
)
letselectedStoryId=nullif (mainMenuSelection===READ_OPTION) {
conststories=this._storyReader.loadStories()
if (stories.length===0) {
console.log("No stories have been created yet! First create a Story")
selectedStoryId=awaitthis._storyWriter.runStoryEditorMode()
} else {
console.log("Choose a story to read\n")
letmenuOptions=stories.map((story) => {
return { displayText:story.title, optionValue:story.storyId }
})
selectedStoryId=awaitthis._userInputValidator.getMenuSelection(
menuOptions
)
}
} elseif (mainMenuSelection===CREATE_OPTION) {
selectedStoryId=awaitthis._storyWriter.runStoryEditorMode()
}
this._savepointTracker.selectedStoryId=selectedStoryIdthis._storyReader.selectedStoryId=selectedStoryIdreturnselectedStoryId
}
asynchandleStoryMode(selectedStoryId) {
varuserStillPlaying=truewhile (userStillPlaying) {
constcurrentPageName=this._storyReader.getPageName()
this._savepointTracker.saveCurrentStoryLocation(currentPageName)
console.log(this._storyReader.getStoryPageText())
varoptions=this._storyReader.getPageOptions()
varselectedOption=awaitthis._userInputValidator.getMenuSelection(
options
)
if (selectedOption==SAVE_OPTION) {
userStillPlaying=falseconsole.log("Story progress saved. See you later!")
} elseif (selectedOption==ADD_OPTION) {
constnextPageName=awaitthis._storyWriter.runPageEditorMode(
selectedStoryId,
currentPageName
)
this._storyReader.loadStoryPage(nextPageName)
} elseif (selectedOption==PREVIOUS_PAGE) {
constpreviousPageName=this._savepointTracker.returnToPreviousPage()
this._storyReader.loadStoryPage(previousPageName)
} else {
this._storyReader.loadStoryPage(selectedOption)
}
}
}
asynchandler() {
console.log("Choose your own adventure game")
try {
constselectedStoryId=awaitthis.handleMainMenuSelection()
if (this._savepointTracker.savepointExists()) {
constpageName=this._savepointTracker.getSavepointPageName()
this._storyReader.loadStoryPage(pageName)
console.log("Story savepoint loaded...")
} else {
console.log("Starting story...")
this._storyReader.loadFirstPage()
}
awaitthis.handleStoryMode(selectedStoryId)
} catch (error) {
this._logger.error("Unhandled exception occurred.", { exception:error.message })
console.log("Something went wrong. Exiting program.")
}
this._userInputValidator.closeTerminalConnection()
}
}
}
if (require.main===module) {
newHandler().handler()
}
module.exports=Handler
Dude… that’s it. What a trip! Assuming you have all the tests passing, you should be able to run the project for real now using the node index.js command and create a story with options. Once you have tried everything out, let’s make one more git commit to save our working state:
Add story writing and page navigation to handler
This combines all the new classes in the handler to support
story creation, adding page options, and going back to previous
pages. This completes our project requirments.
Man, this project was a beast! I had no idea how intense this exercise was going to be when I first designed it. If you were able to stick it out and get all the code and unit tests working. Double congratulations!! 🎉🎉 Hopefully this gave you some decent exposure to JavaScript, unit testing, and working with SQLite.
If you weren’t able to get all the way through, don’t sweat it… this exercise was rough even for me 😅. It took months of revisions to get it to this point. I should have probably picked a more dinky project 😥. But as they say, “go big or go home”.
That’s it for part 2! We are now over halfway through our journey together. In the next section, we will be exploring web based full stack development. At the end of part three we will be building a web version of our choose your own adventure game. For now, I’m going to take a little break, I’m worn out 🥱. See you over in part 3 👋.
”We are looking for someone with 10 years experience in Full Stack Development who is willing to get paid for 2 years experience”
~ Tech Recruiters
Chapter 3.1: What is Full Stack Development?
There are many different types of programming jobs out there. Up until this point in the book, all the concepts we have worked through together have applied to most areas of coding. From this point on, we are going to start looking into a specialized career field of software known as full stack development, which involves building web apps. The term full stack gets its name from the fact that there are two parts to building web apps. There is front end development, which focuses on designing and building the parts of a website or mobile app that you can see and interact with. Then there is back end development, which focuses designing and building the parts of a website or mobile app that you can’t see or interact with but are just as important to keeping the app working. These two halves, front end and back end, come together to make up the full stack.
In my personal experience, I’ve seen many developers specialize in either front end or back end and they might have a little experience with the other half. There is so much information to keep up with and technology is advancing so quickly that it is a full time gig just sticking with front end or back end development. You can find many jobs that are specifically looking for front end or back end developers. In this book, we are going to look over both areas and their responsibilities so you can get familiar with the concept of full stack development.
Most of the concepts and skills we’ll discuss in these chapters won’t be as applicable to other areas of software development, such as working with embedded systems or data science. However, by diving into this specialized information you will have the opportunity to see if this is a career path you may be interested in and learn the skills needed to give you a kickstart into the industry. It’s also just good information to know in general should you start or work for a company that uses the internet for anything.
The reasons I chose to cover full stack development in this book rather than another industry:
Of all the software industries to get started in without a college degree, you are the most likely to find a job in this area. At this time of writing, there is a huge shortage of developers in this field and full stack development is perhaps one of the “easier” software fields to get into if you find that you enjoy it.
This is the field I personally have the most professional experience with, and if I’m going to bother writing about something I better know what I’m actually talking about. 😜
First let’s go over some terminology that will help us navigate the terrain.
30,000 Foot View of Full Stack Development
Here is perhaps the simplest picture I could put together to describe the difference between front end and back end:
When you visit a website on your computer, you use a web browser. Your browser makes a request for information. This request travels through the internet to another computer somewhere. This computer takes the request, performs some work, and returns a response through the internet back to your computer. This is also true is you are using a mobile app on your smart device. Your phone sends requests over the internet, and receives responses back.
In full stack terms, your web browser or mobile device is referred to as a client, since it is the one who makes requests. Front end developers work on code that runs on your device, in other words on the client side. The computer that performs the work and returns a response is known as a server, since it serves the client by fulfilling the request. Back end developers work on code that runs on these servers, or server side.
Alright, with that intro it’s time to actually build stuff! In the next couple of chapters, we are going to jump into front end development and some of the tools we use there. After that we will go through the job of a back end developer and design a full stack application for our final project.
Chapter 3.2: An Overview of Front End
In this chapter, we are going to walk through the basics of front end development and create a simple front end application together. This application will actually be a continuation of our calculator program from all the way back in part 1, but this time with a legit graphical user interface (GUI). Let’s get started.
The Job of a Front End Developer
If you like making things look pretty, then you might enjoy being a front end developer. As a front end developer you build the parts of the app that the user interacts with. The code you write for front end is run directly on the user’s device, which as I mentioned before is known as client side. Sometimes, if an app is simple enough, you can build a complete app using only front end code. Front end developers write code that handles user events, such as clicking on a button or tapping on a screen, and shows the user what they are asking for, usually by making requests to the back end and then displaying the data that is returned.
So, if a front end dev is supposed to make things look pretty in an app… how exactly do we go about doing that? I would like to introduce you to a little something called HTML.
HTML
You may have heard of HTML before. It stands for Hypertext Markup Language. HTML goes way back to 1993. You know, back when kids still played outside… a simpler time ☀️🏞. Many new developers confuse HTML as a programming language. It’s not really a programming language… it doesn’t use conditionals. Instead it is really intended as a way to describe the visual format for a web page. Whenever you visit a website, one of the first things a server sends to your computer or phone is an HTML document.
As a front end developer, you work on the parts of the app that generate this HTML. The syntax of the language itself is actually pretty straightforward. You define a layout of elements in an HTML file using tags. A tag consists of an opening set of <> brackets and a closing set of </> brackets with some content in between. For example, you could have a <button>Click Me!</button> element on your web page which would display a button that says Click Me!. In fact, let’s create an HTML file right now that does just that. First create a new folder in you codebro directory and create an HTML file:
Windows users:
mkdir ~\Desktop\codebro\frontend
cd ~\Desktop\codebro\frontend
New-Item hello-world.html
code hello-world.html
Once you have the file open in VS code, type the following contents into the file.
<!DOCTYPE html>
<html>
<body>
<h1>Hello World!</h1>
<button>Come at me Bro!</button>
</body>
</html>
There are a couple ways to see what this looks like in a browser. The first is to run a command in your terminal to open the HTML file in your default browser:
Windows users:
start hello-world.html
MacOS users:
open hello-world.html
But this requires us to refresh the page every time we make a change. You can view the examples this way if you want. Another way which will show us rapid feedback of our changes is to download an extension in VS code called Live Server. Go to the extensions section of VS code.
In the extension search bar type live server.There should be an extension pop up named Live Server that has over 30 million downloads. Select it and install it.
Once it is installed reopen your hello-world.html file in VS code. Now at the bottom of the VS Code window you should see a button that says “Go Live”. Click that button
This button will open whatever html file you are looking at in VS code in your default browser
Now when we make changes to the file it will automatically update in the browser. Try changing the text on your button and see how it changes in the preview window.
Whenever you are done working with the html, or you want to switch to a different html file, you can turn off the local server by clicking the same button at the bottom of the window you clicked to start it:
Now that this is set up, we are ready to dive deeper into the different types of html elements.
Tags, Tags Everywhere
Like I mentioned before, HTML is made almost entirely of elements wrapped in tags. Tags can also have attributes used to change how they look or behave. An attribute is a configuration detail you add to an element by putting it inside of the opening tag. Here’s a brief example
<pstyle="text-align:right">This is an example sentence in a paragraph tag.</p>
Here we introduce a paragraph element, which displays text on a web page. It is wrapped with <p></p>tags, since that is the tag used to add paragraph text. We also put a styleattribute to the opening <p> tag to add some style to the element (we’ll cover styles in more depth later in the chapter).
There are many different types of tags and attributes you can use to build a web page. The web page itself and all the elements that make up the page are known collectively as the DOM (Document Object Model). You will often hear devs talking about the DOM and how your code interacts with it.
Here in this chapter I will cover some of the well-known tags. Feel free to copy and paste the examples into your hello-world.html file to see what they look like in the preview window.
Headings (h1, h2, h3, h4, h5, h6) and Paragraphs (p)
These are used to organize the text content of a page. The heading tags create text that is bold and generally larger than paragraph text, and is generally used to put labels over paragraphs. For example, the <h1>Hello World!</h1> in your hello-world.html file is a heading tag. The heading numbers range from h1 to h6, with h1 being the largest and h6 being the smallest (around the same size as paragraph text). Put the following html into your hello-world.html file to see an example:
<!DOCTYPE html>
<html>
<body>
<h1>Hello World!</h1>
<h2>Hello Mars!</h2>
<h3>Hello Jupiter!</h3>
<h4>Hello Saturn!</h4>
<h5>Hello Uranus!</h5>
<h6>Hello Neptune!</h6>
<p>Hello pluto! I'm sad that you're not considered a planet anymore.</p>
</body>
</html>
Tables
Tables allow you to create a spreadsheet type element to your web page. It is useful when you have organized data that you want to show to the user. Tables are made of rows using <tr>, and columns headers using <th>. The <td> elements are the individual table data cells in your table. This example below makes a basic table. It doesn’t look very pretty, but we’ll fix that when we talk about adding styles.
<!DOCTYPE html>
<html>
<body>
<h1>Books</h1>
<table>
<tr>
<th>Book Title</th>
<th>Author</th>
<th>Year Published</th>
</tr>
<tr>
<td>The Adventures of Little Tim-Tom</td>
<td>Randy Tiddilywinks</td>
<td>2110</td>
</tr>
<tr>
<td>Do You Even Code, Bro?</td>
<td>Landon Shumway</td>
<td>2023</td>
</tr>
</table>
</body>
</html>
Links (a)
This is probably one of the worst named elements… but the a element is used to put a link in your web page so that when a user clicks on it they can be redirected to another page.
<!DOCTYPE html>
<html>
<body>
<ahref="https://google.com">Go to Google</a>
</body>
</html>
Lists
Lists are used to display a list of items together. You can make ordered lists (which numbers the items in your list) and unordered lists (puts bullet points in from of the items):
Anytime you type in information on a website, you are using an input. These elements are used to collect information from your users which you can then send to the back end. There are many different types of inputs, and you can learn more about them here: https://developer.mozilla.org/en-US/docs/Web/HTML/Element/input
<!DOCTYPE html>
<html>
<body>
<labelfor="name">What is your name?</label>
<inputtype="text"id="name"><br><br>
<labelfor="quest">What is your quest?</label>
<inputtype="text"id="quest"><br><br>
<labelfor="color">What is your favorite color?</label>
<inputtype="color"id="color"><br><br>
</body>
</html>
Divs
Divs are short for divisions, and are used to organize the elements of your page into different sections. These are incredibly useful for grouping elements that belong together and applying specific styles to them (which we will learn more about later in this chapter):
<!DOCTYPE html>
<html>
<body>
<divstyle="background-color: blue;">
<h1>Here's a blue div with an ordered list</h1>
<ol>
<li>water</li>
<li>juice</li>
<li>milk</li>
</ol>
</div>
<divstyle="background-color: red;">
<h1>Another red div with an unordered list</h1>
<ul>
<li>water</li>
<li>juice</li>
<li>milk</li>
</ul>
</div>
</body>
</html>
Buttons
Buttons are perhaps one of the most useful tags in html. They provide your users a way to interact with the web page. You can add code that runs whenever a user clicks a button. This is known as a event listener, since your app is listening for when a button click event happens. Below is an example you can put in your file:
<!DOCTYPE html>
<html>
<body>
<buttonid="myButton"onClick="showMessage()">Come at me Bro!</button>
</body>
<scripttype="text/javascript">
functionshowMessage() {
constbutton=document.getElementById('myButton');
button.innerHTML="Ok I give up!";
}
</script>
</html>
Here we setup the click event listener on the button using the onClick="showMessage()"attribute. In this example, onClick is an attribute of the buttontag. Now when the button is clicked, the showMessage() function will be called and the code inside will be run.
Ok… but that doesn’t look like JavaScript code, you might be thinking. Let’s take a close look:
functionshowMessage() {
constbutton=document.getElementById('myButton');
button.innerHTML="Ok I give up!";
}
Yeah… what the heck is this doing? Well, document is a special variable that refers to the html page itself. .getElementById() is a method that takes in an element id and returns that element so you can then manipulate it to change how the page looks. .innerHTML is how you change the content between the tags of an element.
So in short, before the button is clicked its innerHTML is equal to Come at me Bro!, which is displayed on the button. When you click on the button the code is run which grabs the element with the id of myButton, which we set as an attribute on the button when we created it:
<buttonid="myButton" ...
We then change the innerHTML of the button to equal "Ok I give up!" which forces the text of the button to change.
Adding Style to Your Page
As I hinted previously, you can add style to your elements to make your page look like it’s not complete garbage 🚮. There are several ways to do this. Almost all elements support the style attribute so you can attach style properties to a specific element. For example, here we add color styles properties to each of our heading elements so that they show all kinds of colors:
<!DOCTYPE html>
<html>
<body>
<h1style="color: green;">Hello World!</h1>
<h2style="color: red;">Hello Mars!</h2>
<h3style="color: orange;">Hello Jupiter!</h3>
<h4style="color: rgb(171, 171, 31);">Hello Saturn!</h4>
<h5style="color: #a6f4a6;">Hello Uranus!</h5>
<h6style="color: hsl(240, 95%, 44%);">Hello Neptune!</h6>
<pstyle="visibility: hidden">Hello pluto! I'm sad that you're not considered a planet anymore.</p>
</body>
</html>
For colors, you can use the name of colors, rgb values, hexadecimal, and hsl (for all of you graphic designers out there 🖌). You can also make stuff invisible using the visibility property.
There are so many styles and values you can add to your elements, there is no freaking way I can get into all of them (people make their whole careers out of just learning to style stuff). So the important thing to note here is when you set styles like this on individual elements they are called inline styles, since you are adding the style in the line where the element is defined.
An alternative to this is to use what is known as Cascading Style Sheets, or CSS for short. These are files that define all of your styles in a central location which you then use to style your html.
Using CSS to Add Style 📸
Now, I have to admit that I’m not really qualified to talk about style 🤓, but we can at least cover the basics with CSS. First, turn off the live server showing the hello-world.html file. Now create a new html in your frontend directory called groovy.html. Add the following html to the file:
Click the “Go Live” button in VS Code to open the file in your browser. If you view what the HTML looks like before we add the CSS using the live server, it doesn’t look very interesting…
Let’s add some style to this page using CSS. Create a file in your frontend directory called groovy.css. Then copy and paste the following contents into the file:
Now back in your groovy.html file, add the following line right under the opening <html> tag and above the <body> tag:
<linkrel="stylesheet"href="groovy.css" />
Now when the page reloads, things get really interesting:
What a Groovy website! Adding style can really make a difference (I’m not saying it’s a good difference, but it’s definitely a difference 😆).
Now that we can see the styling effects, let’s walk through the syntax. First of all, let’s look at how we reference our groovy CSS file in the HTML file:
<linkrel="stylesheet"href="groovy.css" />
Here we specify that we are linking to a stylesheet and set the path to our groovy.css file. Next thing to look at is the keyword class that we are using on our buttons:
Each one of these buttons belongs to the same class, groovy-button. Classes allow us to apply the exact same style to all elements that belong to a particular class. Next let’s talk about how inline-styles work with CSS files
<h1style="margin-top: 50px;">Things I think are groovy</h1>
<ulid="groovy-list">
<li>Lava Lamps</li>
<li>Hacky Sacks</li>
<li>Your Mom</li>
</ul>
Here we apply an inline-style on this h1 element. This inline-style will be combined with whatever style we include from the CSS file, and if the CSS and inline styles conflict (for example, they both try to set the text color) the inline-style will be used instead of the CSS styling.
Last thing to point out is we have an element with an id of groovy-list. We will use this id in the CSS file to style this specific element.
Now let’s take a look at the first couple of lines of the CSS file:
The first thing to notice is body. This is an example of a selector. You use selectors to select which HTML elements will have the style properties between the {} applied to them. Selectors can be the name of HTML element types. body is a type of HTML element, and this CSS file will apply the background style property to any body element found in the HTML file. For the background, we use a linear-gradient function with a bunch of groovy colors! CSS supports all kinds of gradients that can make some really cool effects.
These two parts, the selector and the properties, together make a rule. CSS files are made up of one or more of these rules. Let’s look at the next rule in the file:
h1 {
color: white;
}
Here we make a rule that all h1 elements will have their text color set to white. That’s all there is to it. Next rule is slightly more complicated:
Remember how we had three buttons in the HTML and they all belonged to the groovy-button class? CSS selectors can also be a the name of a class. You have to put a . in front of the class name when selecting them. This will apply all of these style properties to all of the elements that belong to this class.
Most of the properties here are common. You can look up what each one of them does if you’re interested. I do want to talk about the animation properties.
CSS animations allow you to add movement to your page. You create an animation using the @keyframes keyword followed by the name of your animation. For this example, I created an animation called groovyRotation. This animation gives a floaty kinda of feel by rotating the elements by 720 degrees while moving them upward and making them invisible.
In this example, the animation property takes 4 arguments: groovyRotation 6s linear infinite. The first is the name of the animation. The second is how long you want the animation to take from start to finish, in this case 6 seconds. The third, linear, describes how the animation movements should be played out. The last infinite, will cause the animation to replay infinitely. The animation-direction: alternate; line causes the animation to play forward, then reverse back to the starting position. There are many different combinations you can use to play around with these.
When you create an animation, in the @keyframes you can specify the properties of the element at the start of the animation:
The animation will do a bunch of fancy math to work out the intermediate steps based on the number of seconds you want it to run, and hence figure out how to move the element. There are literally endless possibilities you can create using all of these different animation options, so if you’re interested in learning more definitely check out online tutorials for CSS animations.
Remember our ul element that had an id of groovy-list? This is how you select an element by id in CSS. You simply put a # before the name of the id. Now these properties will be applied to that element.
This is just a very simple sneak peek into the world of styling with CSS (and a pretty lame one at that 😅). There is some cool stuff you can do with CSS rules to make a website really 💥pop💥. Using classes also helps you establish a theme for a site since you can apply the same styling to many different elements fairly easily.
Feel free to mess around with the styles to try different settings. Once you are done go ahead and stop the server.
Final Thoughts
As a front end dev, you are responsible for not just building a website, but an experience for your users. Front end development is just as much of an art form 🎨 as it is a science 🧪, which is why I think it’s pretty fun to work on. Now that we’ve covered the basics of HTML elements and styling, we’re going to walk through building an interactive calculator using HTML and JavaScript.
Chapter 3.3: Building a Calculator with HTML and JavaScript
Before this chapter, all of our programs have been text based, but now we are finally ready to build something that has a Graphical User Interface (so exciting 🎉)! We are going to take our calculator from part 1 of the book and add some lipstick to it 💄. To start, add a directory called calculator-html with a file in it called calculator.html:
mkdir calculator-html
cd calculator-html
code calculator.html
Save the file, then open the file in your browser using the “Go Live” button. You should see something similar to this:
Now that we can visually see the elements of the html file, let’s talk about the contents of the html itself.
<!DOCTYPE html>
Starting from the top, we have the <!DOCTYPE html> tag. This is a special type of tag that lets the browser know this is an html file.
<html>
<title>Calculator</title>
Here we have the opening tag for the <html> document. This is usually the first element you put in an html file, and everything else goes inside of it. The <title> tag lets you put in text that shows up in the browser tab when you open this file in a web browser. We then put a closing </title> tag.
Here we start the <body> of the document, or in other words the parts of the document that will actually show up on the screen itself. The first thing we put is a <h1>Calculator</h1> heading to let people know this is in fact a calculator (just in case… you know… that isn’t completely obvious). For this calculator, I decided to use a <table> element to organize the buttons and labels. The first row of the table <tr> has a <input> element with an id of display. This is where we will display the numbers the user types into the calculator, as well as the results of any calculations they make. This snippet of html makes up this part of the calculator:
Each button has an onclick property which will call a function when the button is clicked (for example onclick="setNumber('1')" will call the function setNumber and pass in '1'). Then we set what will be displayed on the button by typing text between the opening and closing tags >1<. We have setNumber, setOperator, calculate, and resetCalculator functions which we will type out when we add our JavaScript file. This brings us to the next section of the html:
The <script> element allows us to import a JavaScript file into the html. This JavaScript file will hold all of the functions needed for our calculator to work. Let’s go ahead and add that file now:
code calculator.js
This will open up a new calculator.js file in VS Code. Add the following JavaScript code to the file:
CHECKPOINT
varnumber1=""varoperator=nullvarnumber2=""varcalculationPerformed=falsefunctionresetCalculator() {
console.log("called clear")
number1=""operator=nullnumber2=""calculationPerformed=falsesetCalculatorDisplay('0')
}
functionsetNumber(number) {
console.log(`clicked button ${number}`)
if (!operator&&!calculationPerformed) {
number1+=numbersetCalculatorDisplay(number1)
}
elseif (operator) {
number2+=numbersetCalculatorDisplay(number2)
}
else {
// if a calculation was just performed and the user
// selects another number, reset number1 to be
// the selected number
number1=numbercalculationPerformed=falsesetCalculatorDisplay(number)
}
}
functionsetOperator(operation) {
calculate()
operator=operation// reset number 2
number2=""setCalculatorDisplay(operator)
calculationPerformed=false
}
functioncalculate() {
if (!operator||!number2) {
return
}
constresult=performCalculation(Number(number1), operator, Number(number2))
number2=""operator=nullnumber1=resultcalculationPerformed=truesetCalculatorDisplay(result)
returnresult
}
functionsetCalculatorDisplay(value) {
document.getElementById('display').setAttribute('value', value)
}
functionperformCalculation(number1, operation, number2) {
varresultif (operation=="+") {
result=number1+number2
}
elseif (operation=="-") {
result=number1-number2
}
elseif (operation=="*") {
result=number1*number2
}
elseif (operation=="/") {
result=number1/number2
}
else {
console.log(`Unknown operation: '${operation}'. Cannot perform calculation`)
return"ERROR"
}
returnresult.toString()
}
In this JavaScript file, we add the logic for all of the functions we are using in the calculator.html file. Once you have added all of the code make sure to save the file.
Looking at the code itself, the performCalculation should look familiar from part 1 of the book. Let’s walk through the rest of the file:
Here we set some variables that we will use to track the values we need for the calculator to work. Note that number1 and number2 are actually string types. This will make it easier for us to track all of the numbers the user types in on the calculator. We will cast them into actual numbers when we perform the final calculation.
We run this function if the user clicks on the clear button. It just resets all of the values to what they were at the beginning.
functionsetNumber(number) {
console.log(`clicked button ${number}`)
if (!operator&&!calculationPerformed) {
number1+=numbersetCalculatorDisplay(number1)
}
elseif (operator) {
number2+=numbersetCalculatorDisplay(number2)
}
else {
// if a calculation was just performed and the user
// selects another number, reset number1 to be
// the selected number
number1=numbercalculationPerformed=falsesetCalculatorDisplay(number)
}
}
This is called anytime the user clicks on one of the numbered buttons. We check to see if the number should be part of number1 or number2 in the calculation and ‘add’ that number to the string of numbers (remember that when using the += operator on a string it doesn’t perform a math addition, it just adds the character into the string).
functionsetOperator(operation) {
calculate()
operator=operation// reset number 2
number2=""setCalculatorDisplay(operator)
calculationPerformed=false
}
This is called if the user clicks on one of the operator buttons ( +, -, /, or *). We check to see if we need to update the value of number1 by calling calculate() (for example, if the user types in 2 + 2 + 2 we need to track the value of all the calculations). We then set the operation to be the button the user clicked and show it on the calculator display. Next function we will look at is the calculate function:
This function takes the two numbers and the operation to make a calculation. We first make sure that we have an operator and number2 set, otherwise we exit the function since we cannot perform a calculation without them. We then cast the strings for number1 and number2 into actual numbers so we can do, you know, math 🧮. We then reset the operator and number2 variables to prepare for any other calculations the user will make. Finally we display the result in the calculator display, which takes us to our last function we will look at:
This function allows us to set the value that is actually displayed on the calculator. Remember in the html we created an element with an id of display. Here we get that element using its id and then call setAttribute to set the 'value' attribute to the value we want to display.
And that’s it. If this is your first time building a calculator with clickable buttons, congratulations! 🎉
Using Browser Developer Tools to Debug
Before we wrap up, there is one more cool tip I want to share with you that will make your life much easier as a web developer. They are called browser developer tools, and they come included with most of the popular browsers in use today. developer tools allow you to debug code that is running in your browser to help you figure out the cause of any issues. There is a lot to learn when it comes to using these tools, so we will just be covering the bare basics and then you can go learn more on your own. In this demo, I’m going to be using the Google Chrome web browser, since it is the most popular browser at this time of writing.
Let’s use these tools to put breakpoints in our calculator javascript code and walk through the code line by line as it is running. If you don’t have it open already, open the calculator.html in your browser so you can see the calculator.
Make sure to click on the browser, then if your using Windows or Linux, type Shift + CTRL + i (MacOS type Option + ⌘ + i). This should open up the developer tools panel in the browser:
Like I said, there is a lot going on here. Now don’t get too excited 🤯, for now we’re just going to be looking at two of these tools that I find really useful. using one of these tools to set breakpoints on the javascript code for the calculator. First, click on the Elements tab. This will show you all the HTML elements for your page:
On the left of the panel you see the html tags with all the different elements, as you hover your mouse cursor over them they will light up in the browser so you can see exactly where the element is located in the page. You can click on the drop down arrows to look at elements that are nested inside of other elements.
On the right of the panel you can look at any styles that are being used on the element, and even better, you can test out different styles and the page will be immediately updated to show what it looks like. For example, let’s click on the <table> element on the left, then on the right click the element.style window:
Next, let’s change the background for this calculator to blue. Type in background, hit the enter key, then type blue. You should see the page immediately update to show the change:
This allows you to quickly try out different styles on the elements in your page. Keep in mind though, if you want the change to be permanent, you will need to update the actual HTML or CSS file in your project to use the style. Any style changes you make in developer tools are only temporary.
Ok last thing I want to show you is setting breakpoints. To do this, click the Sources tab:
From here, you can see all the different files that are being used as part of this web page. We have our html file as well as the javascript file. Click on the calculator.js section, this will show the javascript code in the middle of the panel. From here we can set breakpoints similar to how we did in VS Code in chapter 2.4 by clicking on a line of code. I’m going to put a breakpoint the first line of the setNumber function (line 16 if you followed the checkpoint):
Now that we have our breakpoint set up, anytime we do anything on the web page that causes the line of code to run, the breakpoint will pause the code so we can then walk through it line by line. To do this, click on any number button of our calculator and watch what happens:
The code is now paused at the breakpoint we set. Over on the right side of the panel we will see some buttons that will look familiar if you did the debugging exercise in chapter 2.4:
You can use these debugging tools to go through the code. The Scope window below the debug buttons will show you the variables in your program and what their values are so you can make sure they match what you expect.
That’s all the developer tools I’m going to show you here, but you can obviously learn more about them by searching online tutorials that are more in depth. Using these tools can save you gobs and gobs of time when you’re working on issues with your web pages, so the more you know about them the better.
Final Thoughts
This has been a very simple exercise in using HTML and JavaScript to create a tool that a user can interact with. Obviously, most websites are much more complicated than this, but this example should give you a starting point for you to start exploring on your own. In our next chapter, we are going to explore the concept of frameworks and how they can be used to make front end web development easier.
END OF DRAFT
END OF DRAFT
Thanks for taking the time to read this draft 🙂. Hopefully you were able to get some good things out of it. I’m actively working on the book and looking for feedback, so if you have any other comments or questions shoot me an email at do.u.code.bro@gmail.com. Thanks again! 👋


.png)
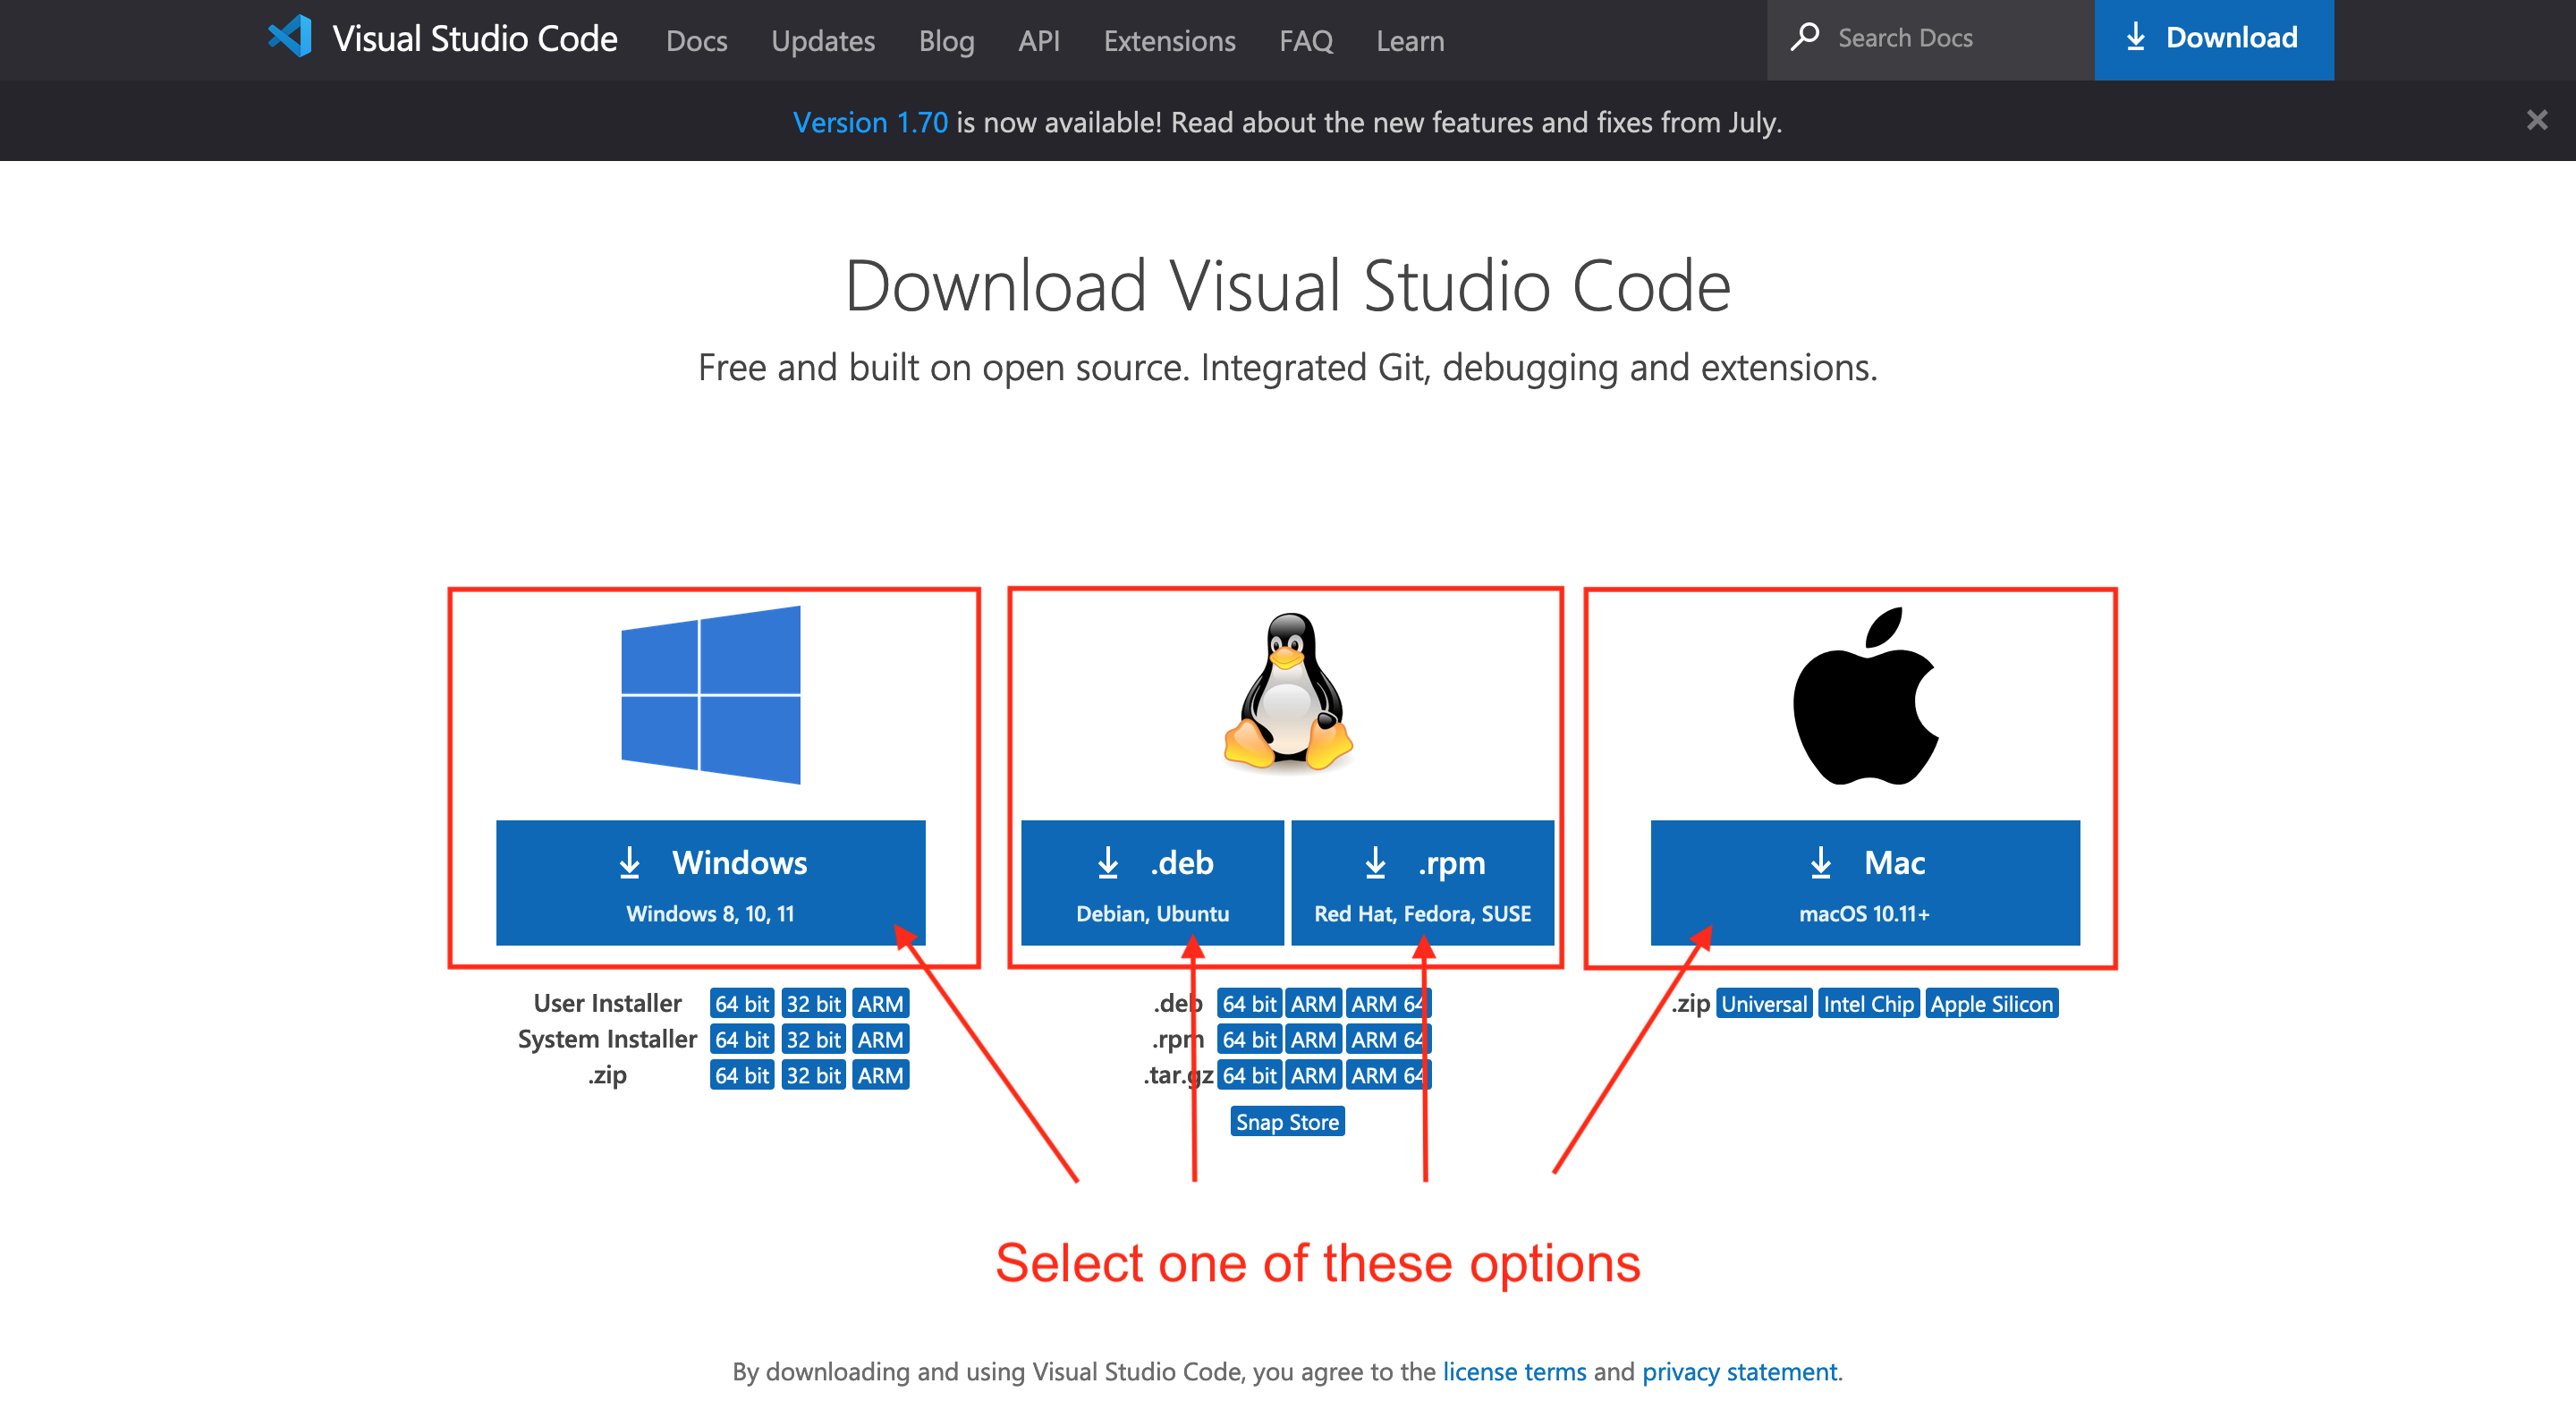
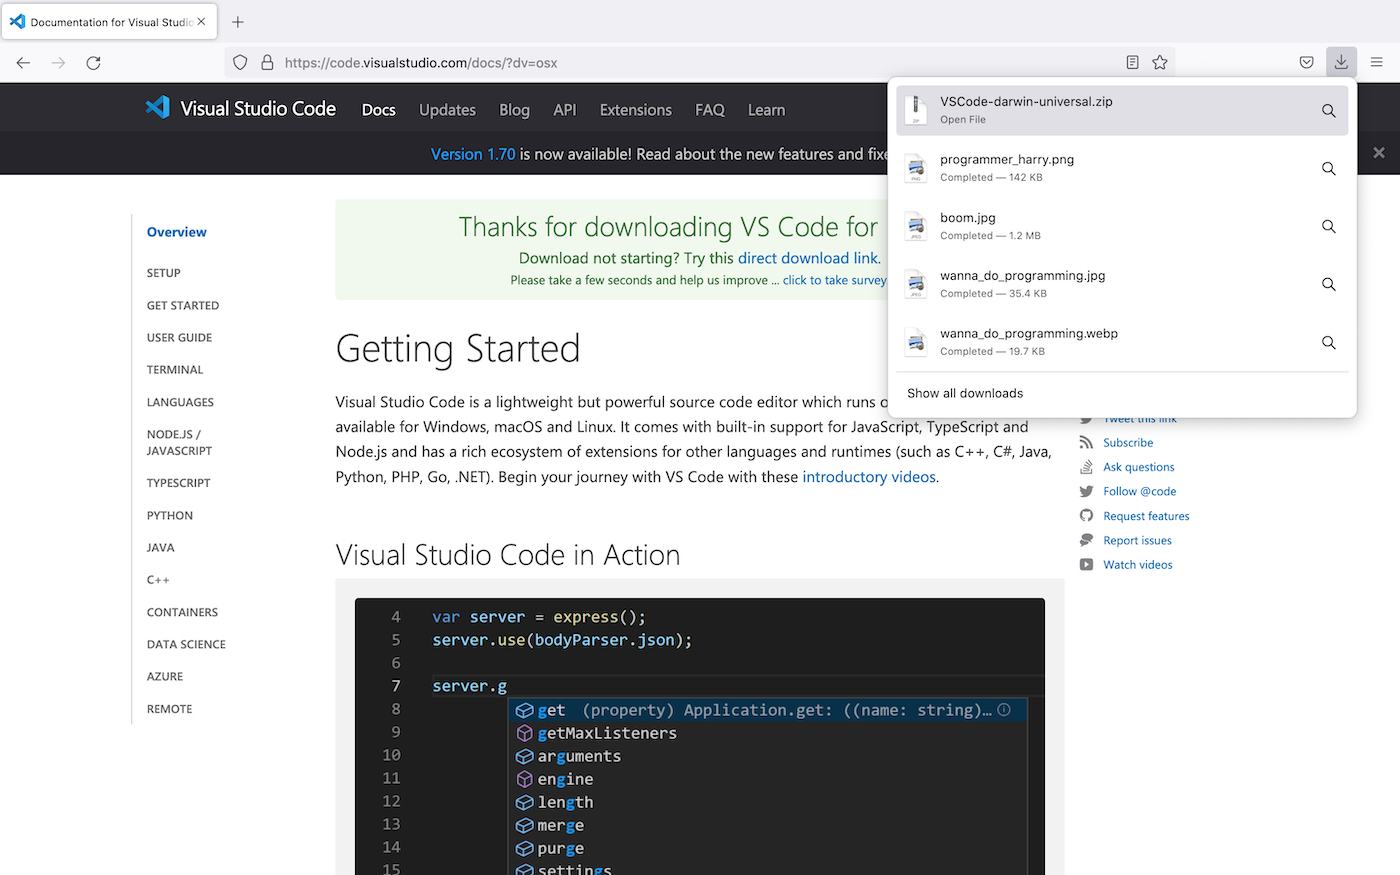
.png)
.png)
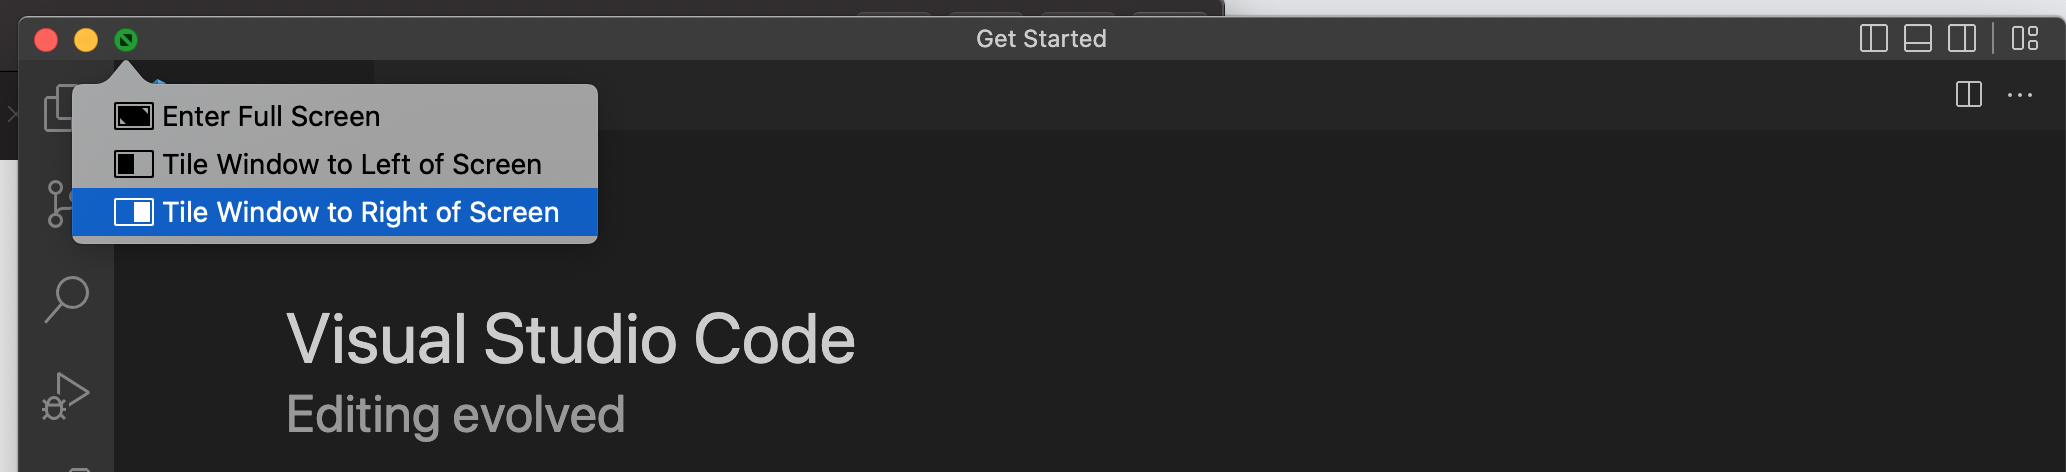
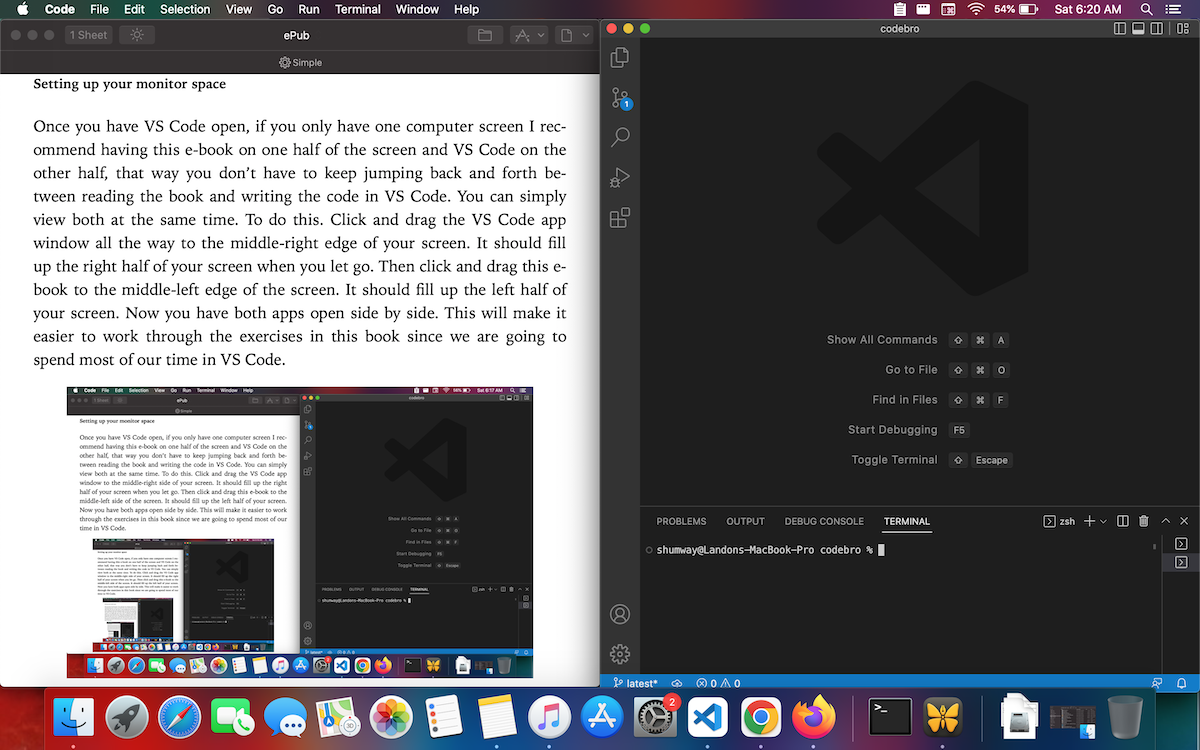
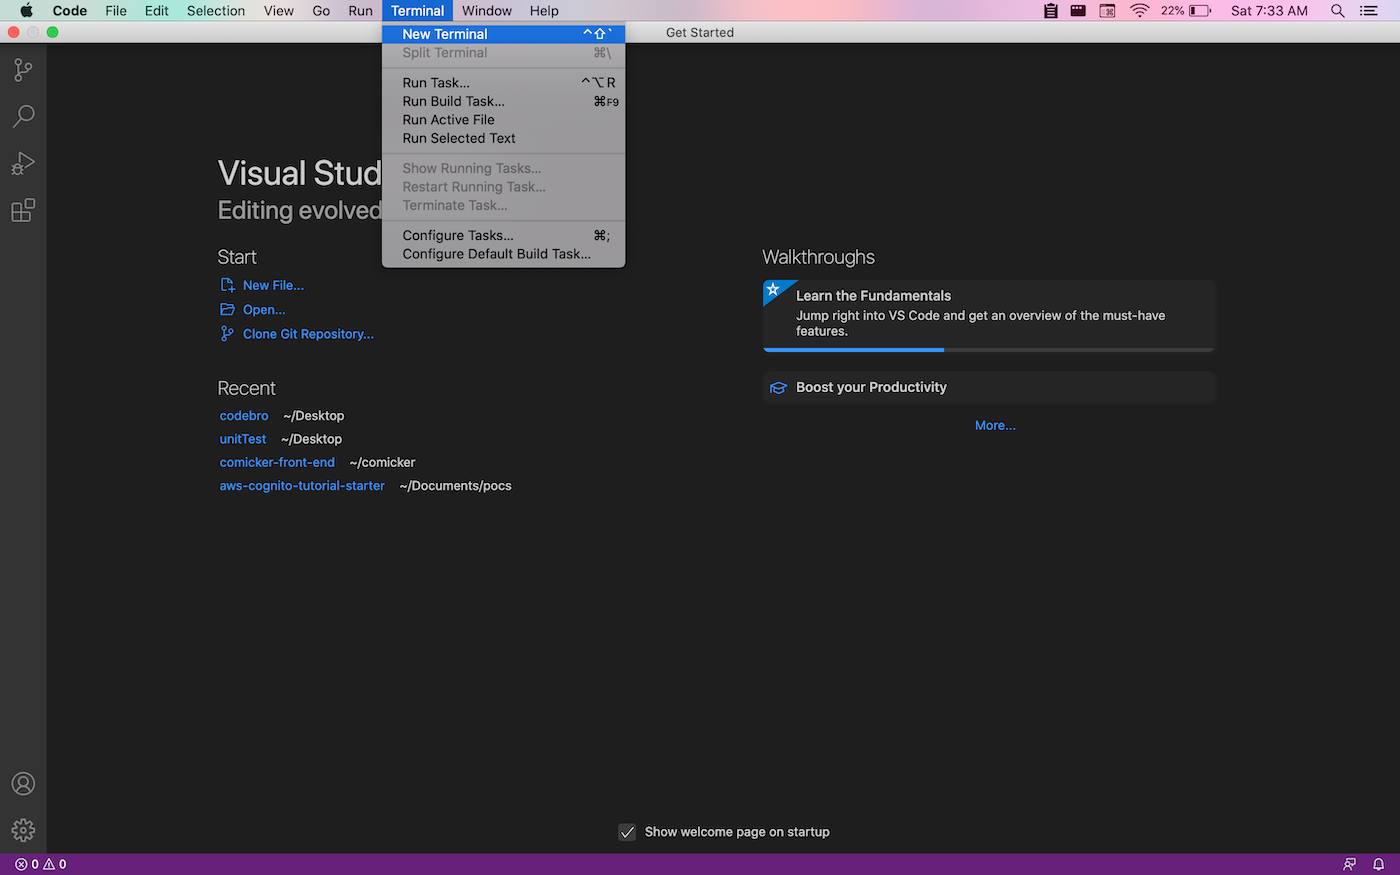

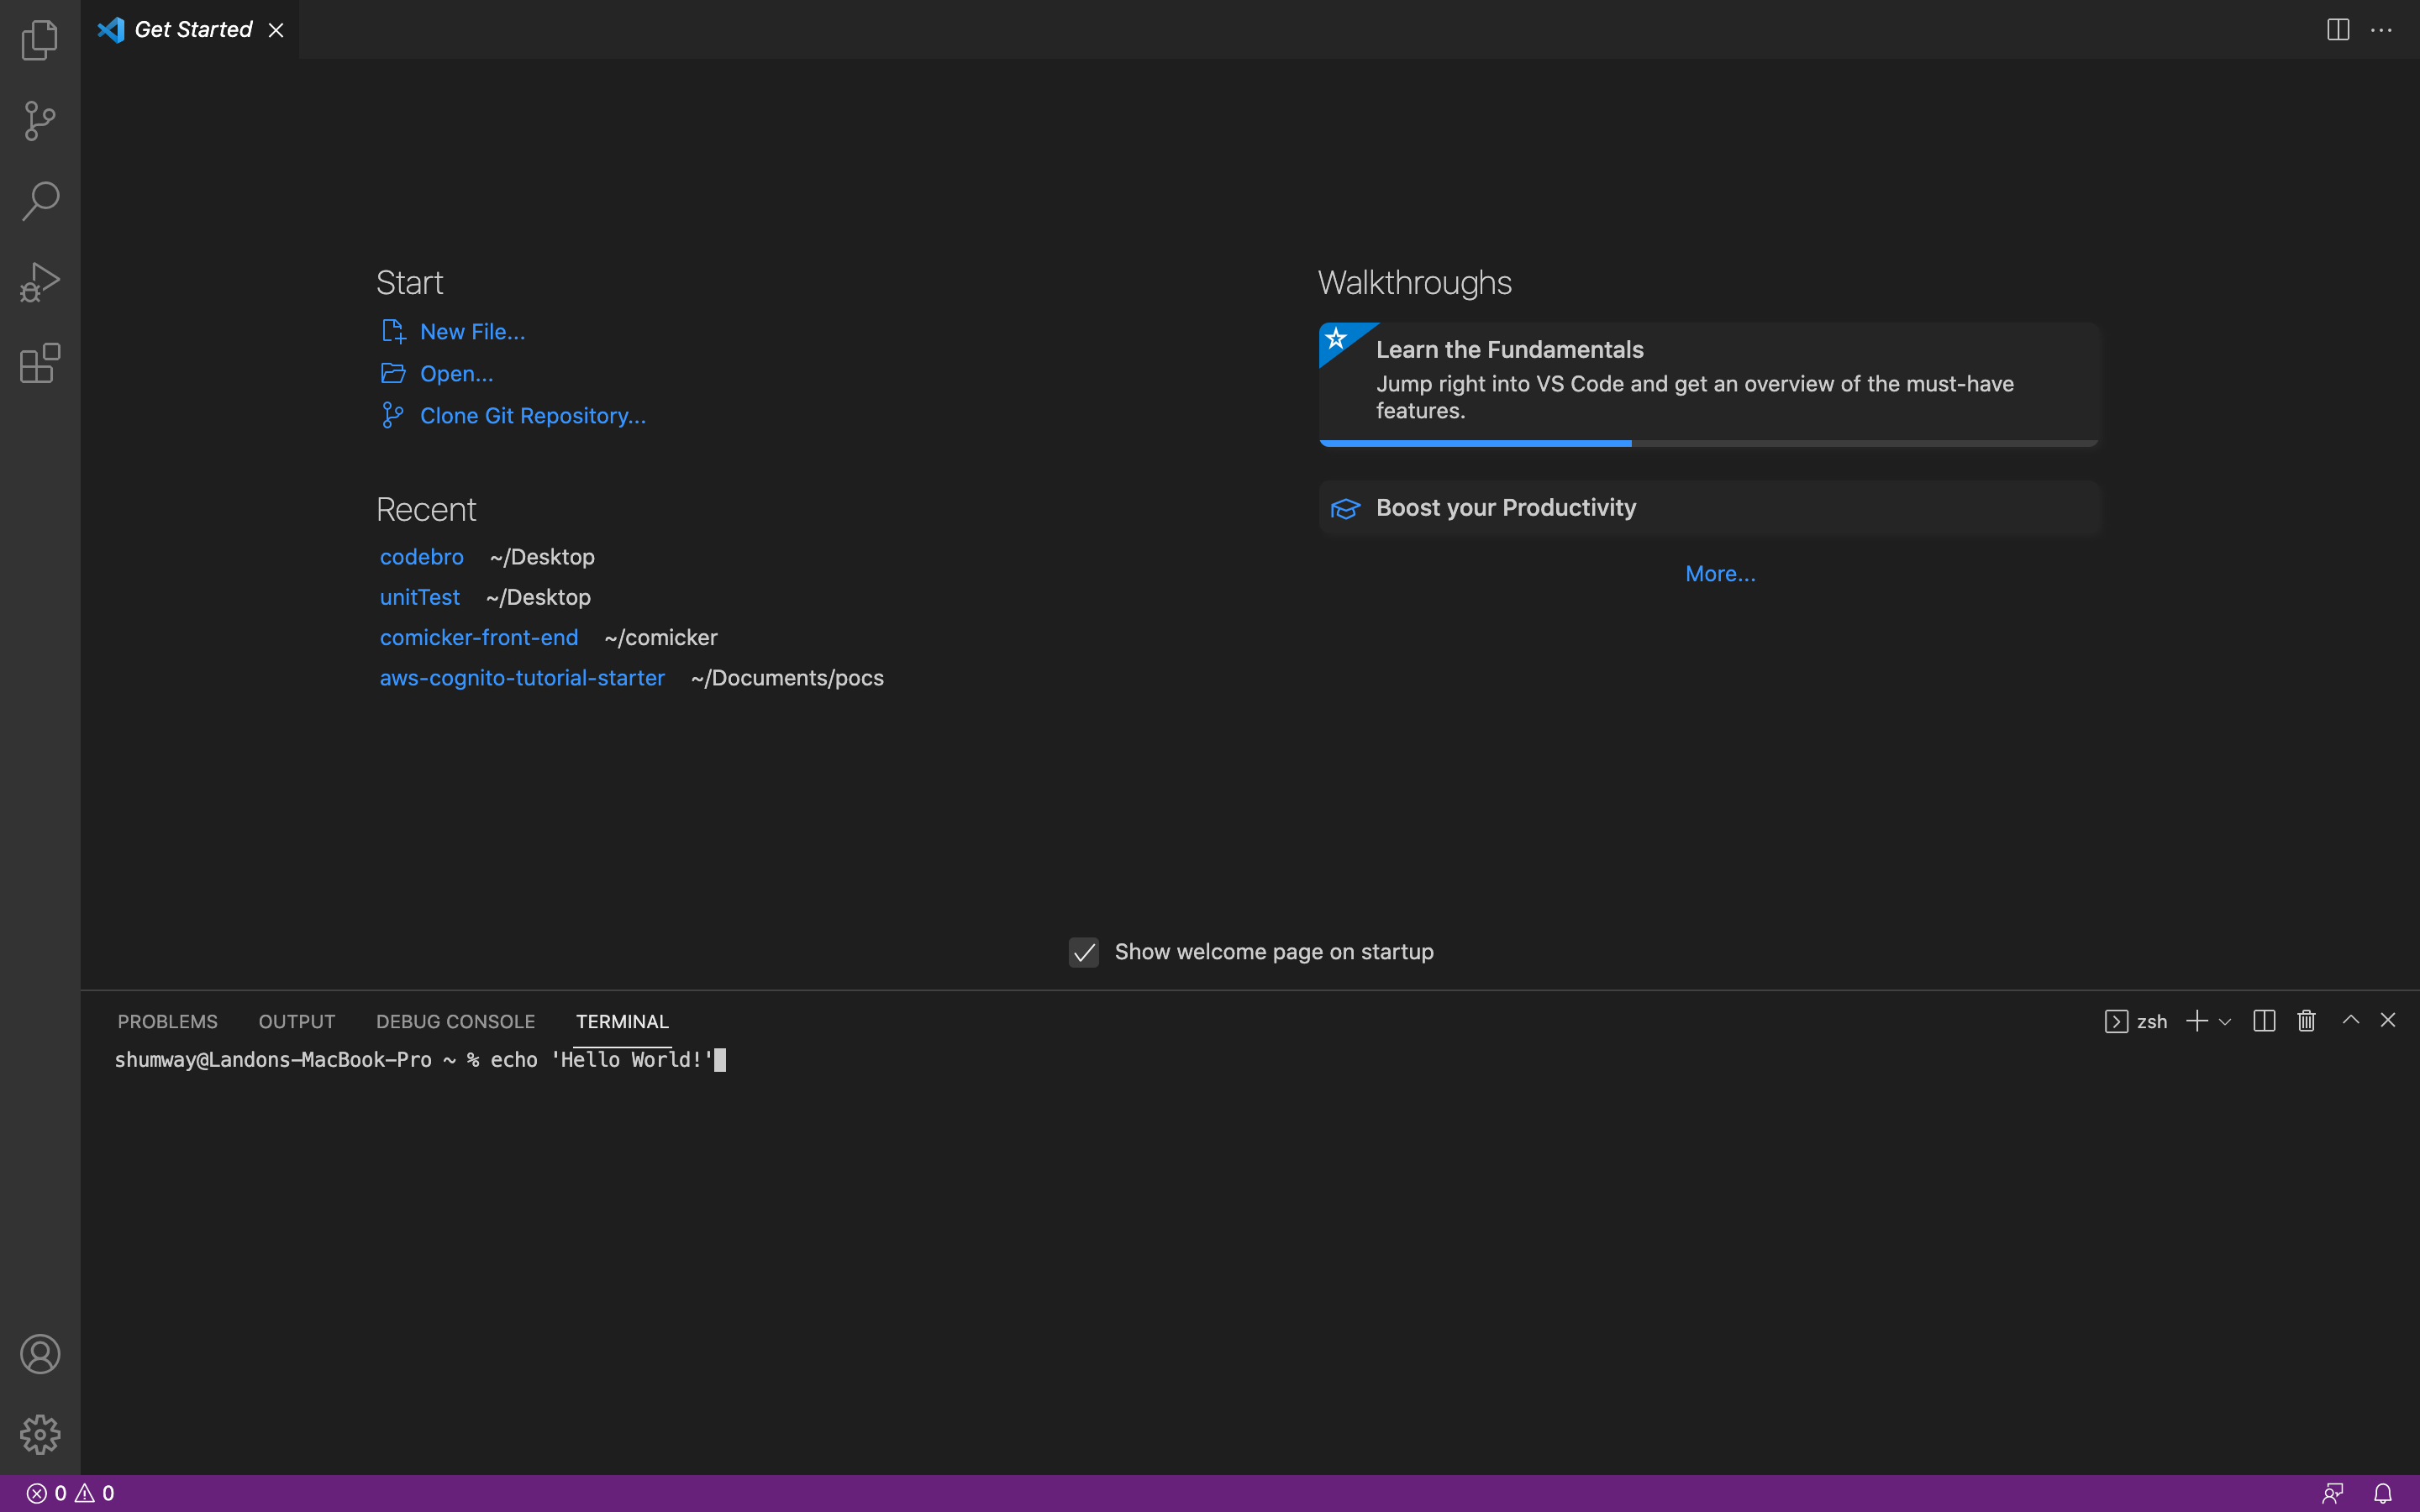
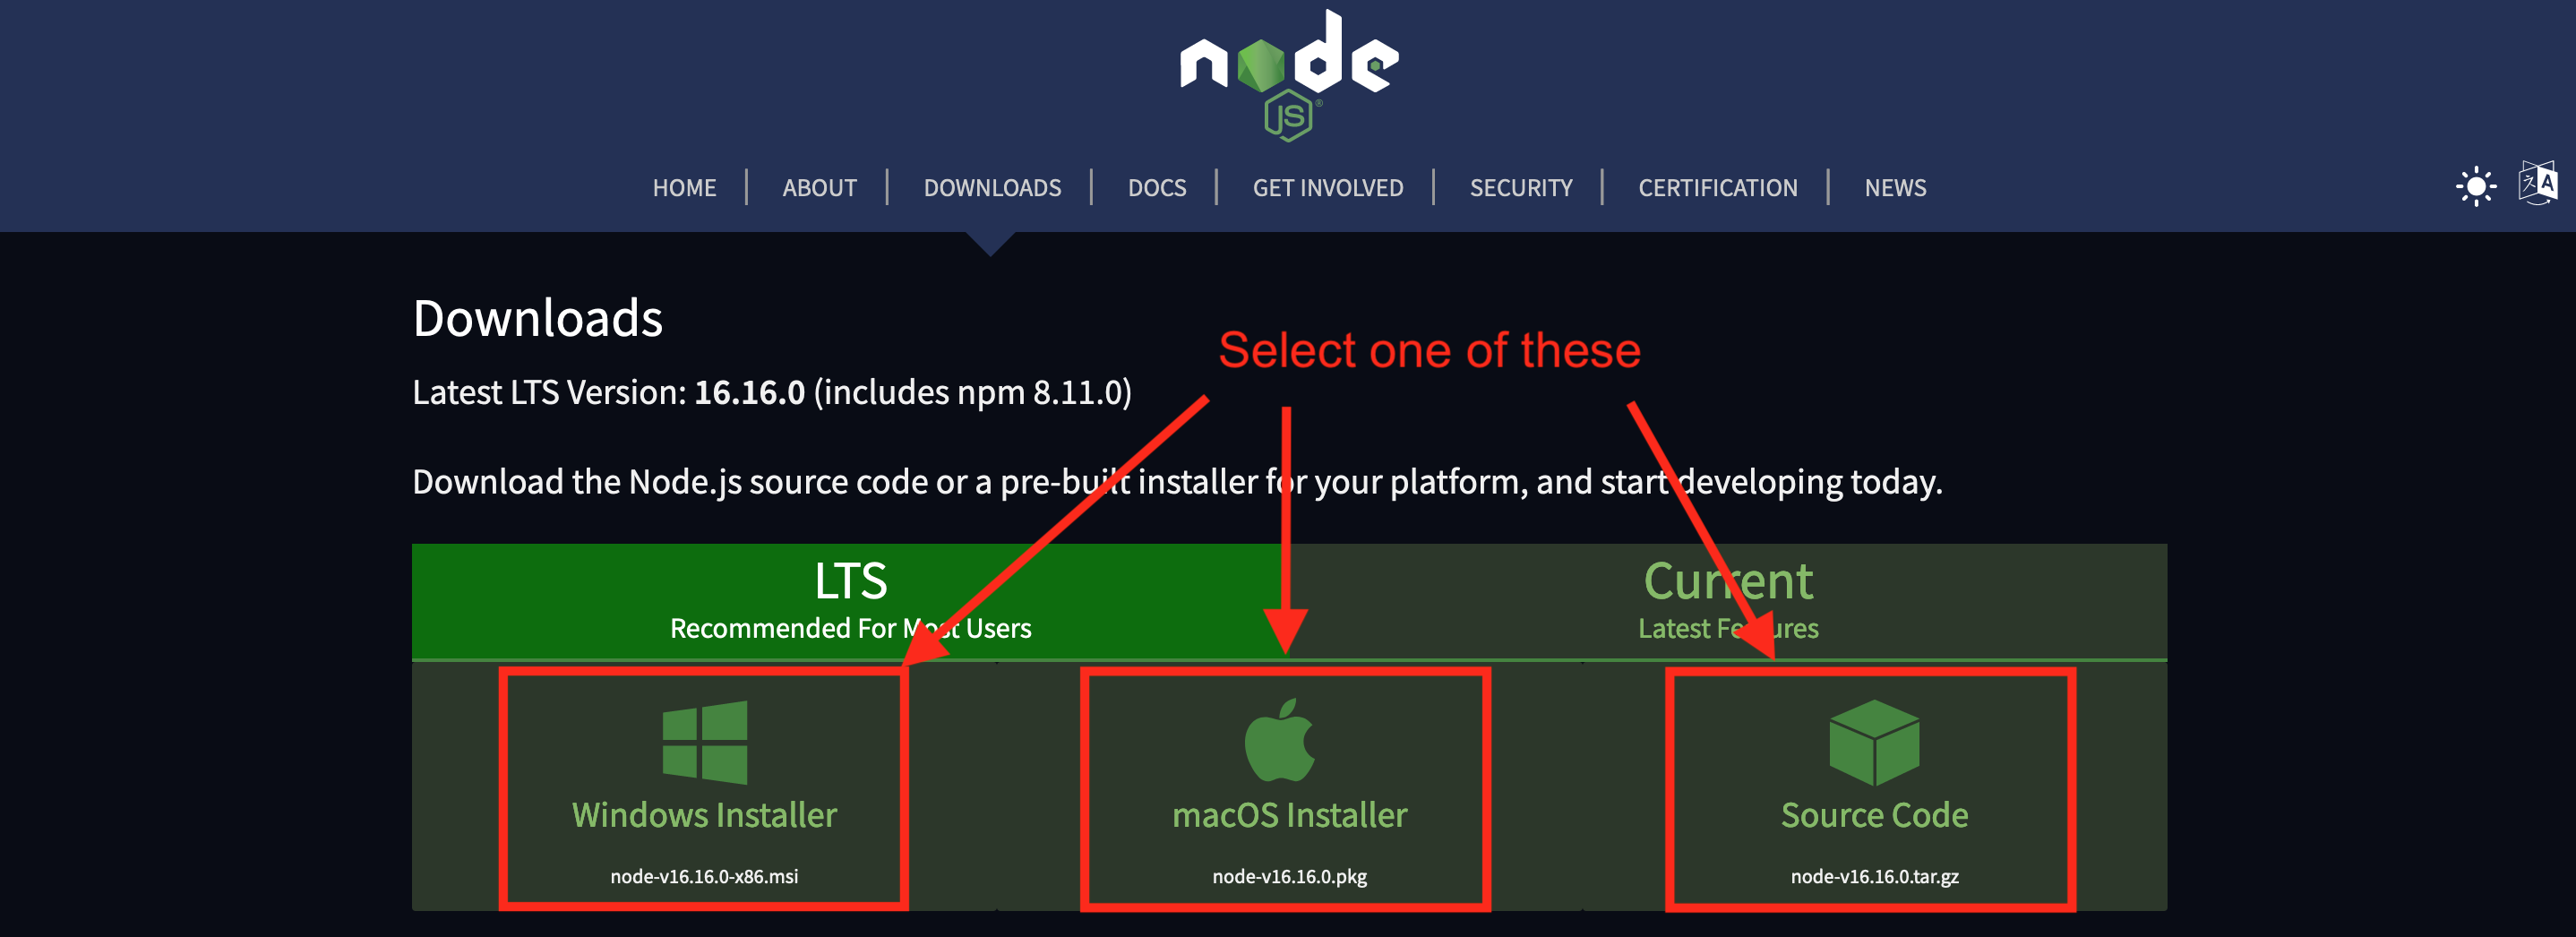
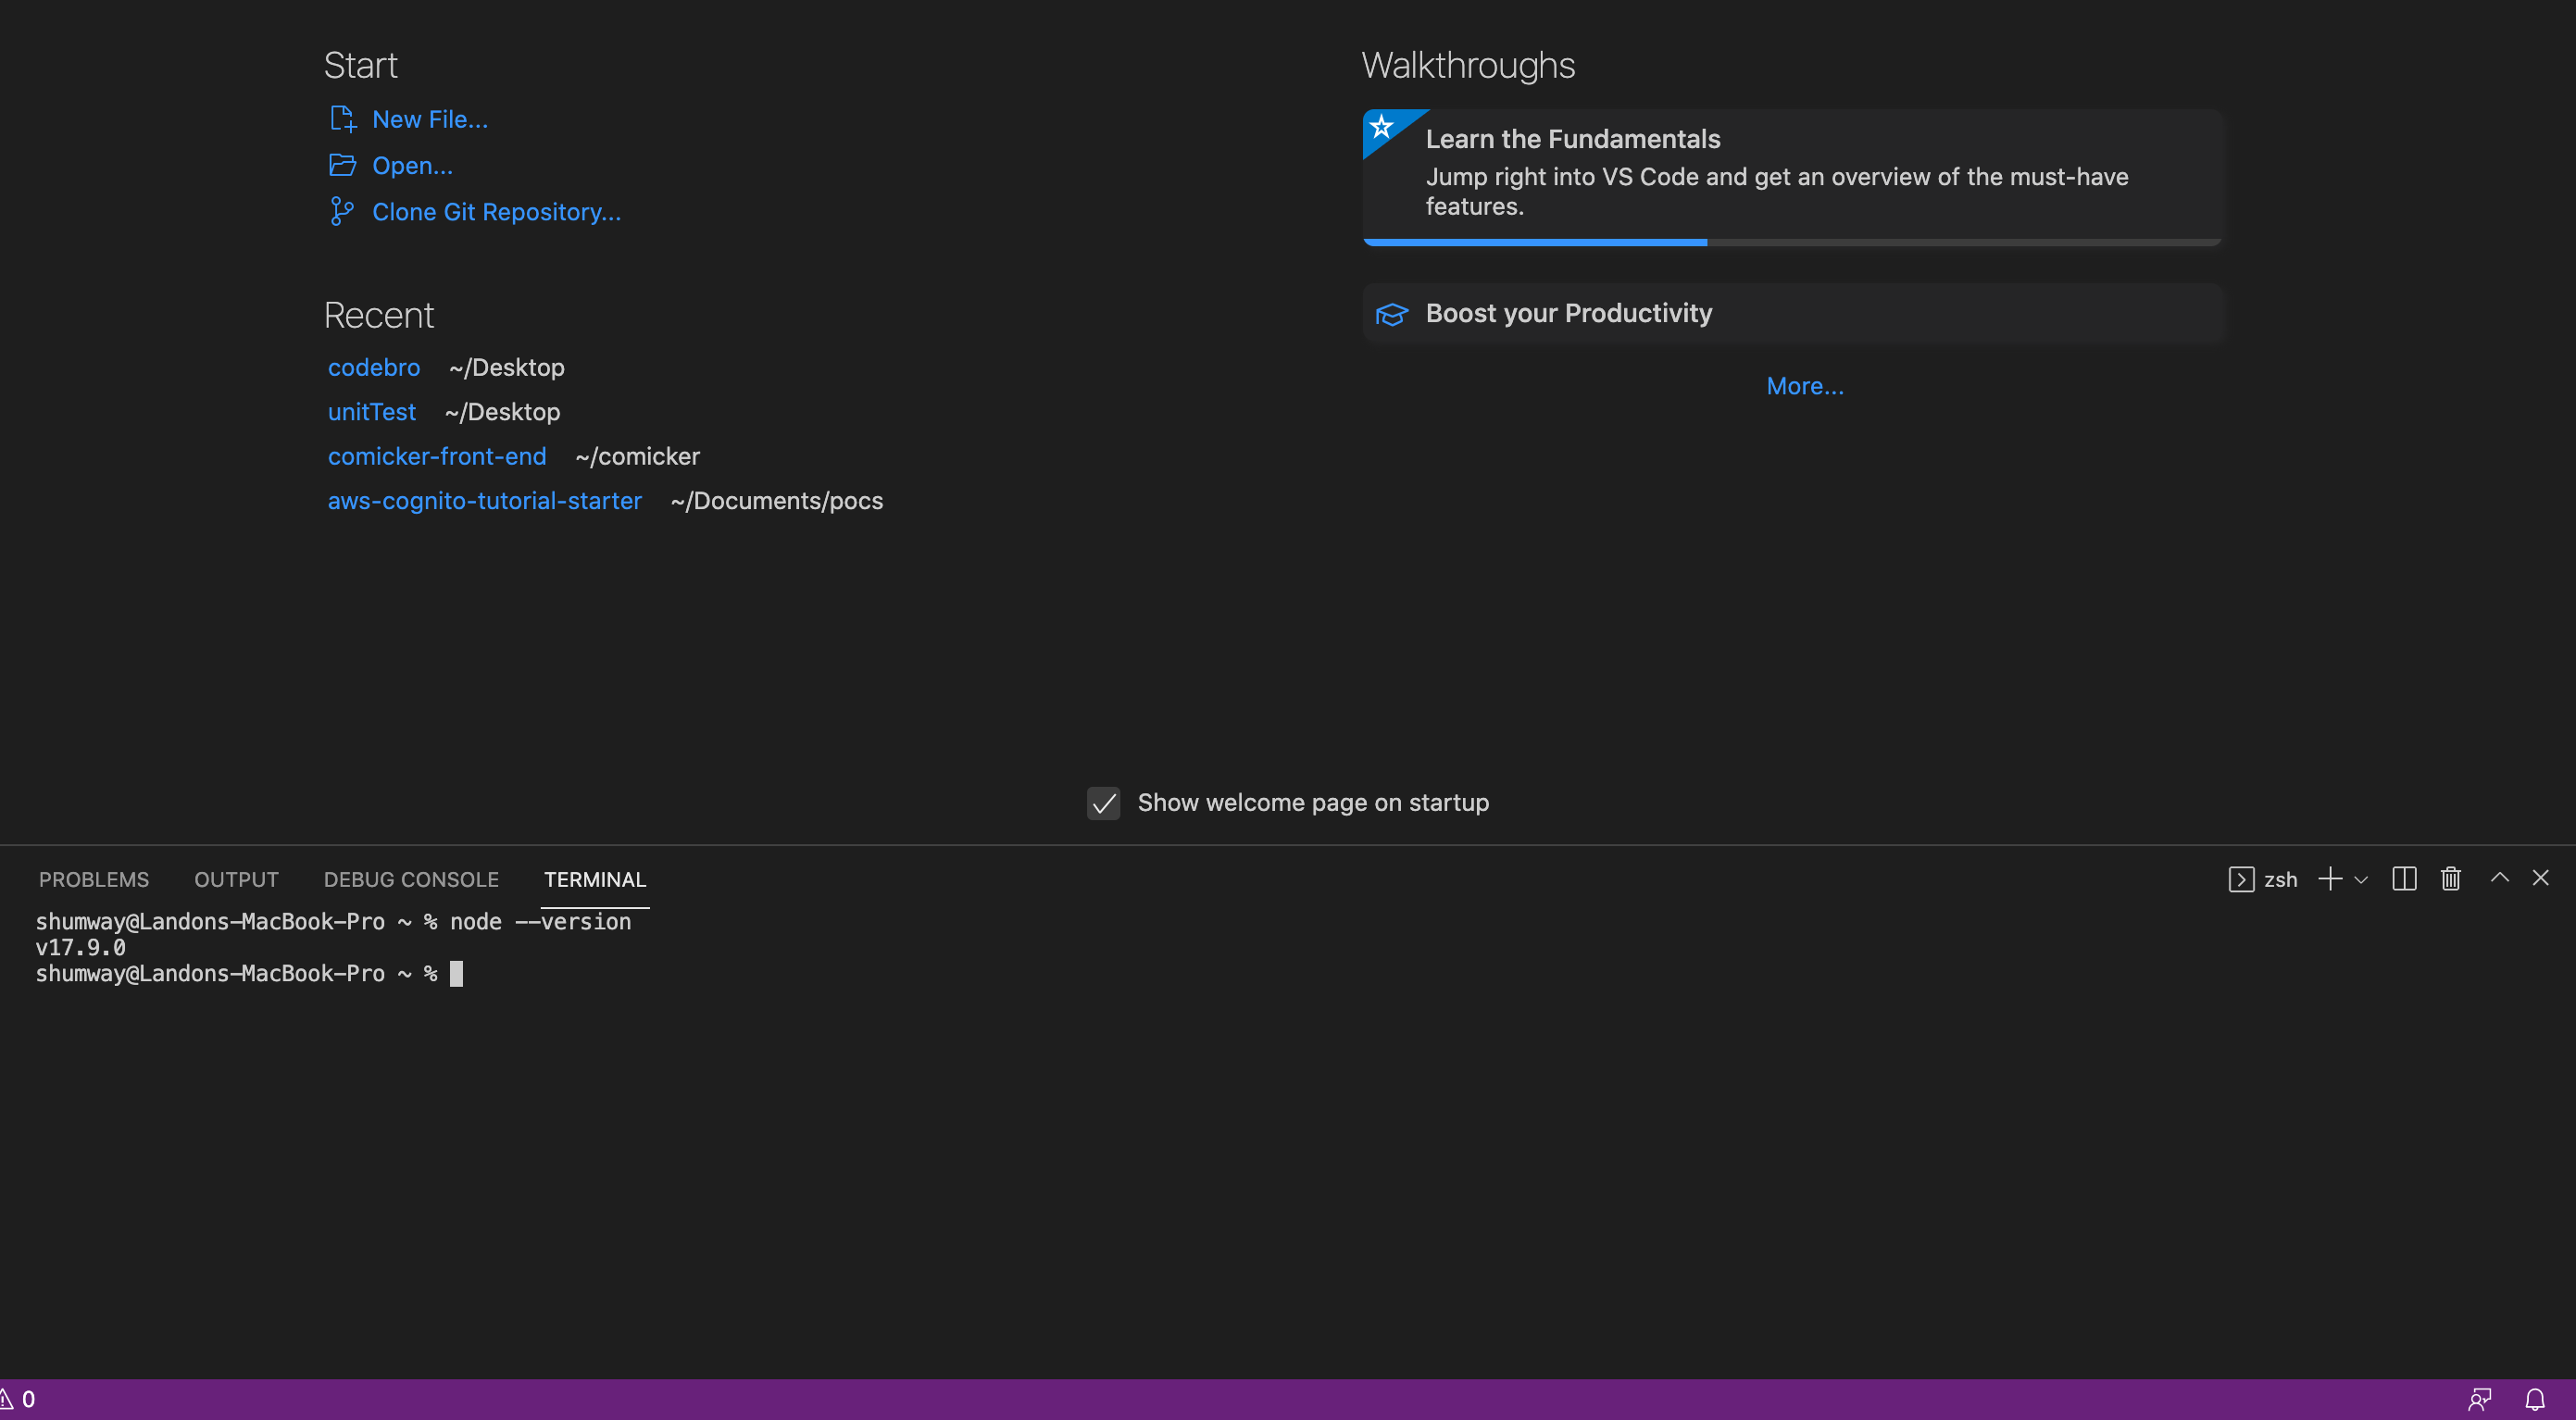
.png)
.png)
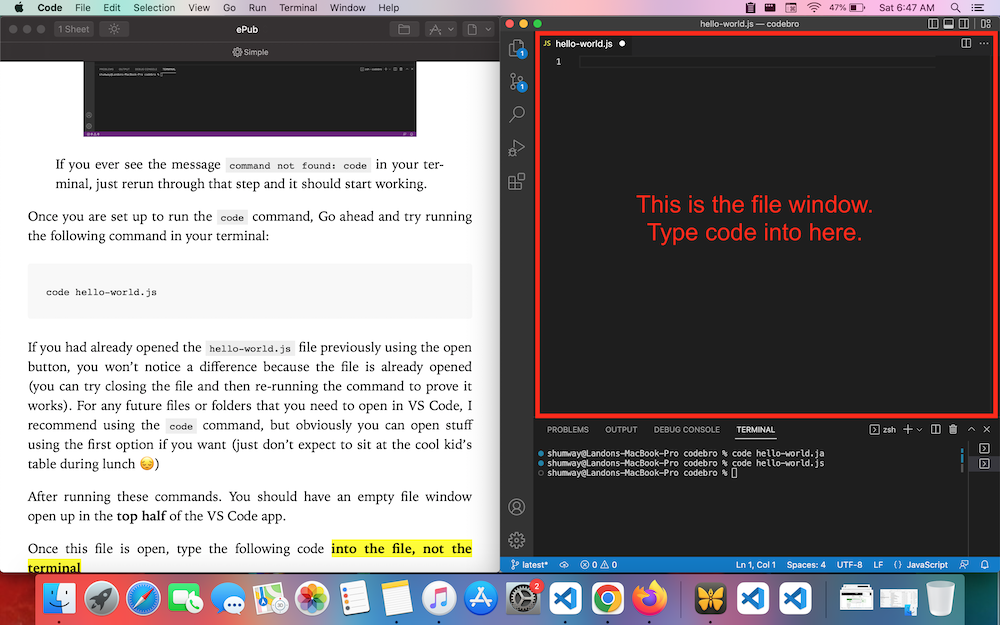
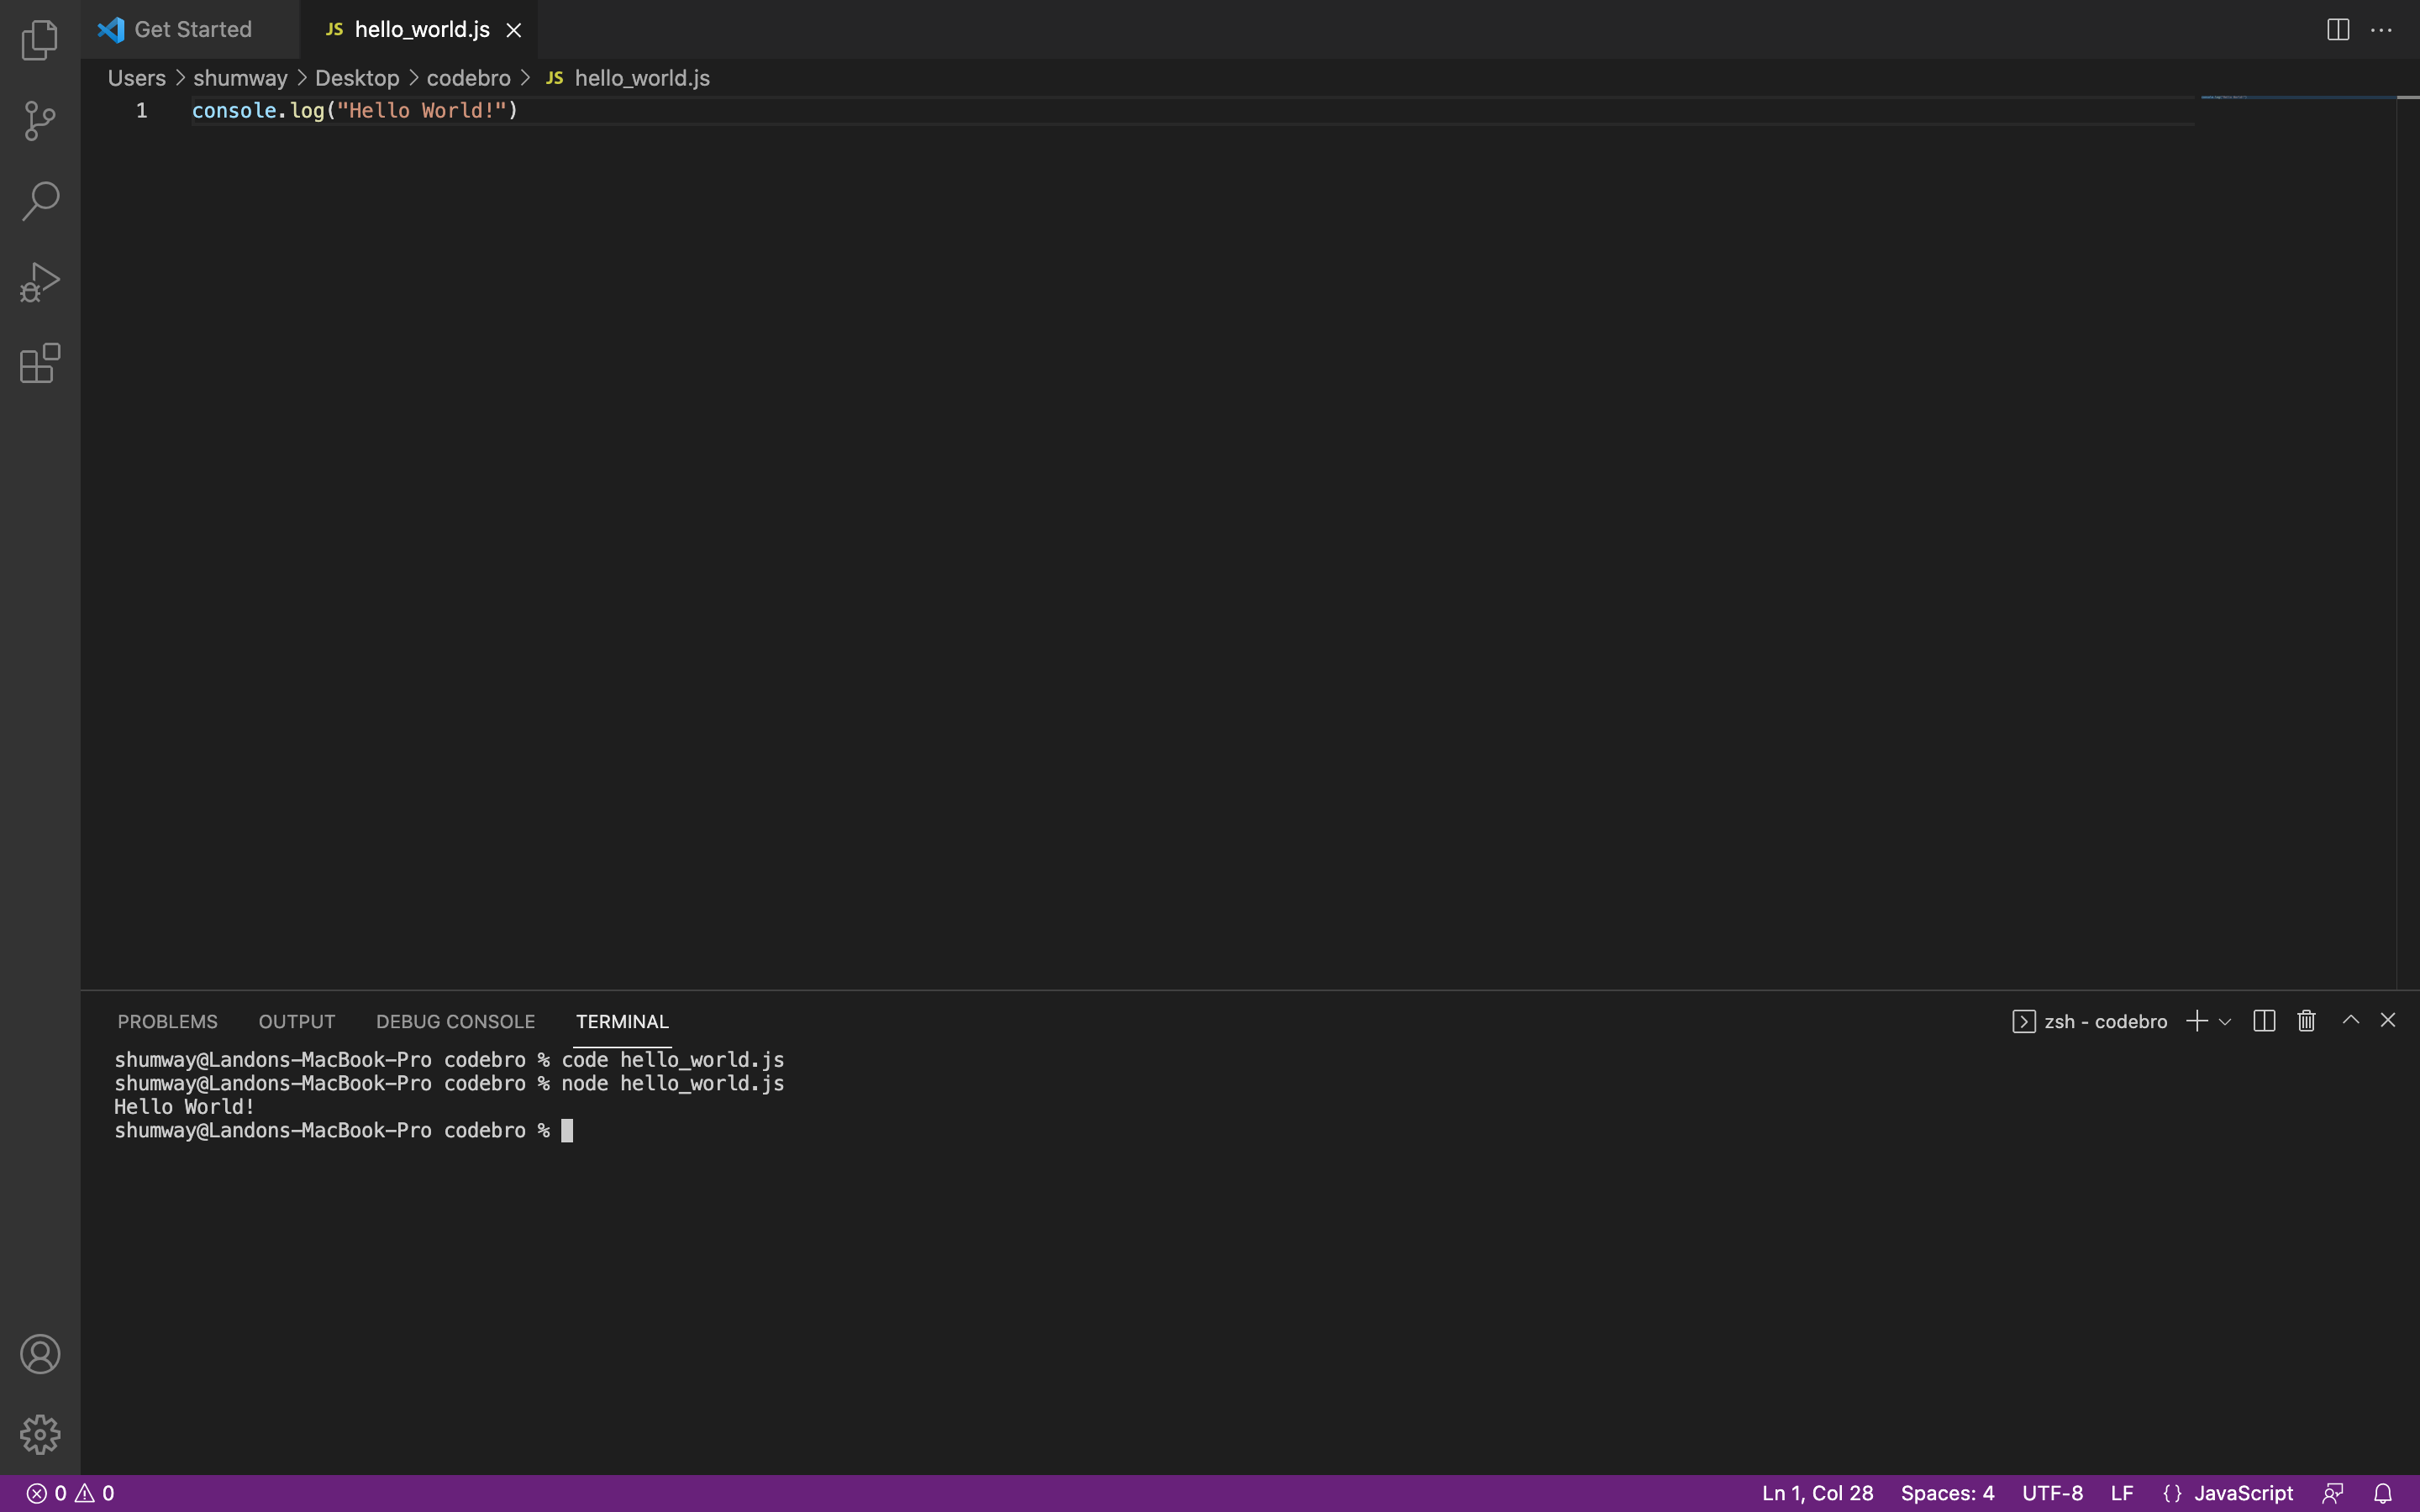
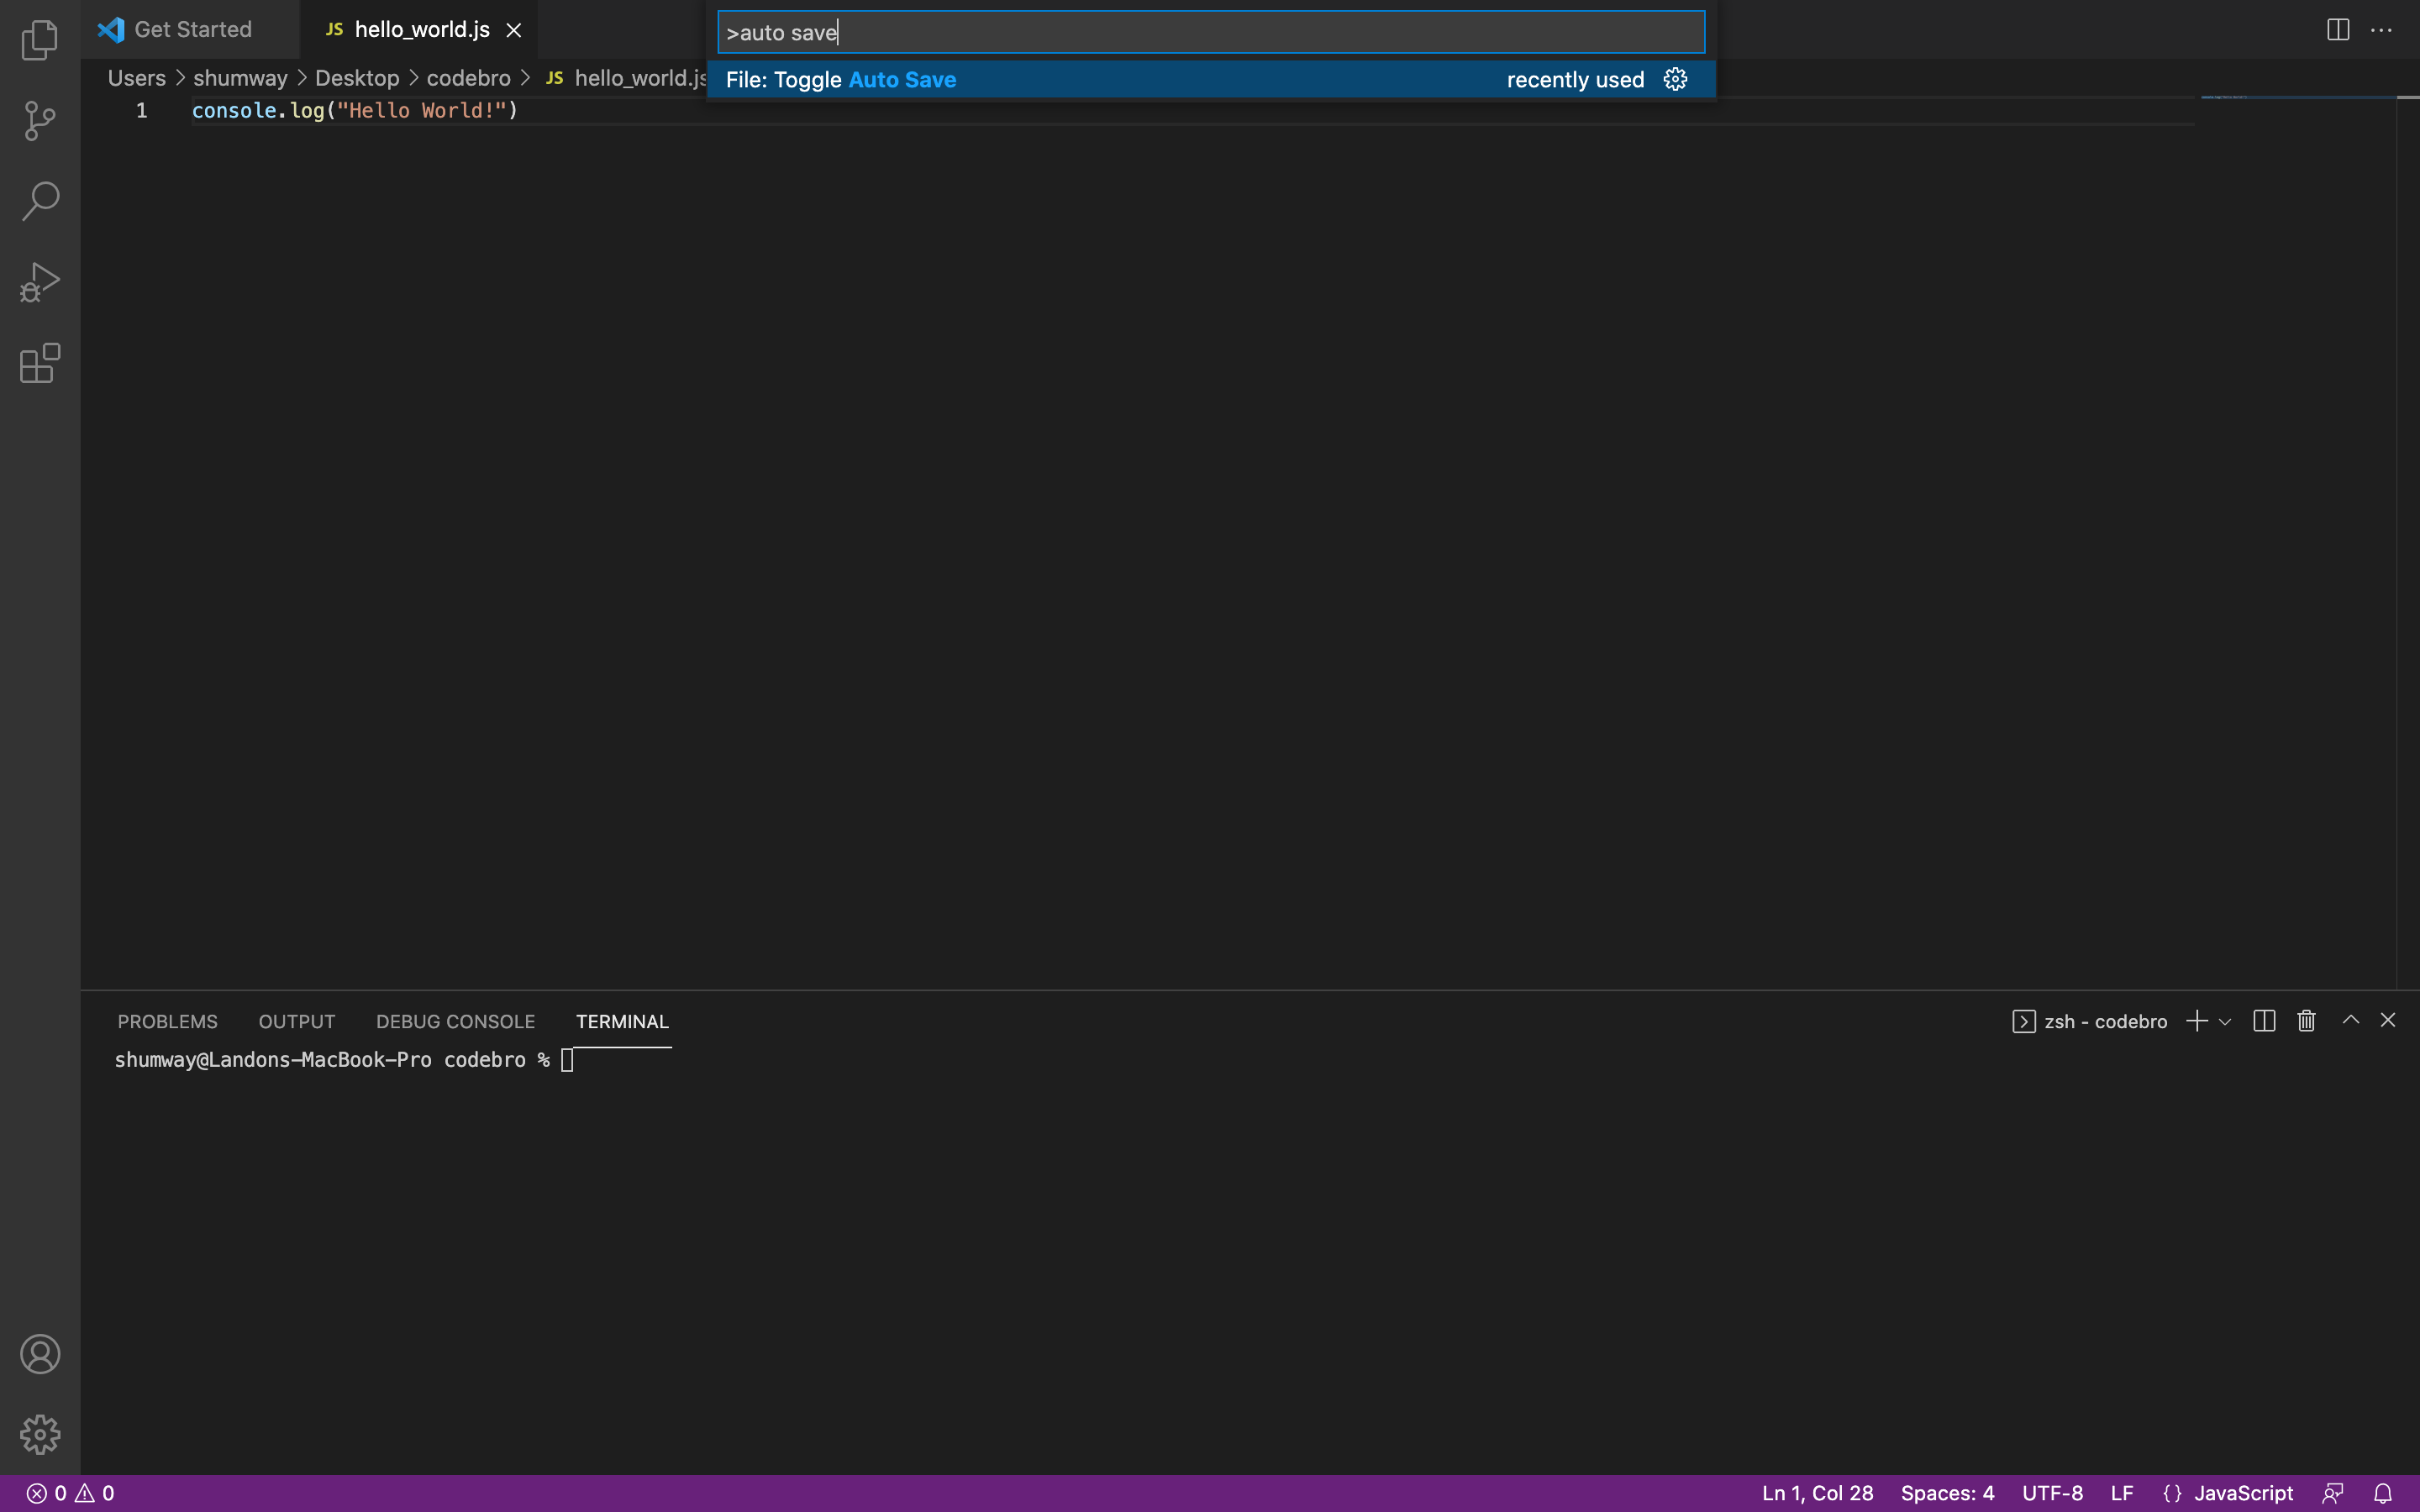
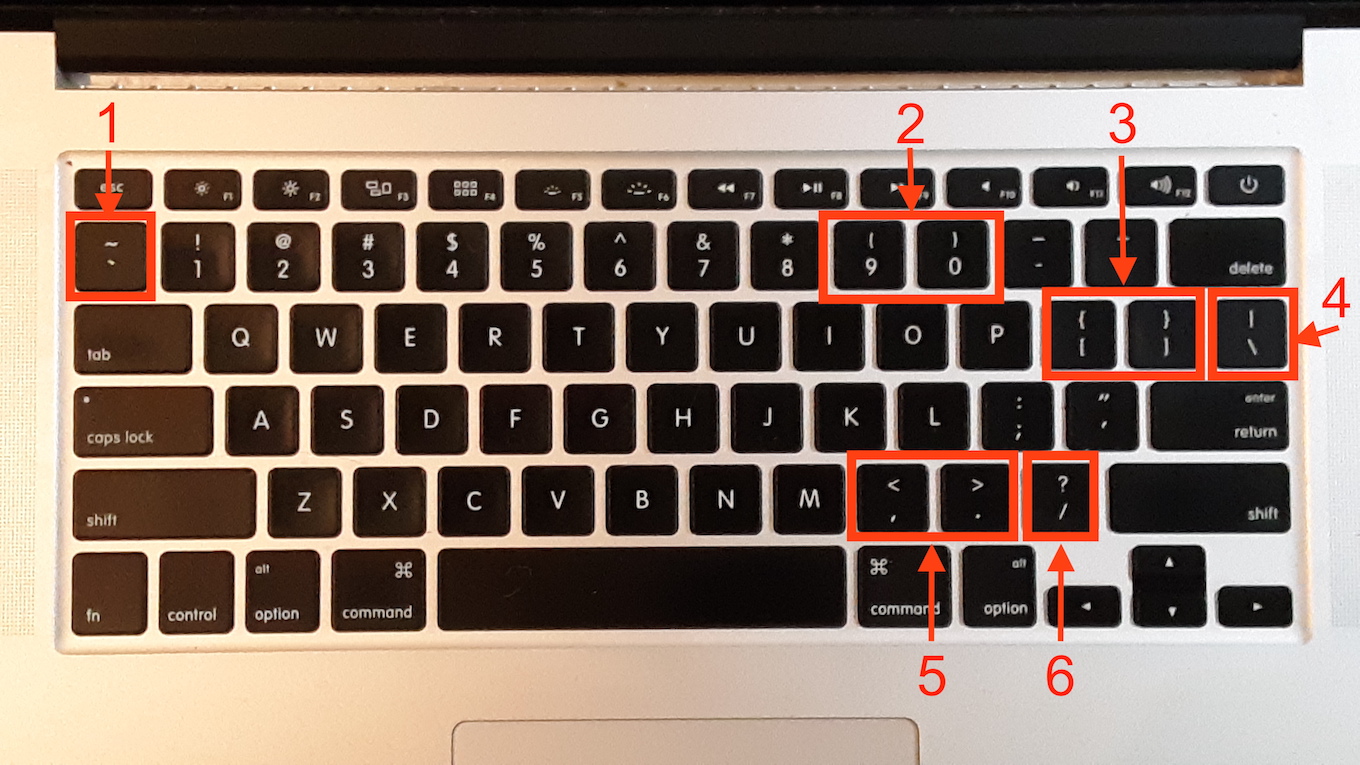
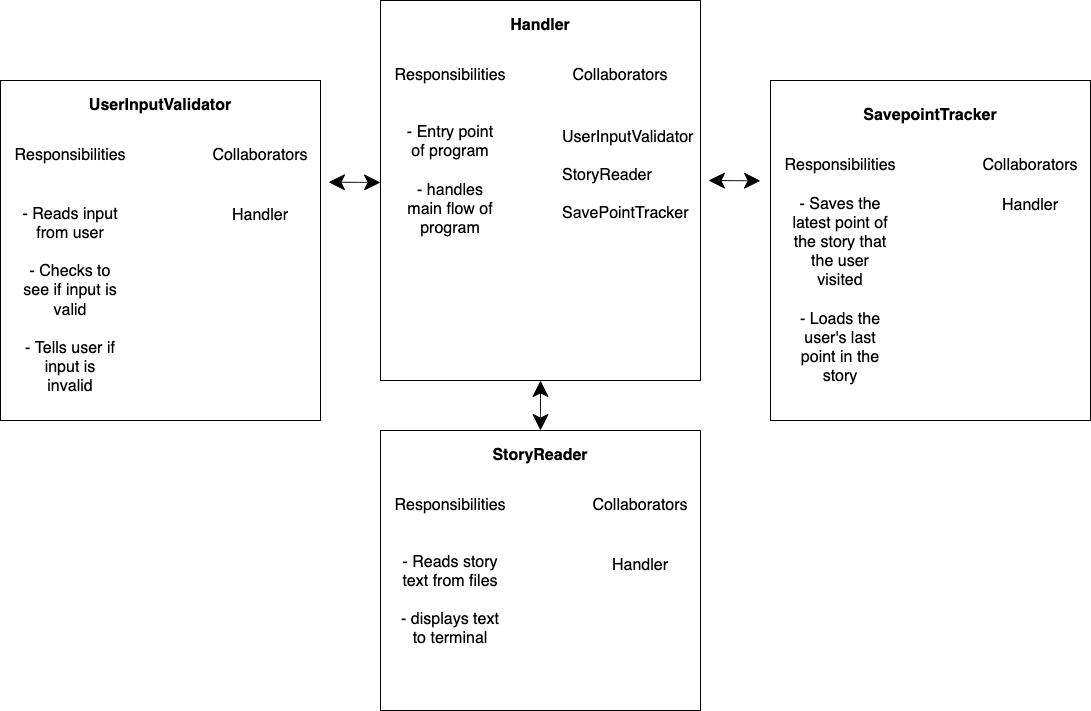
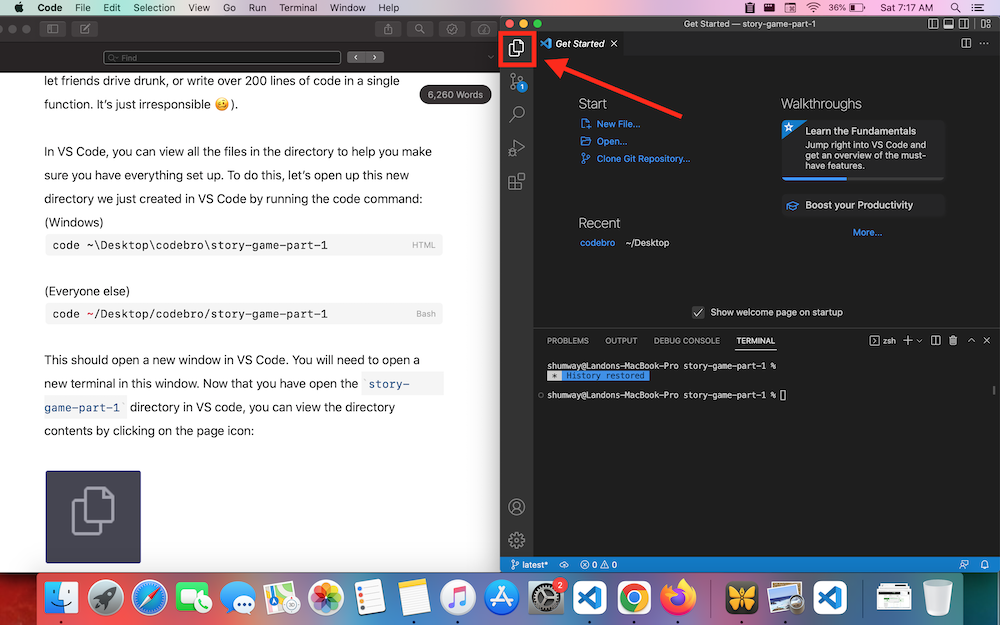
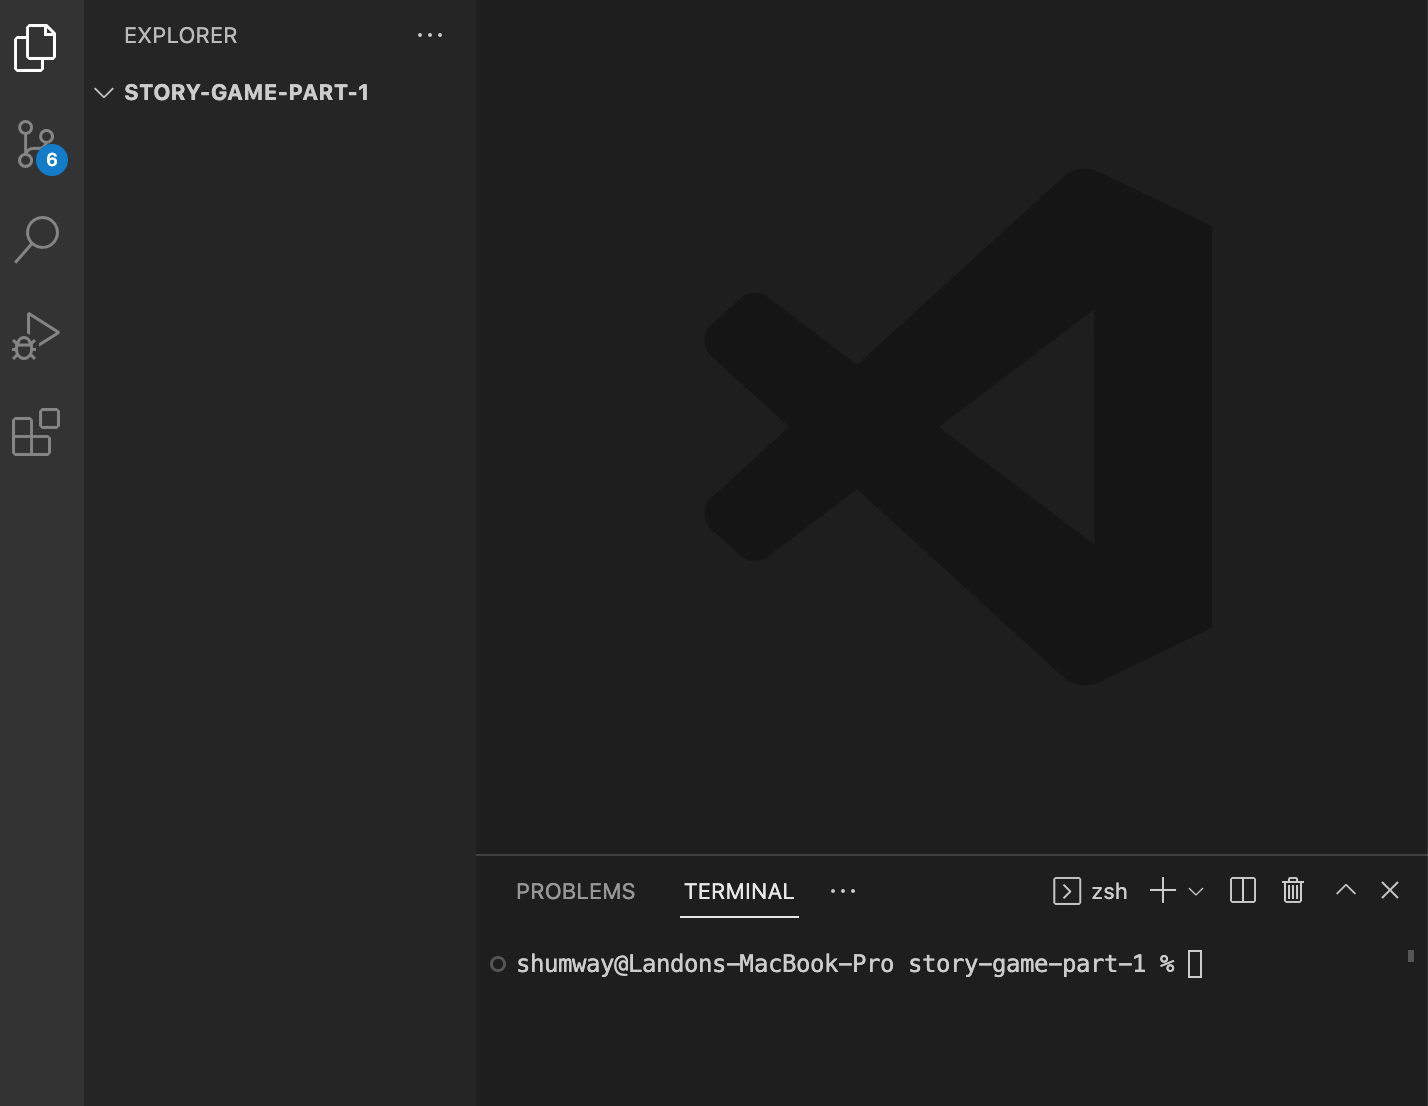
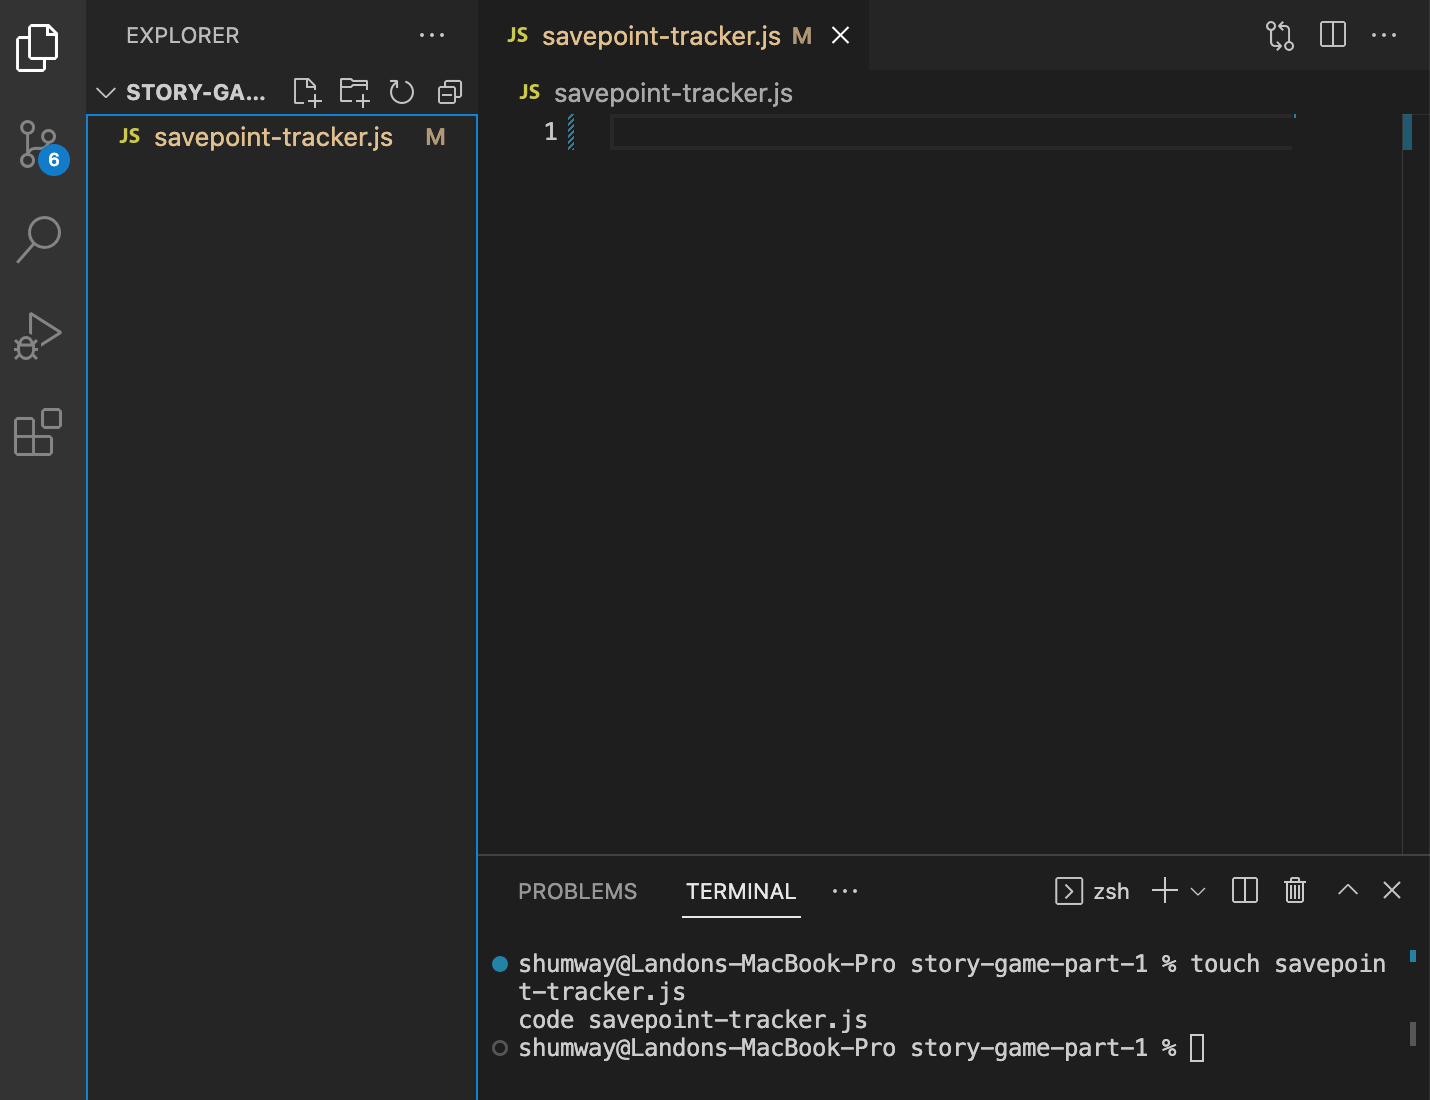

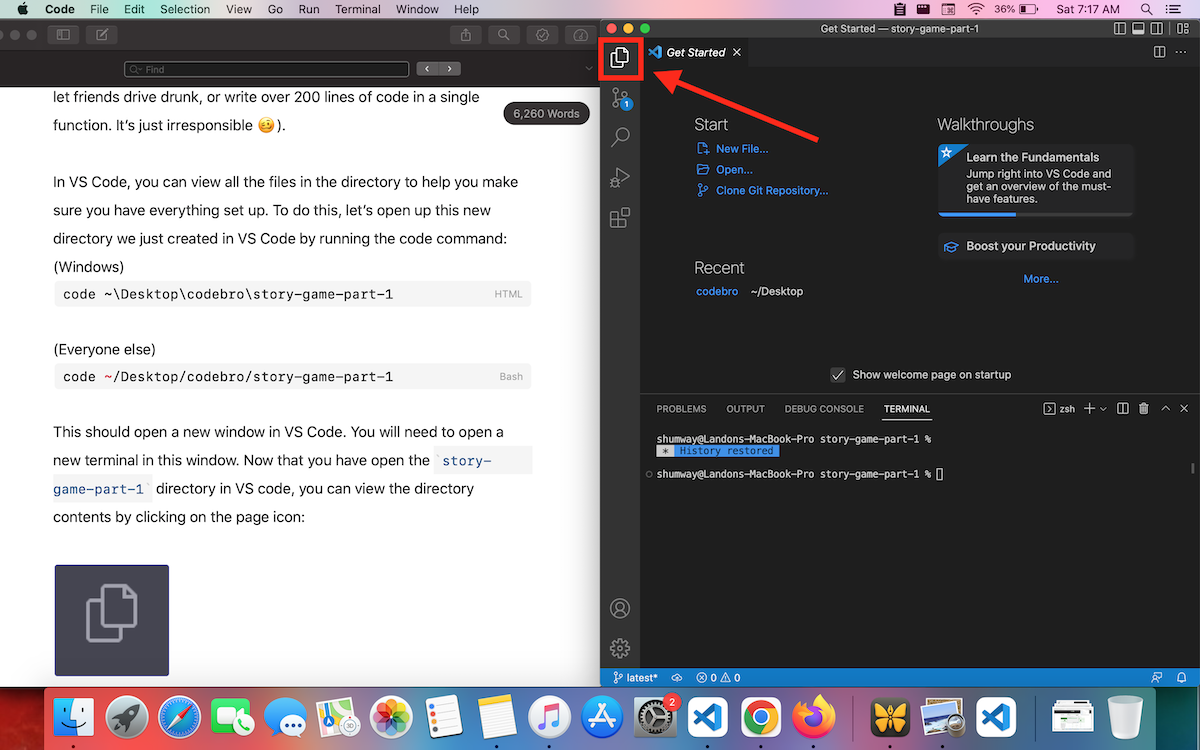
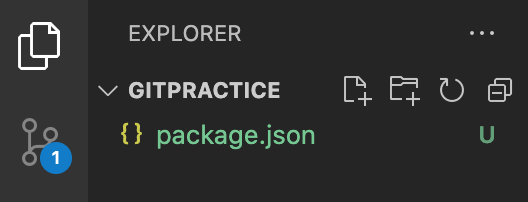
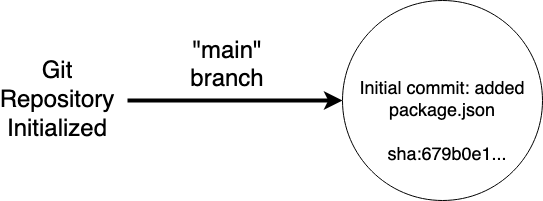

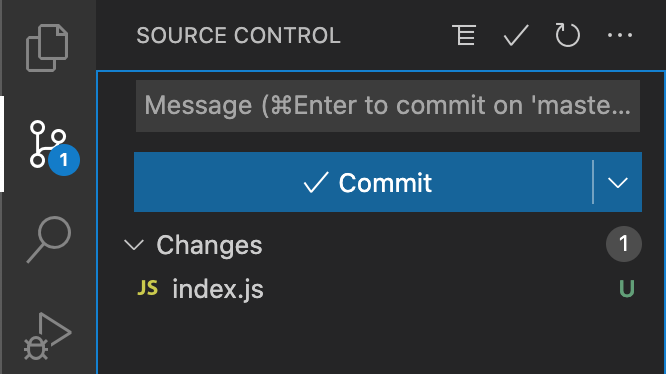
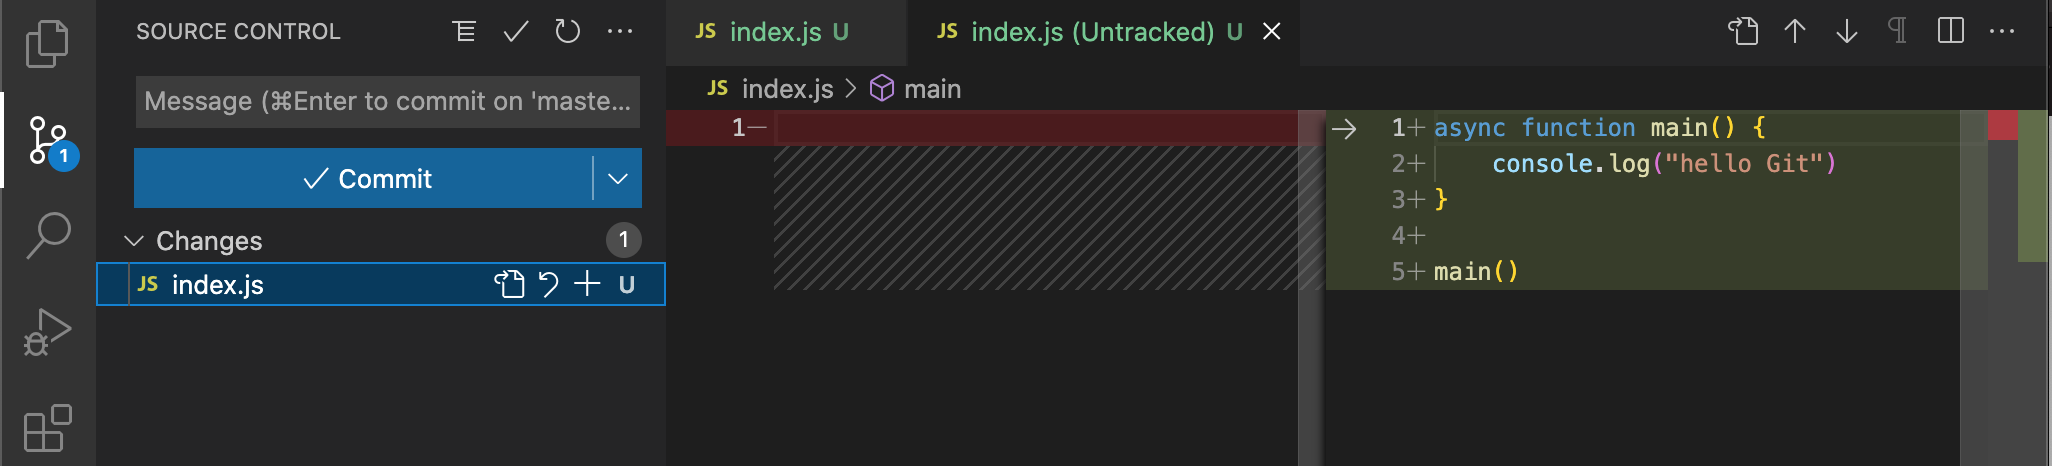
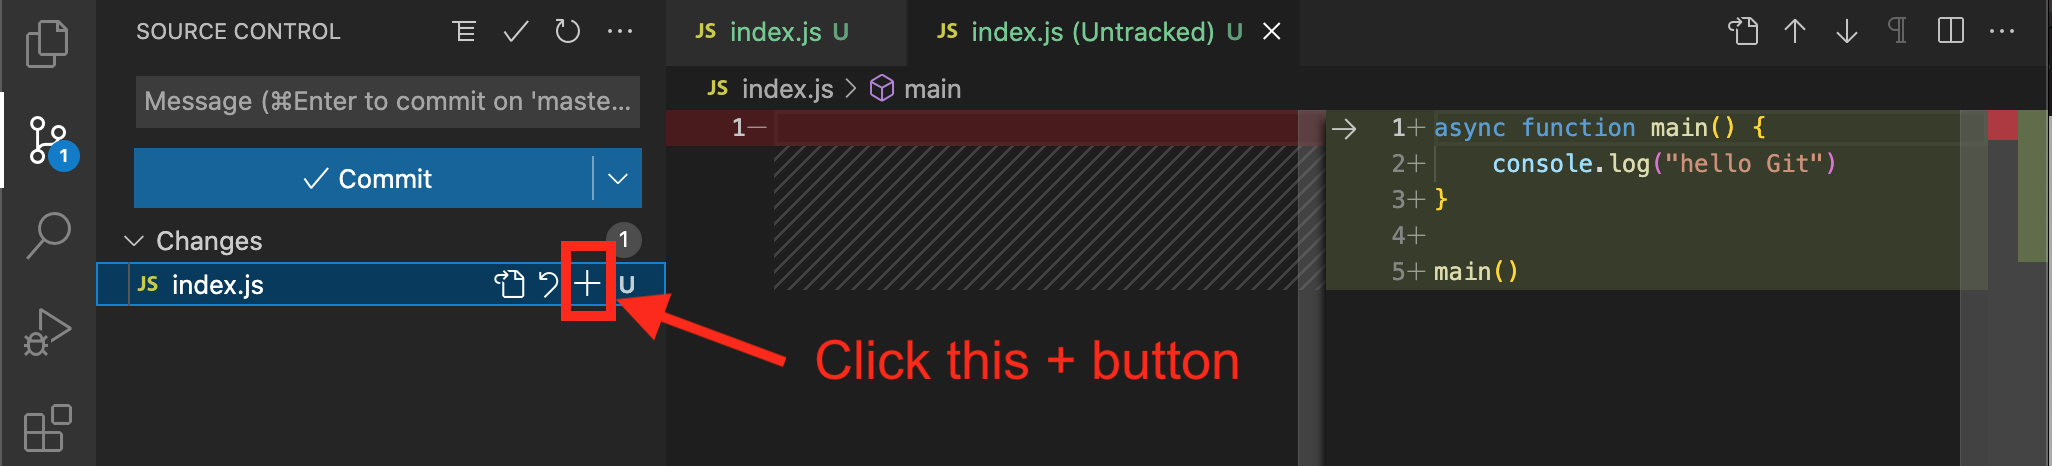
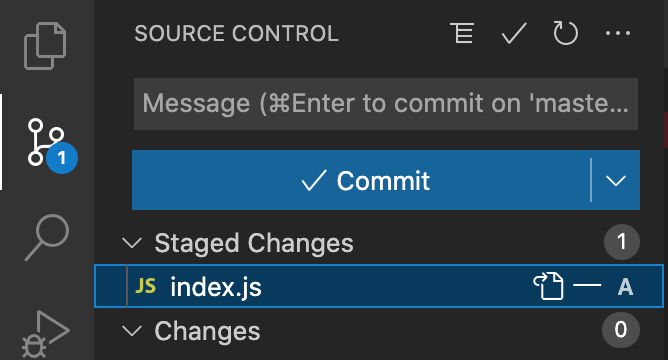
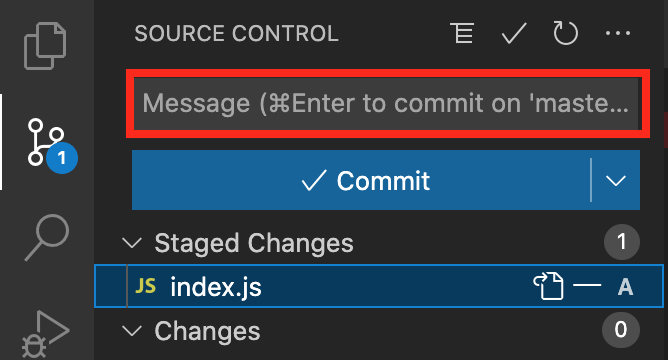
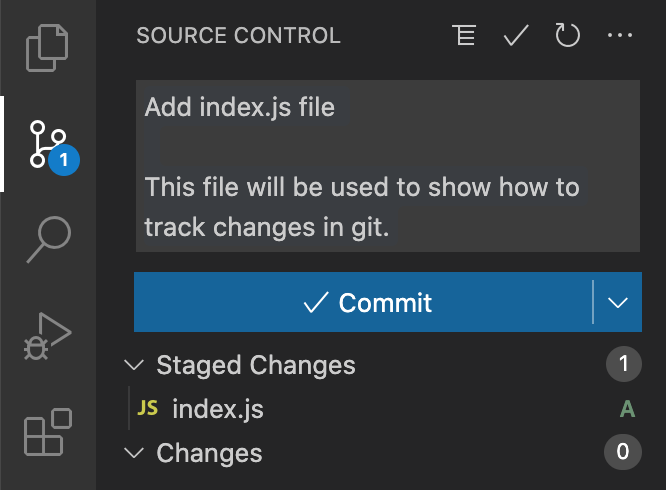
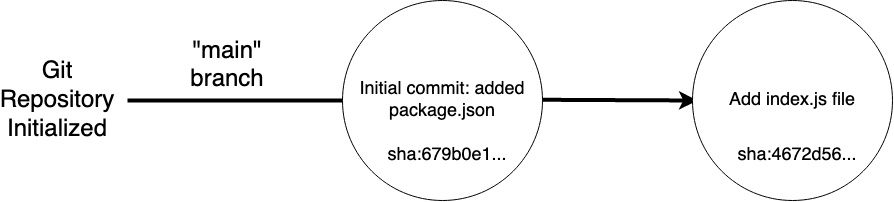
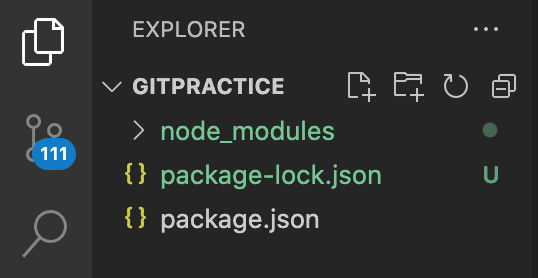
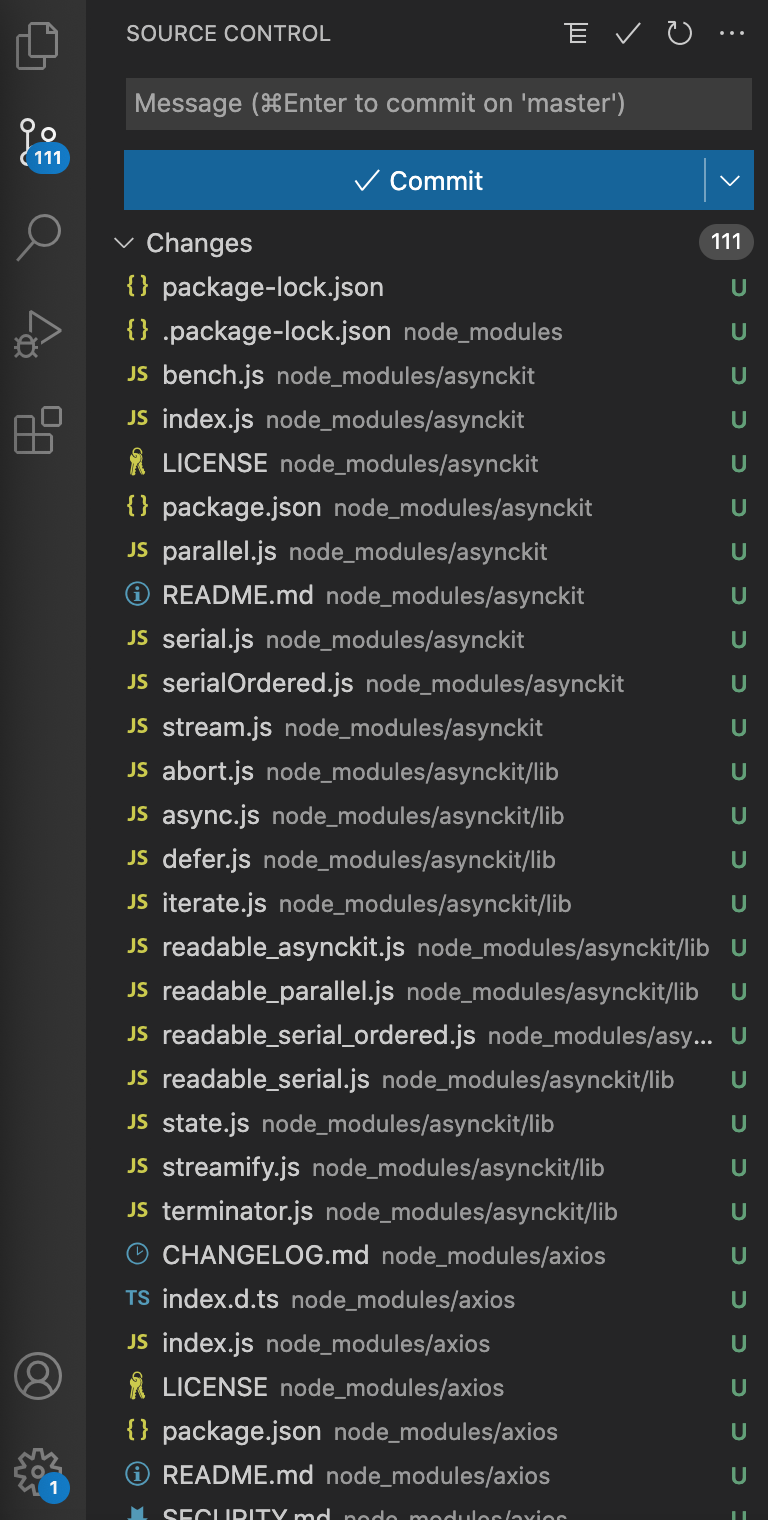
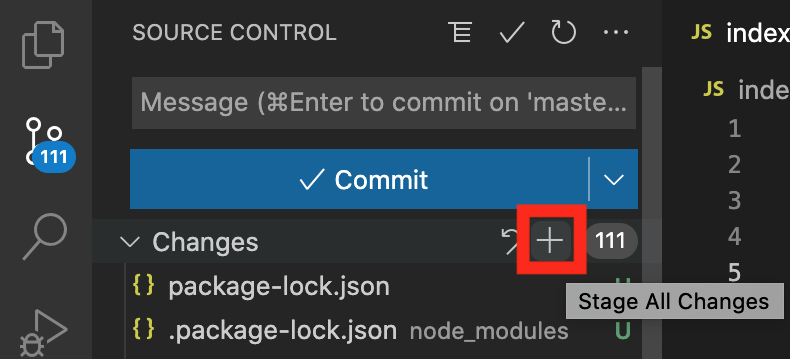
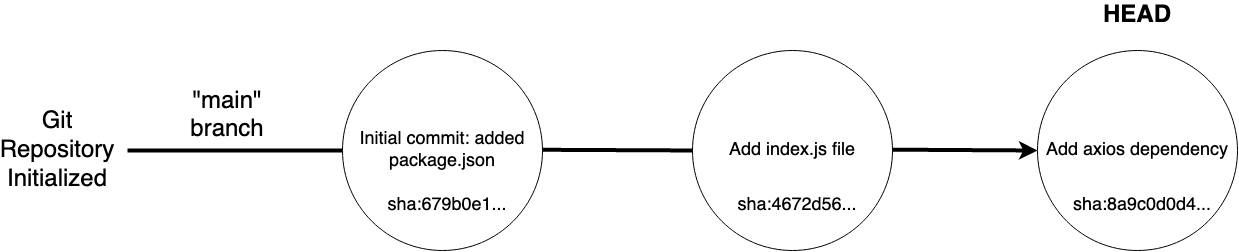

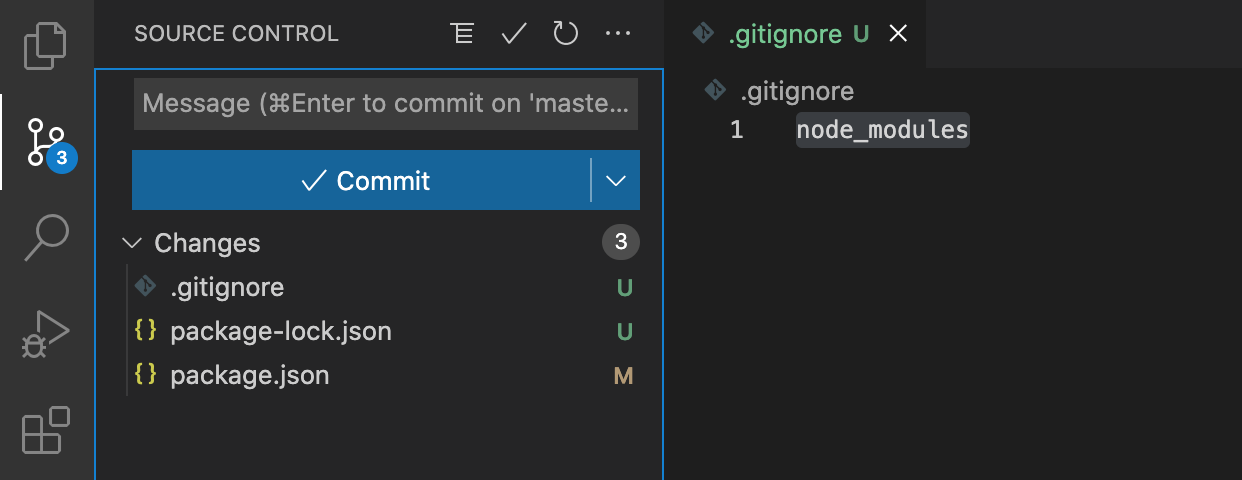
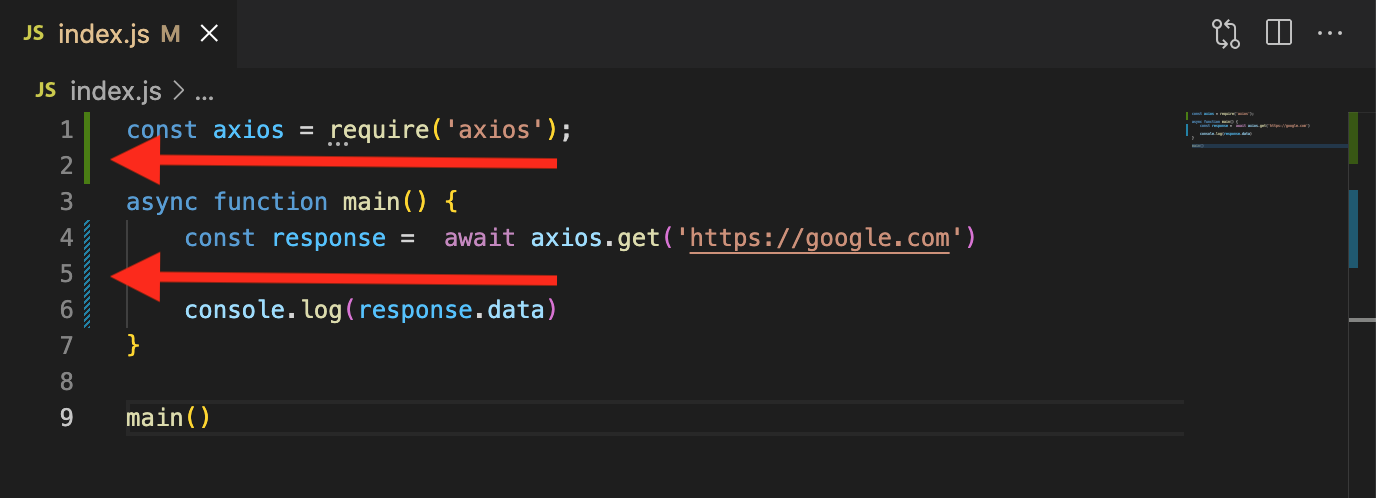
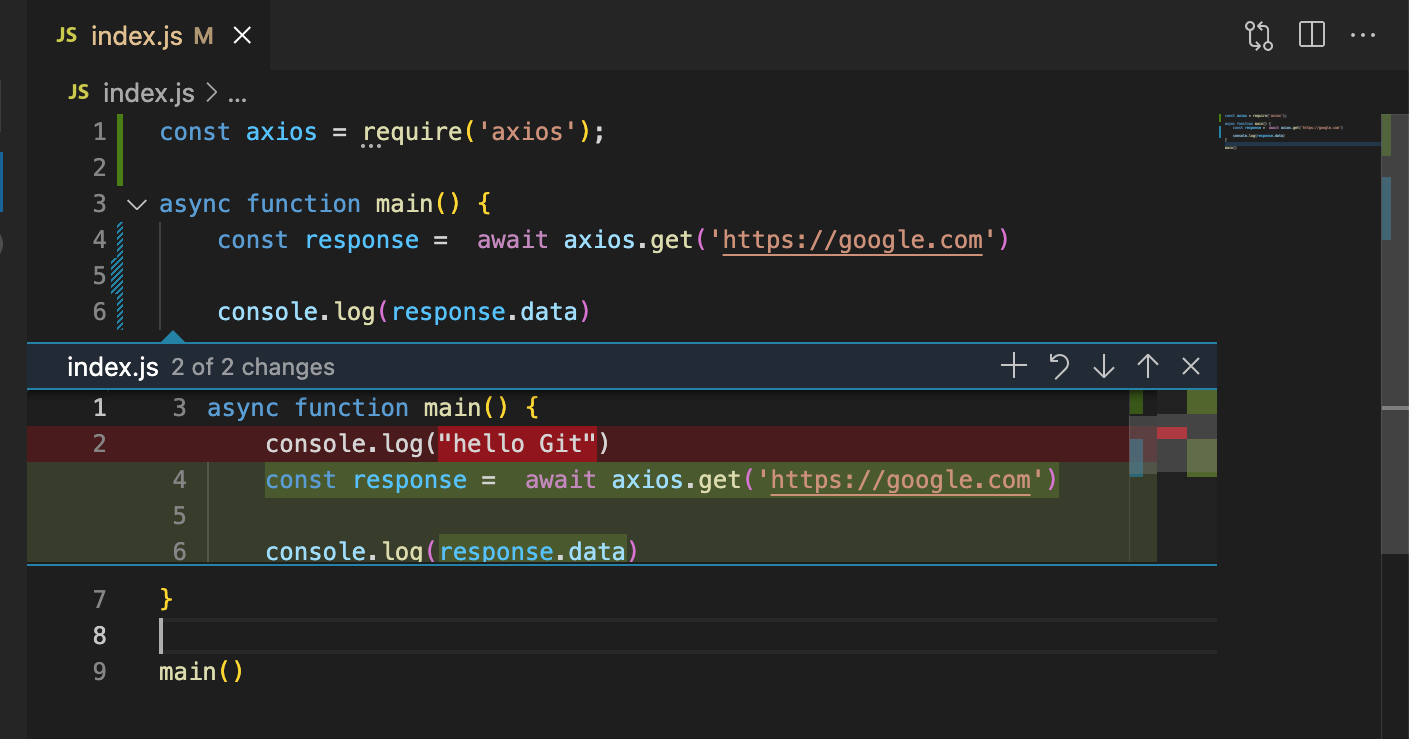


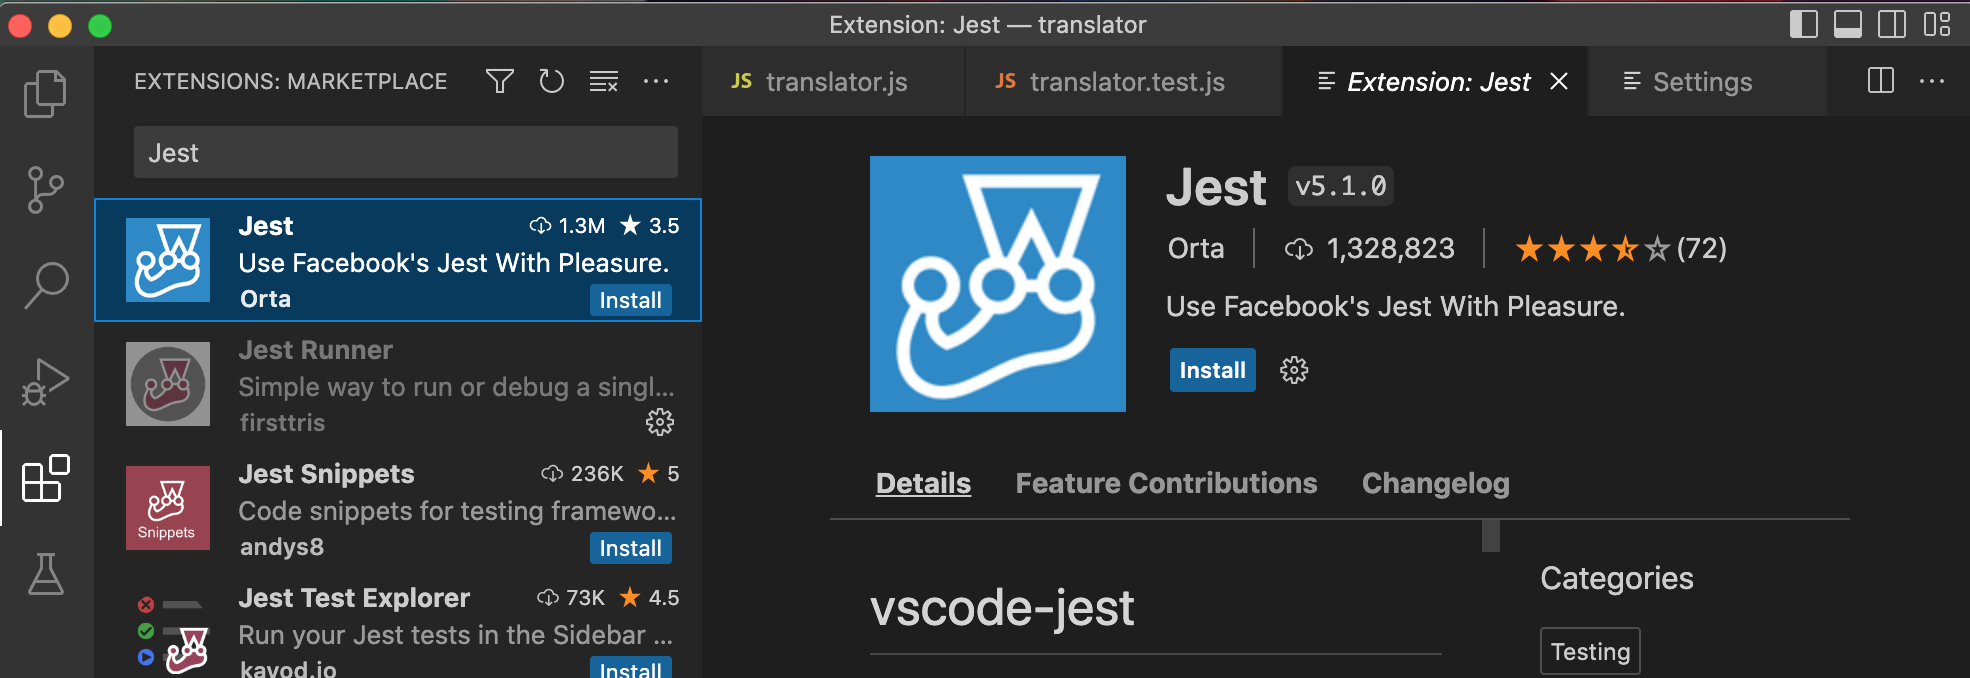
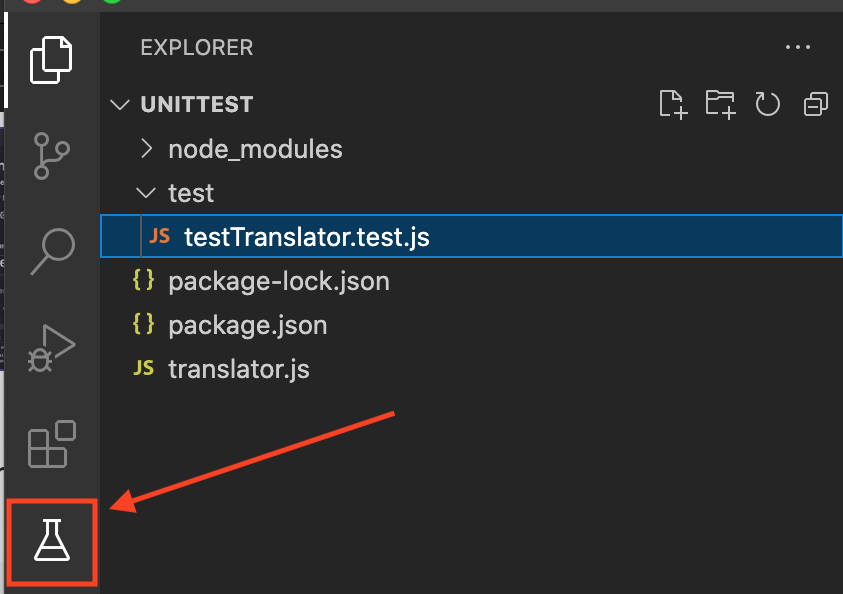
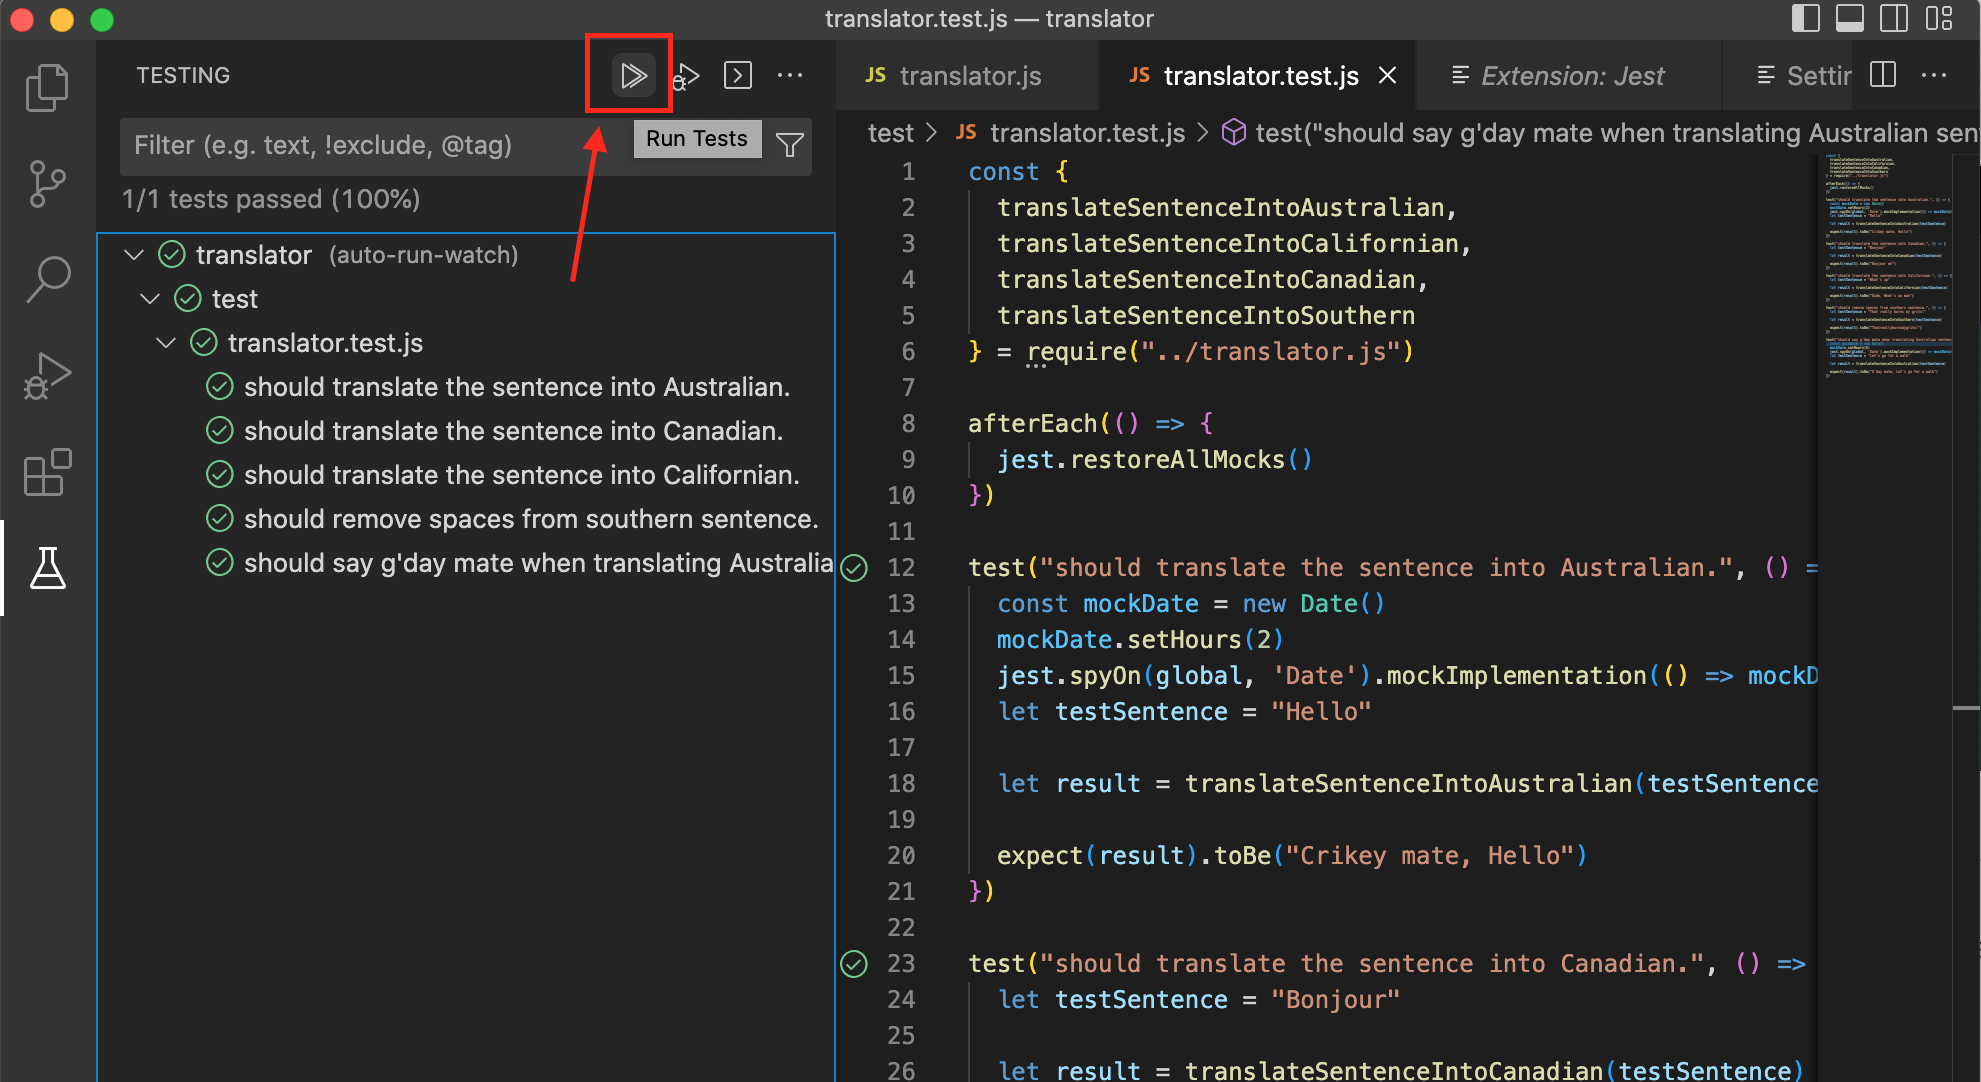
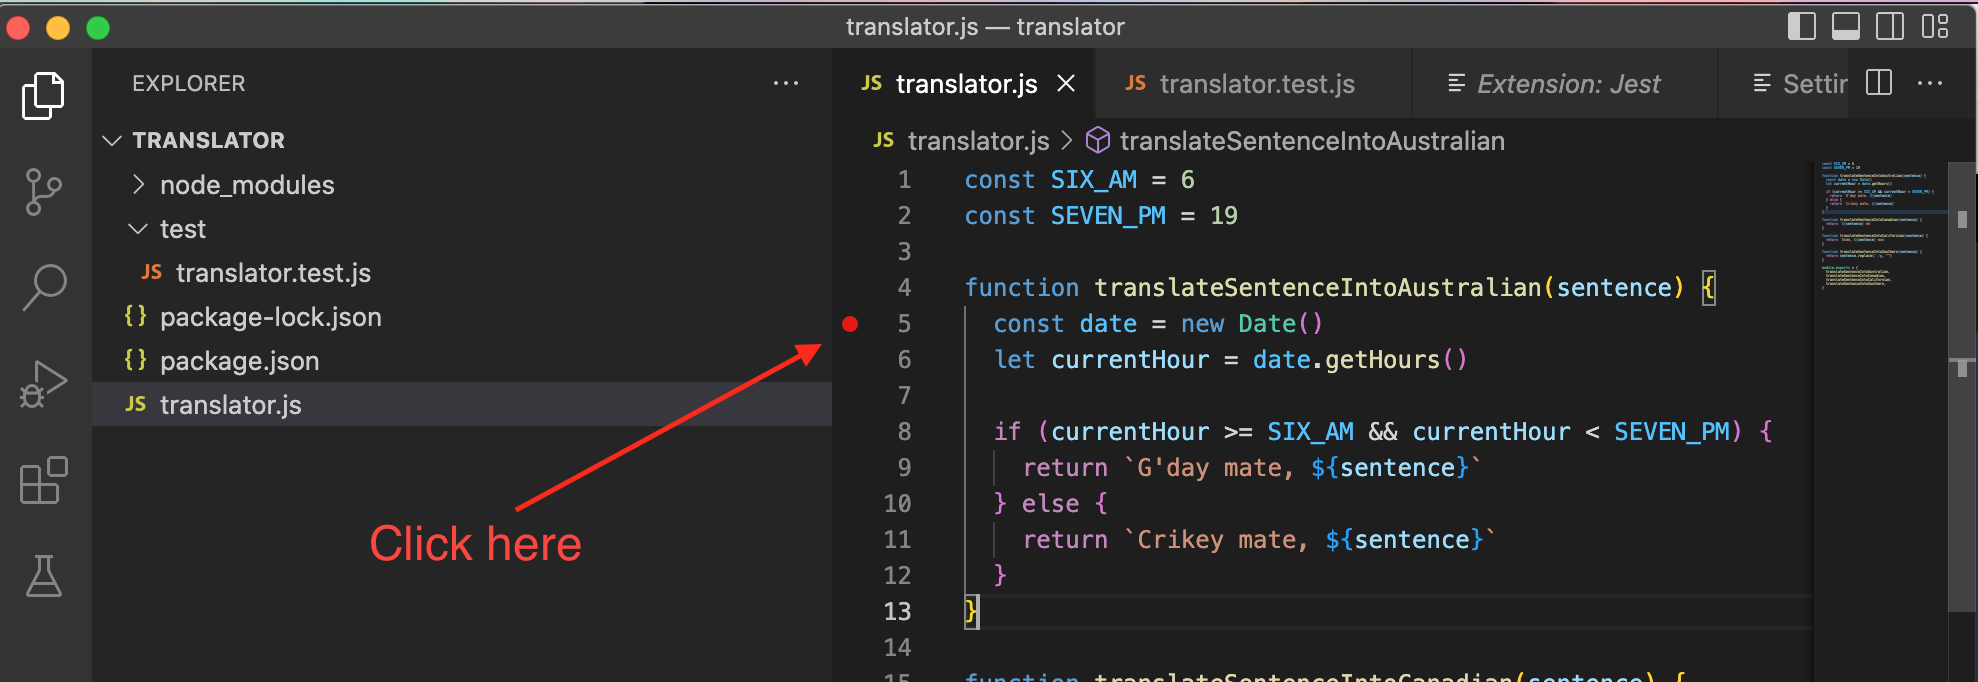


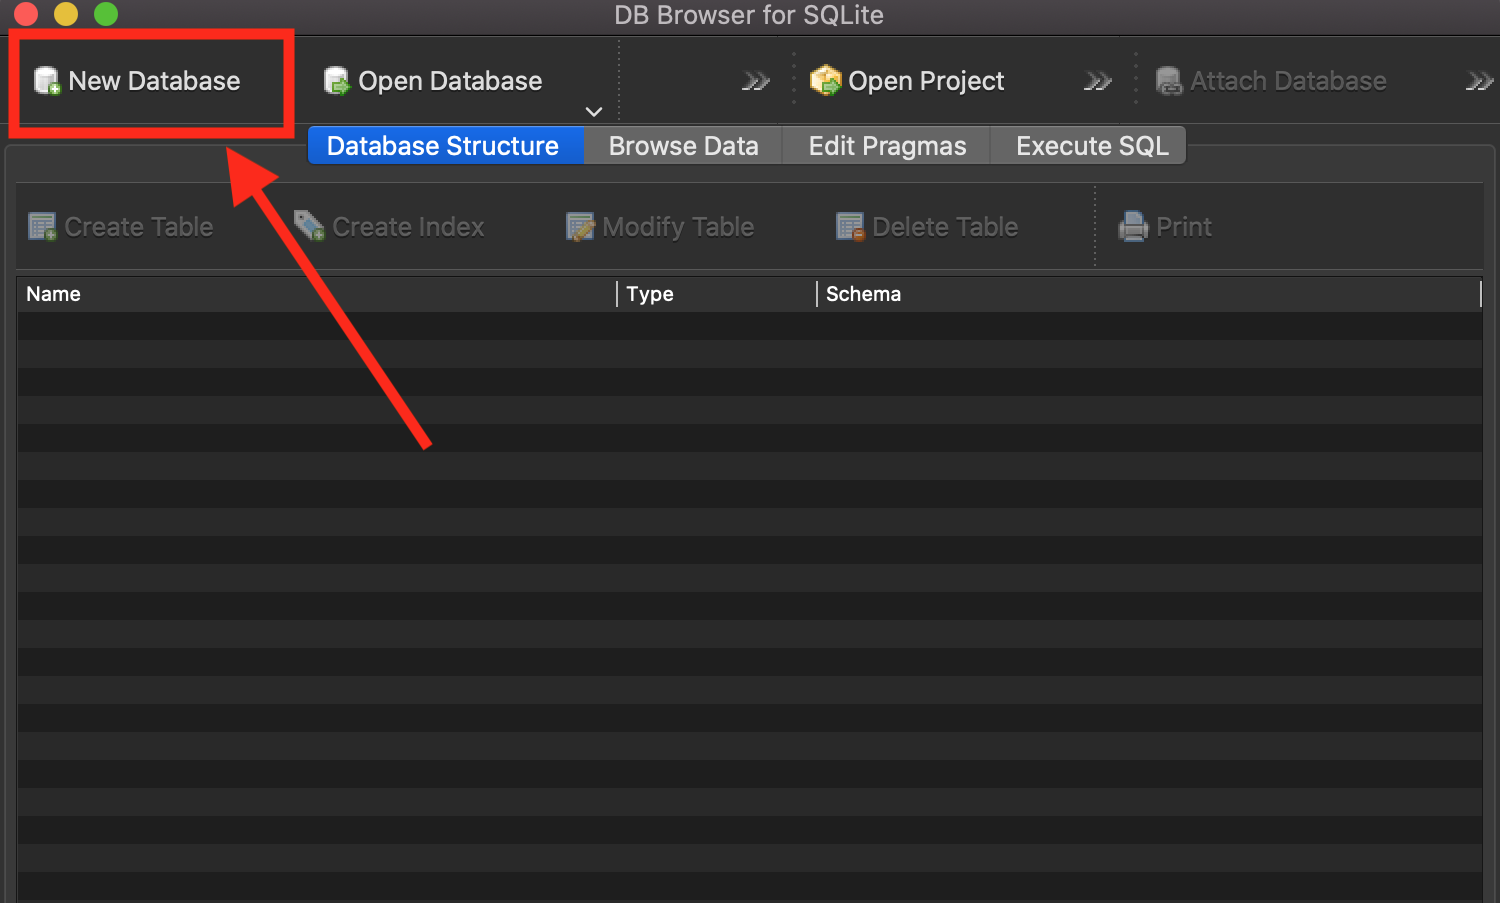
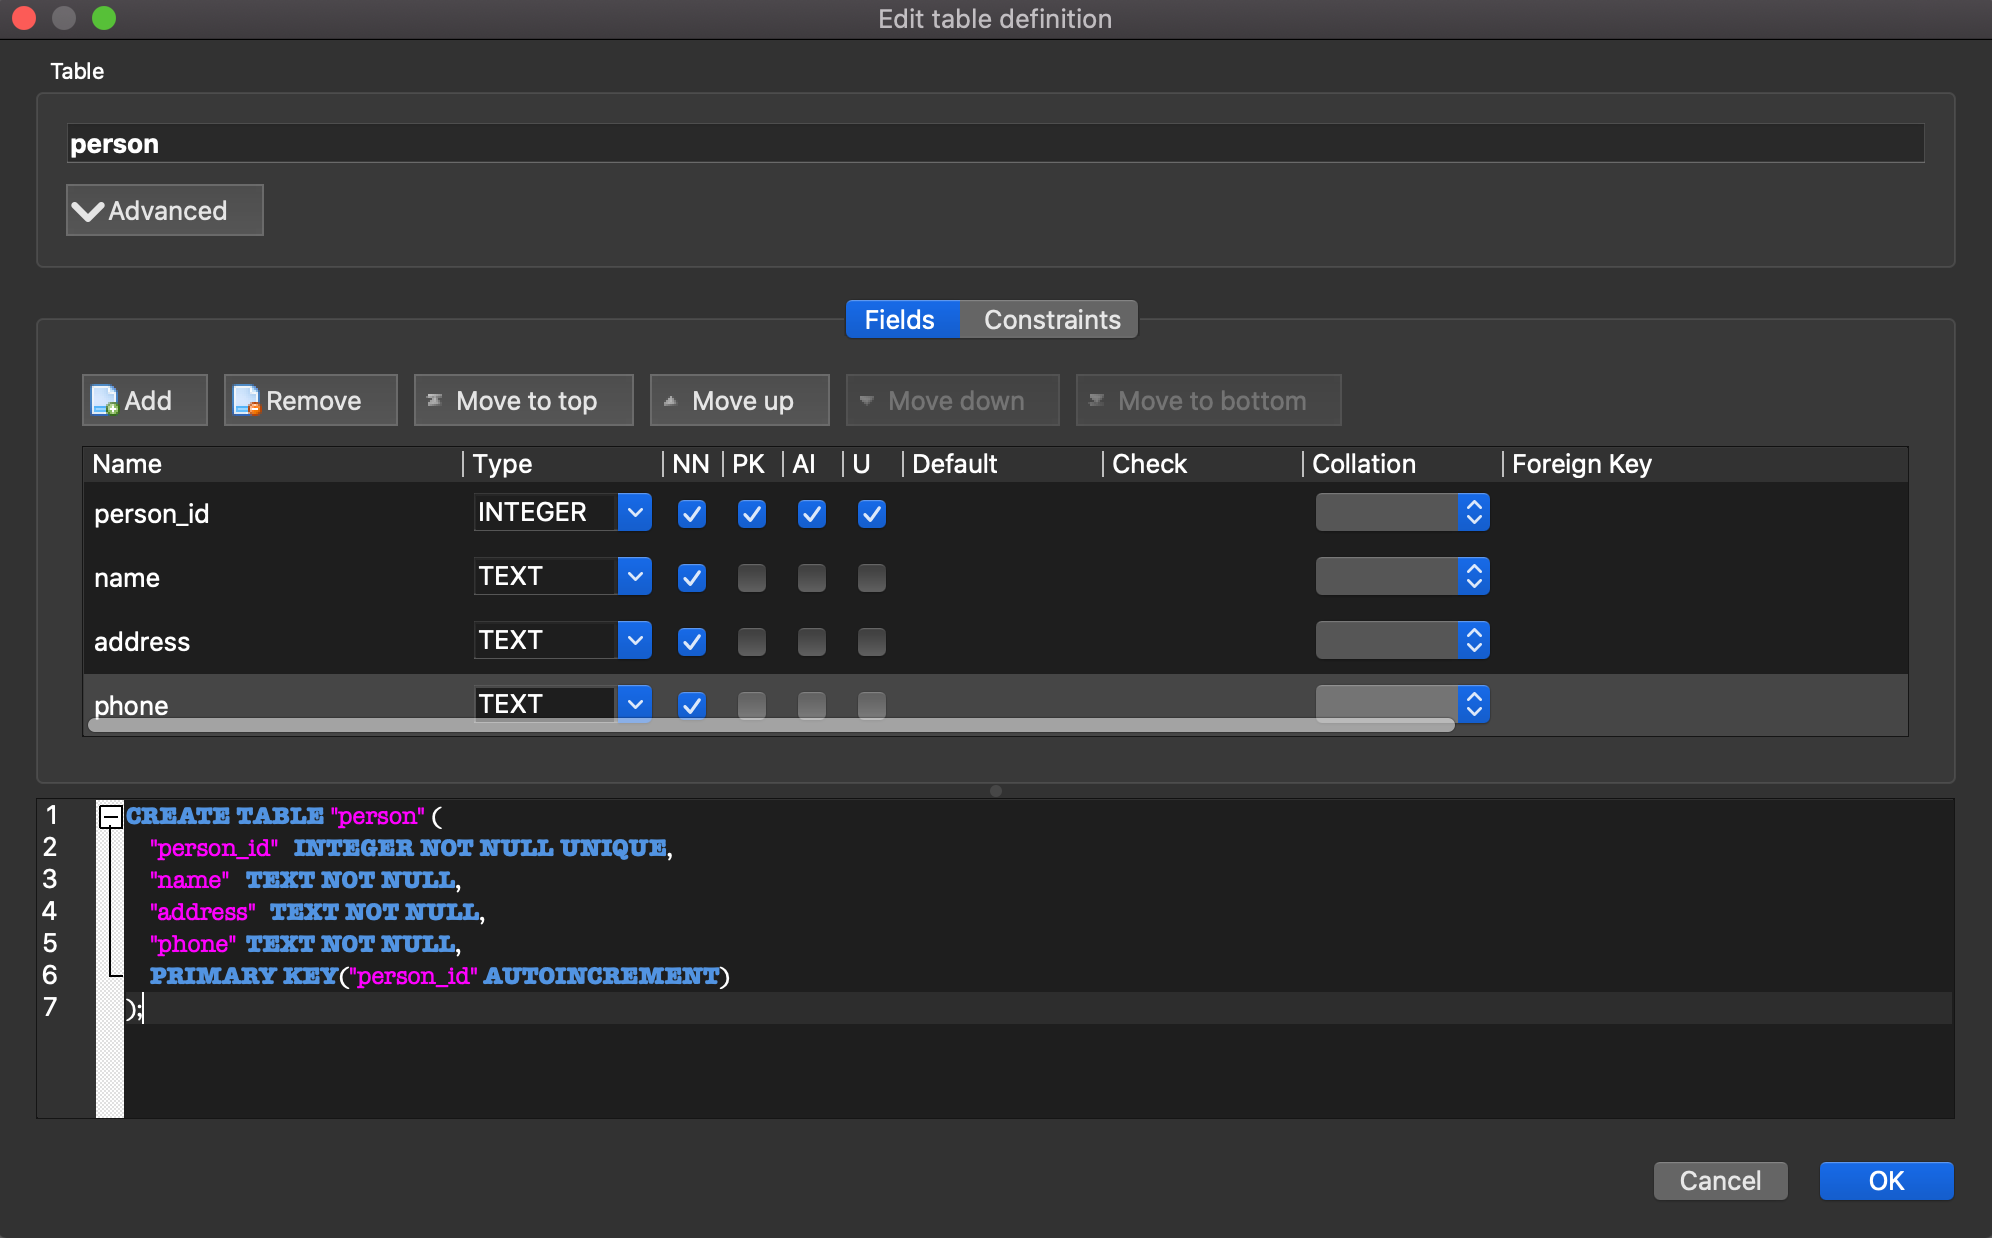
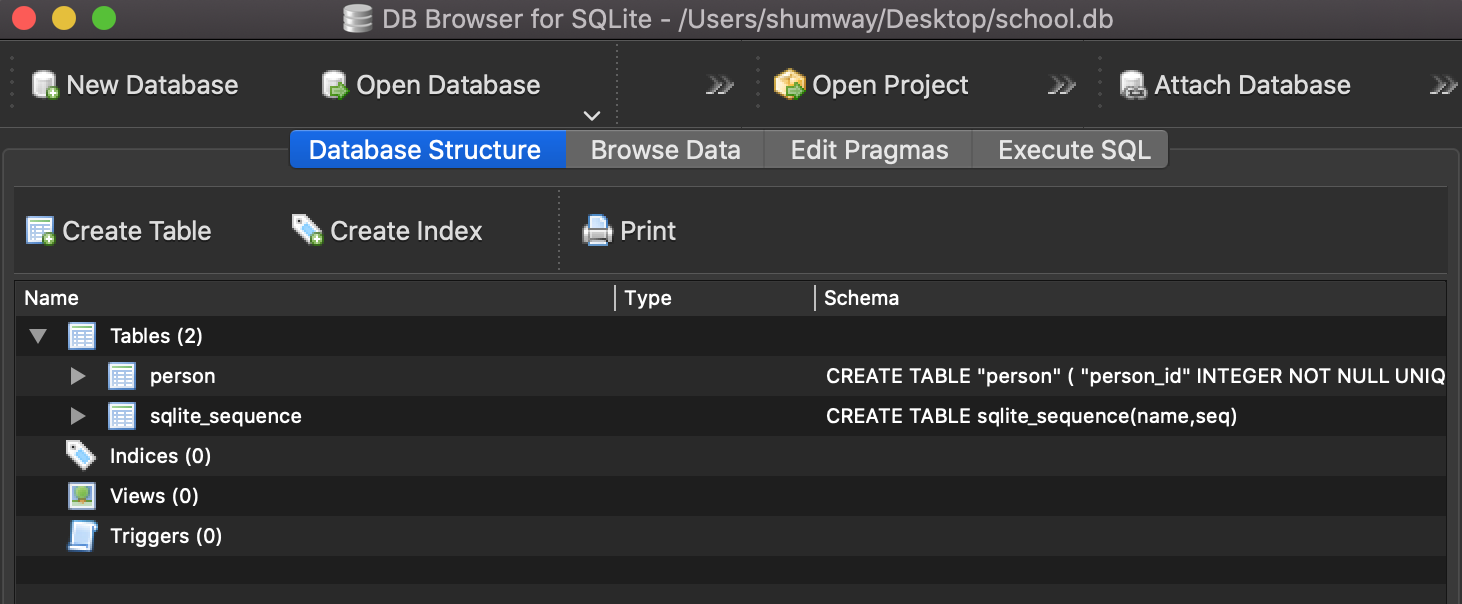
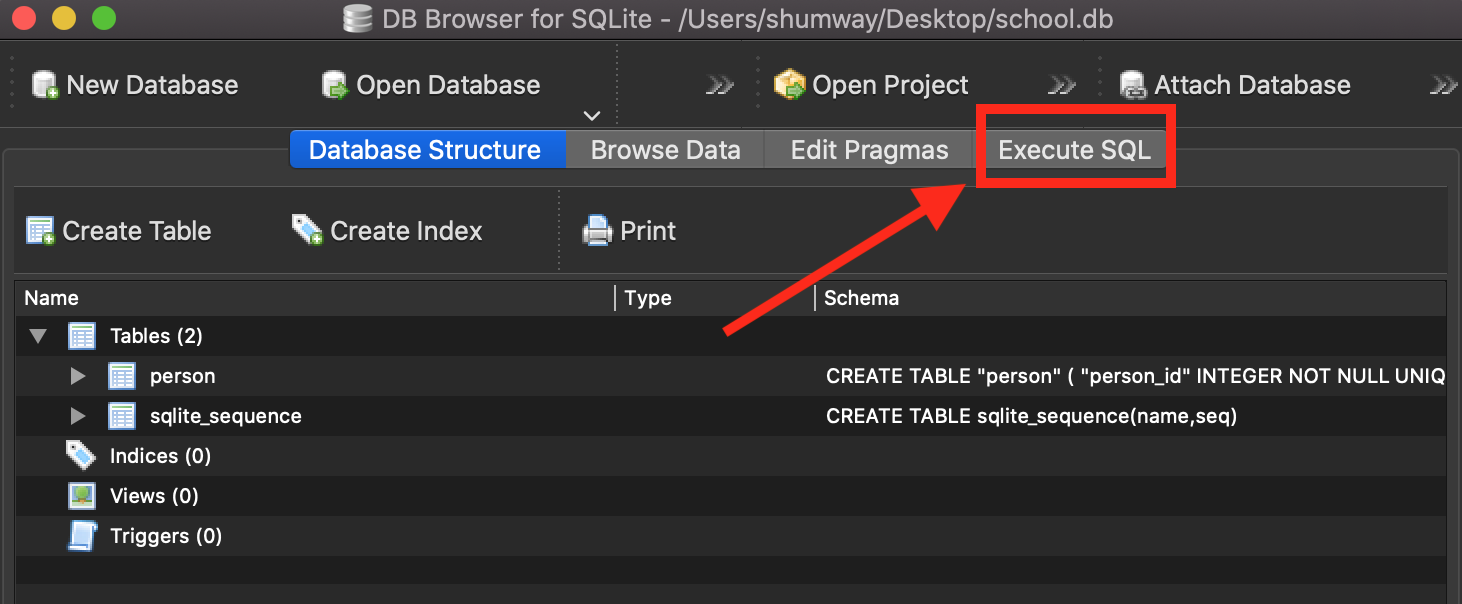
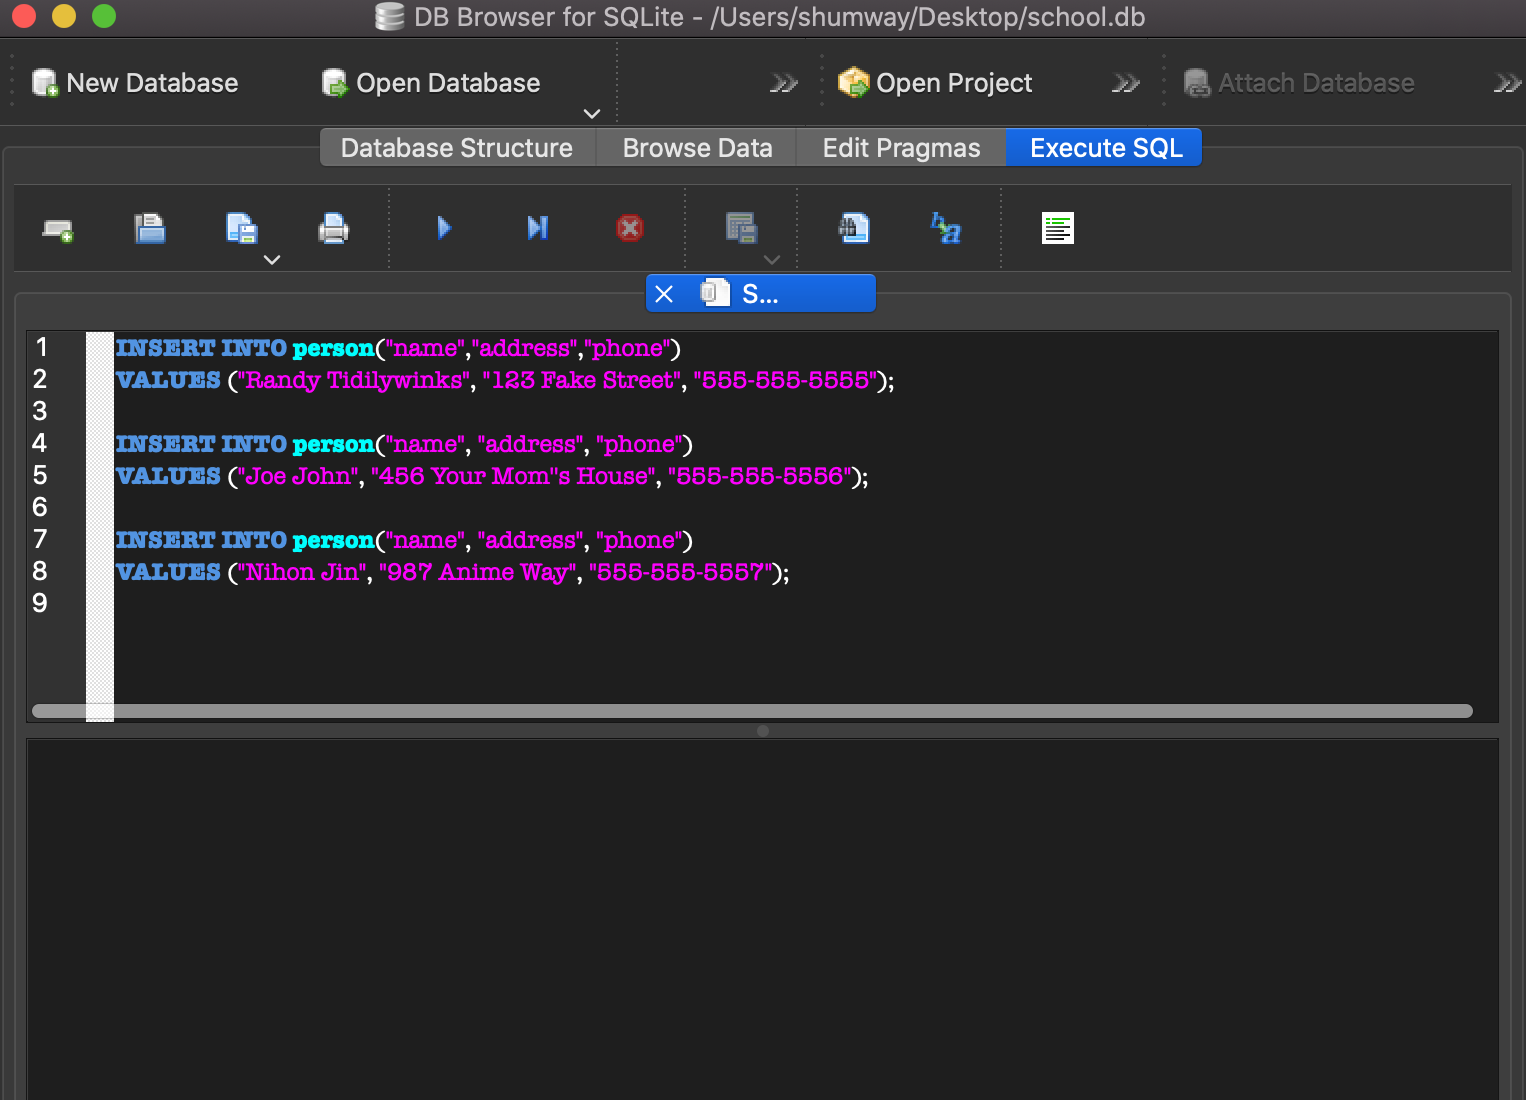
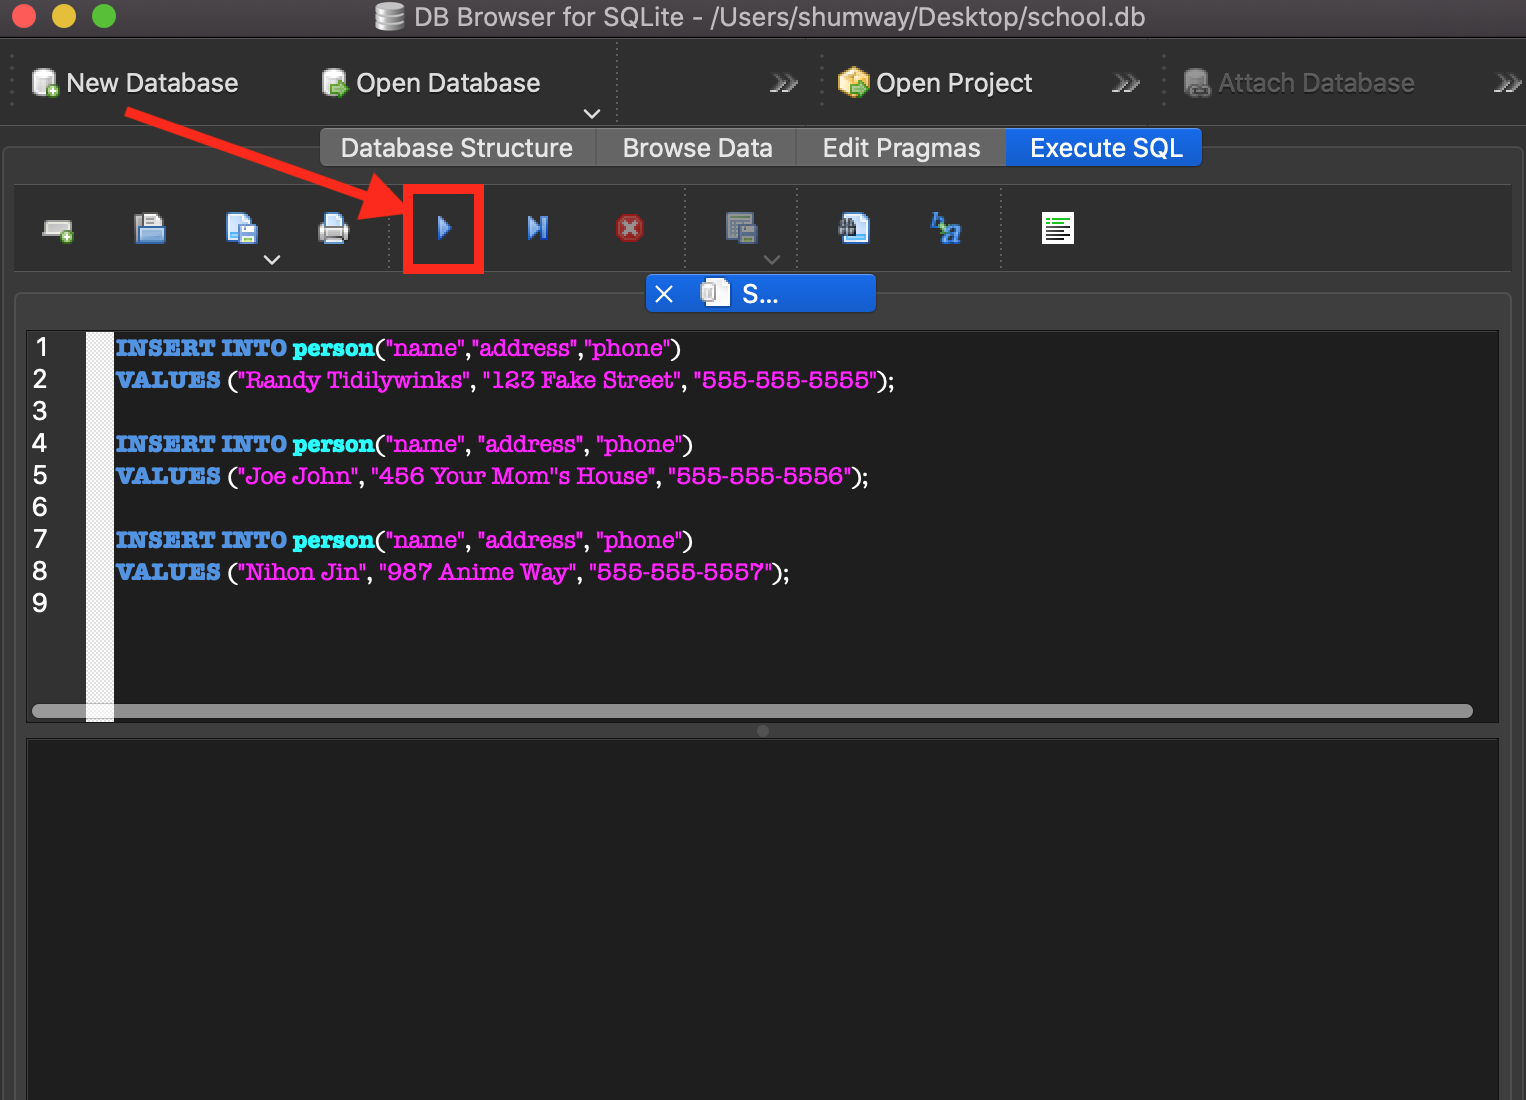
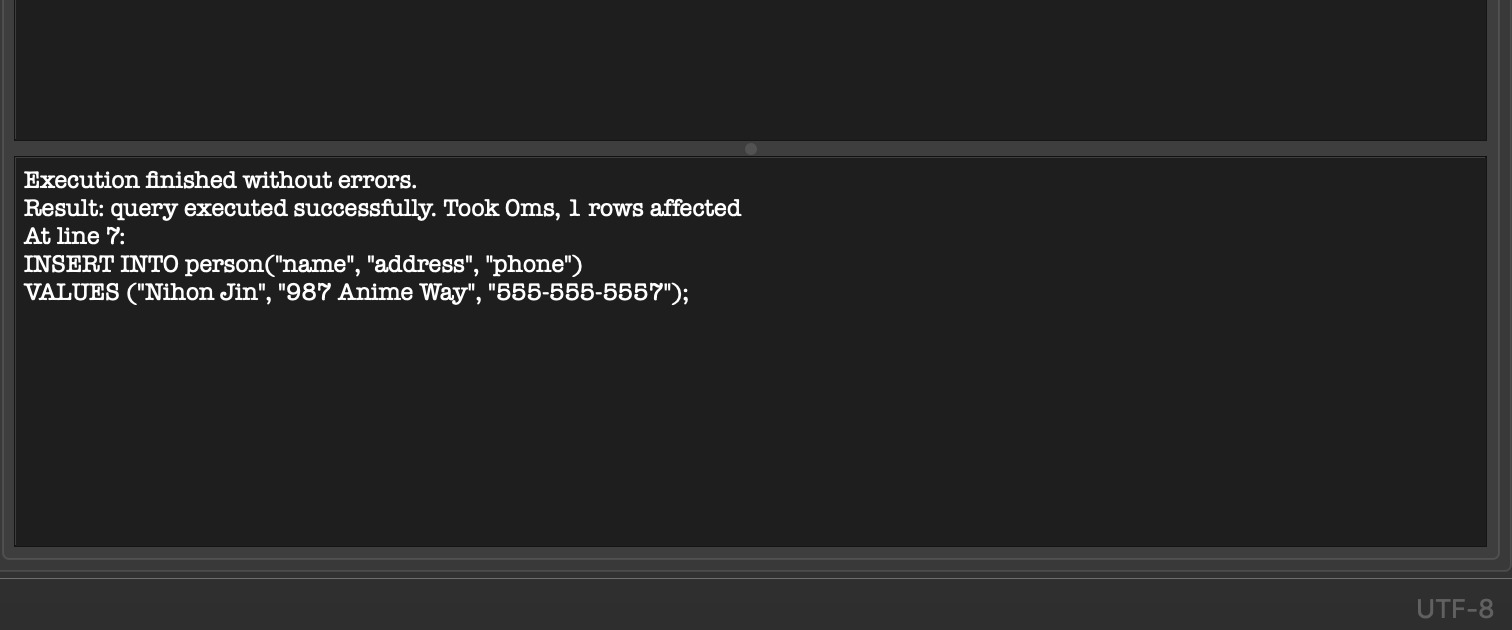
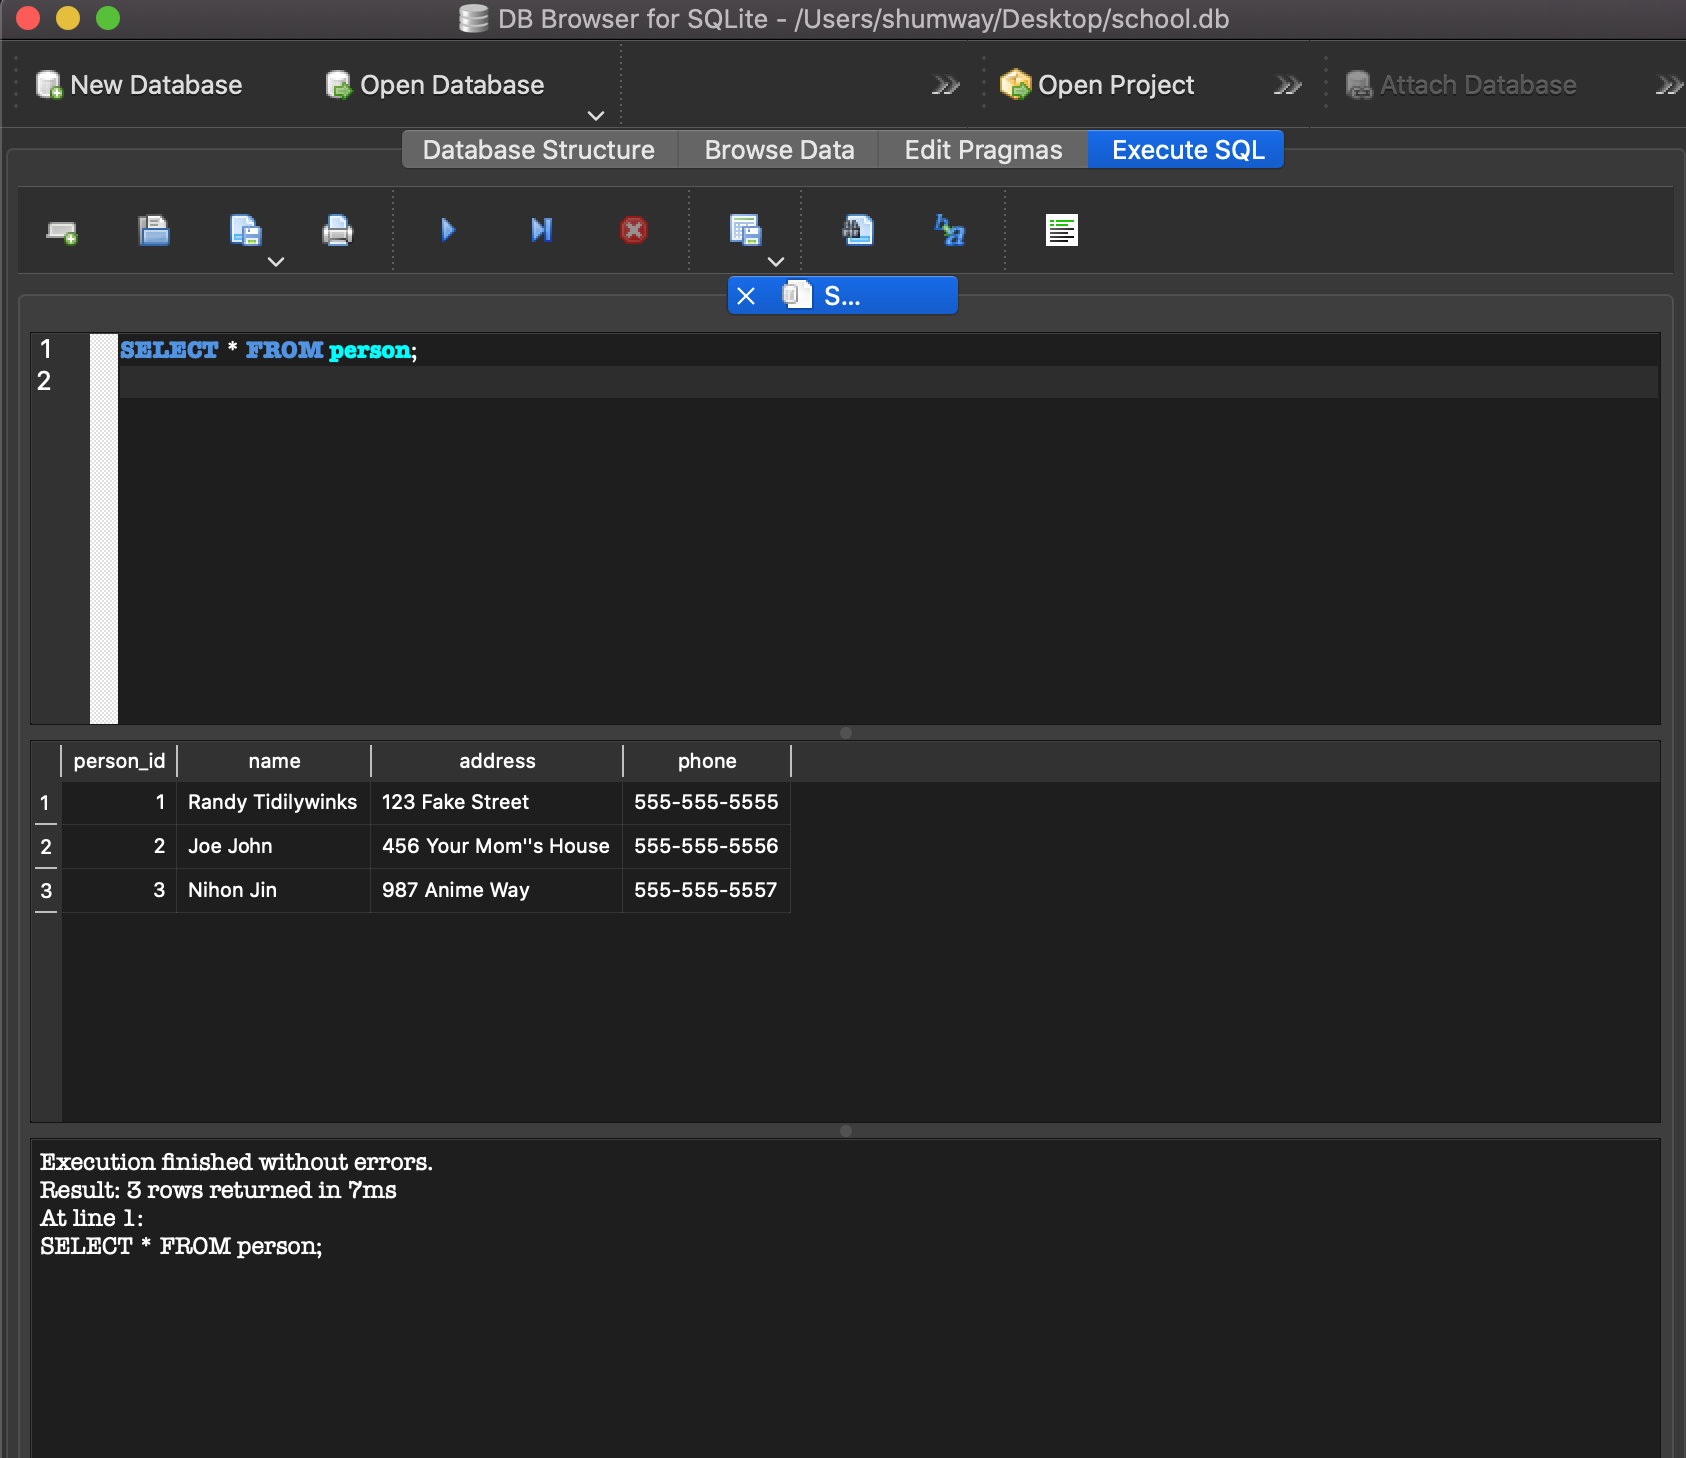
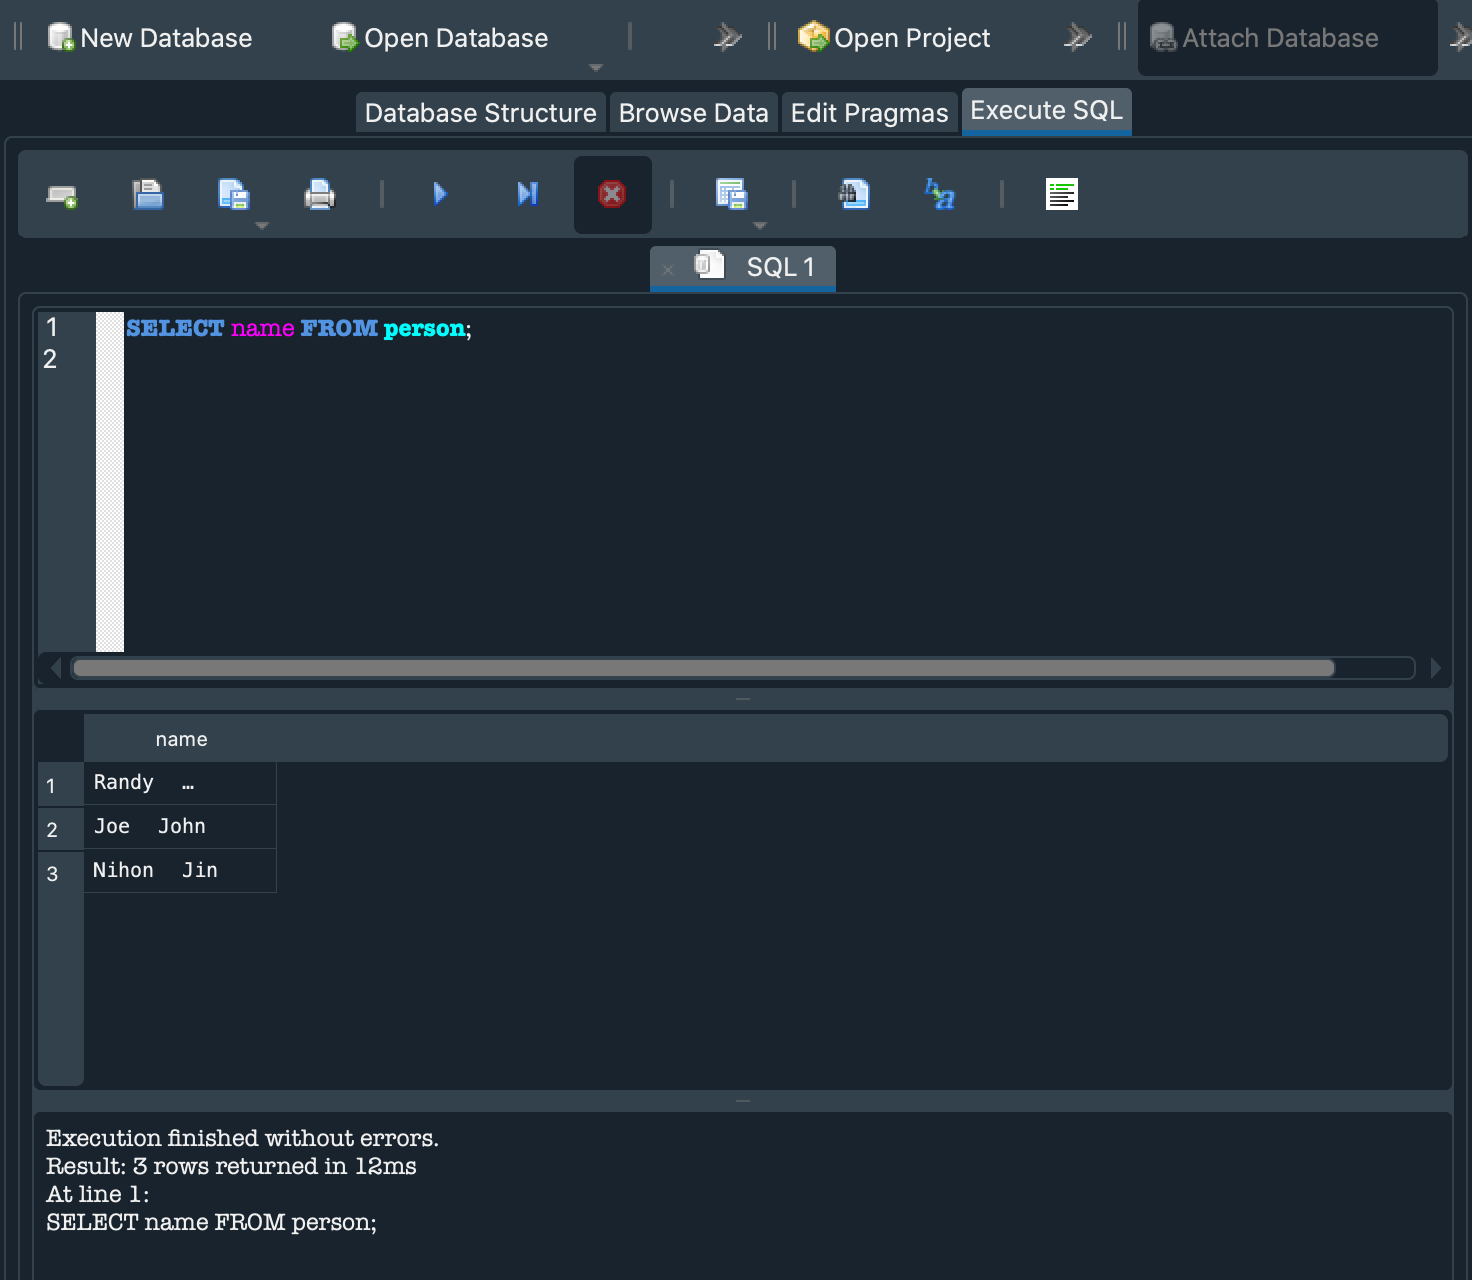

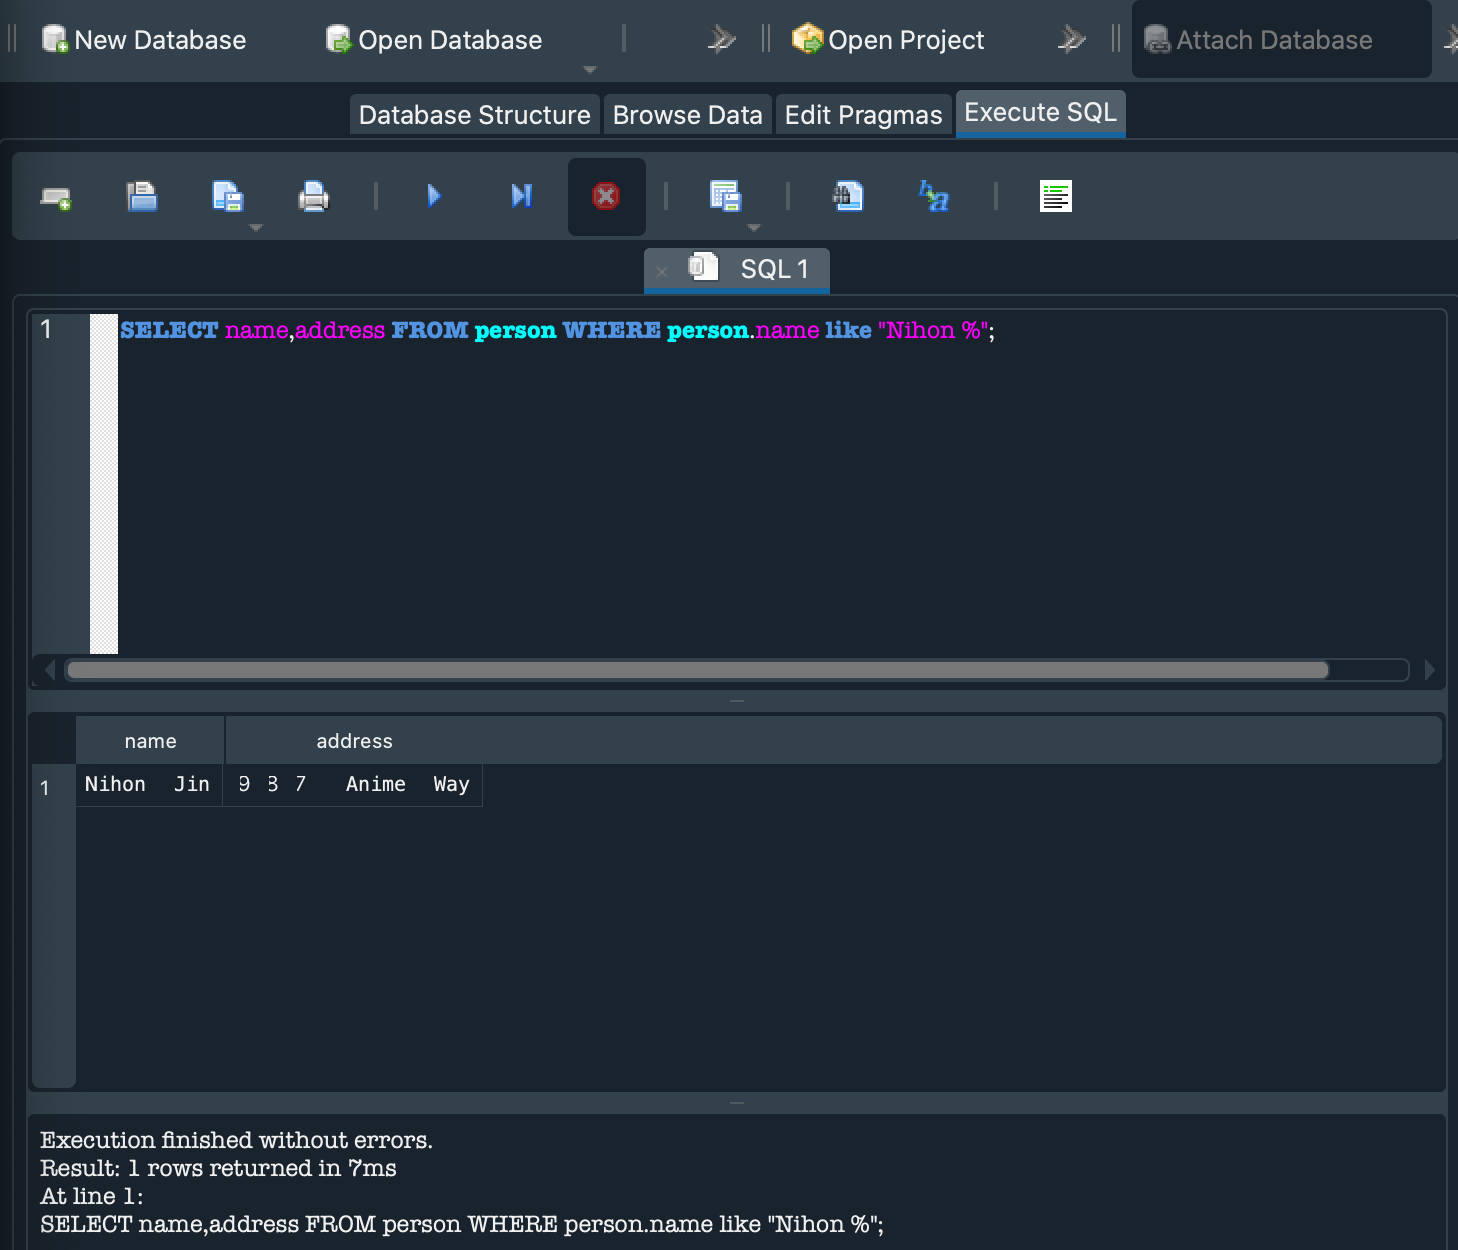
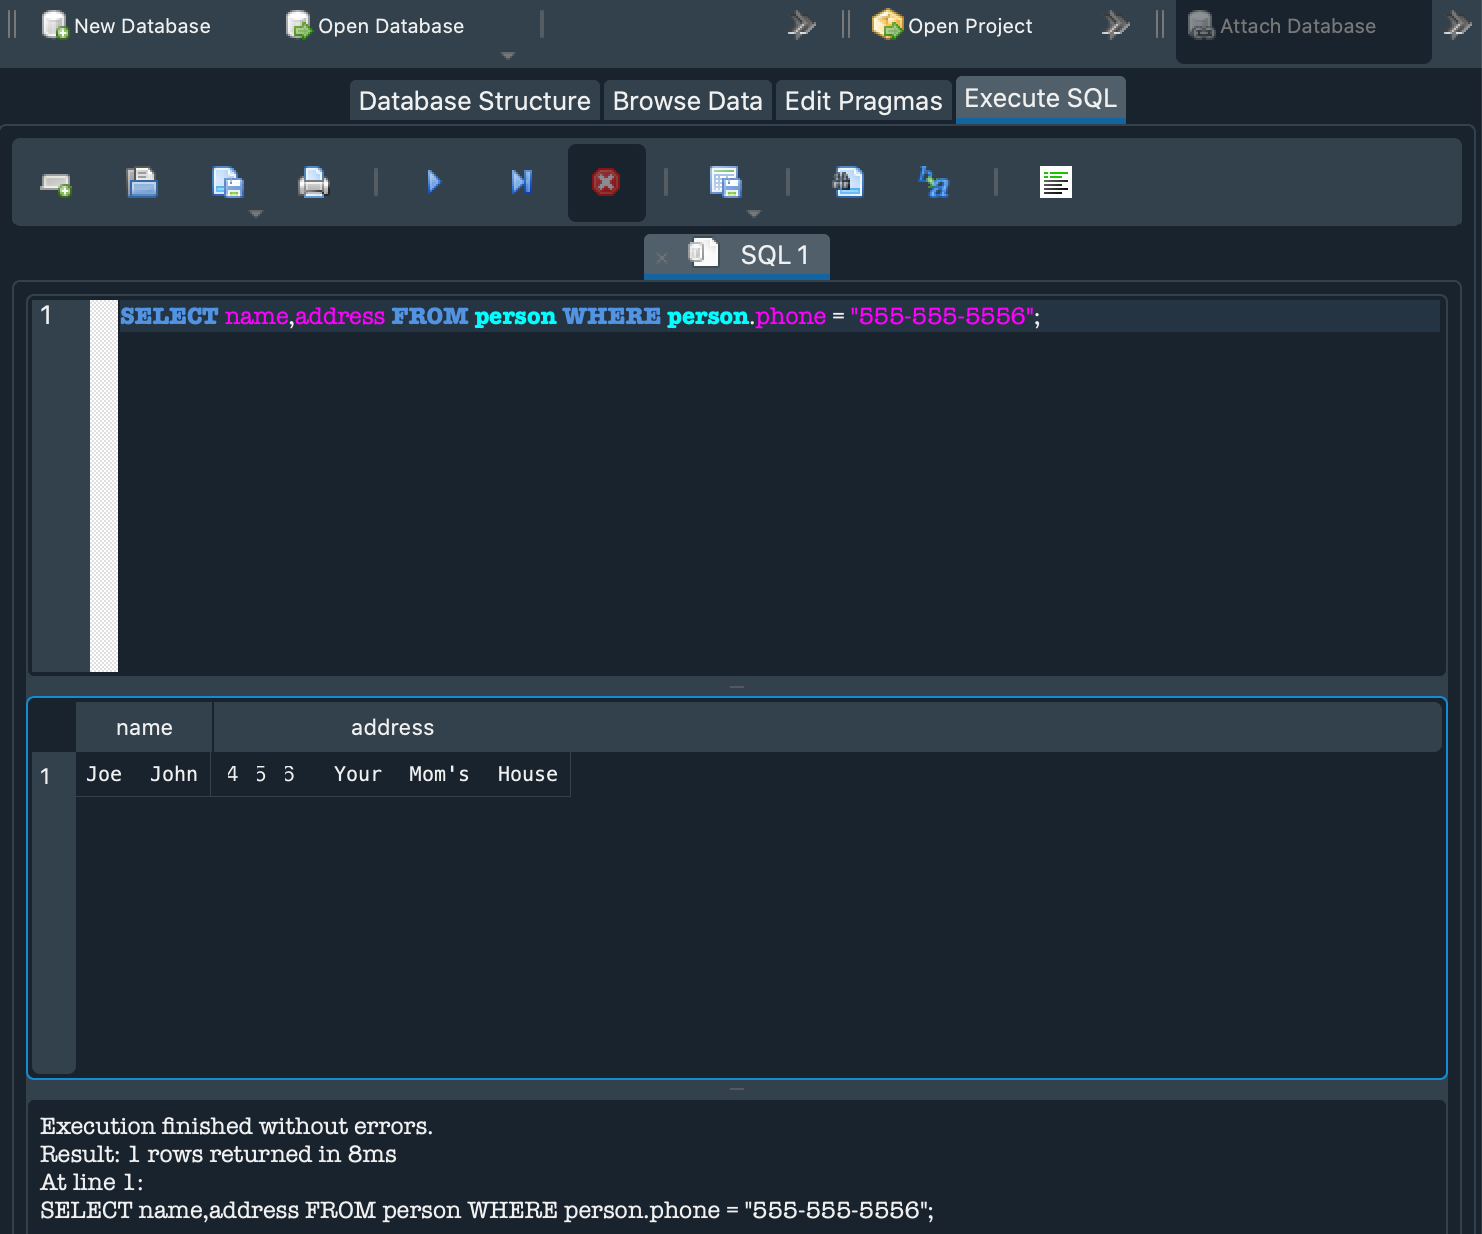

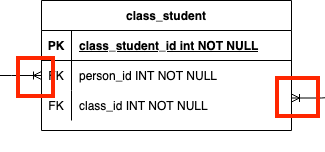
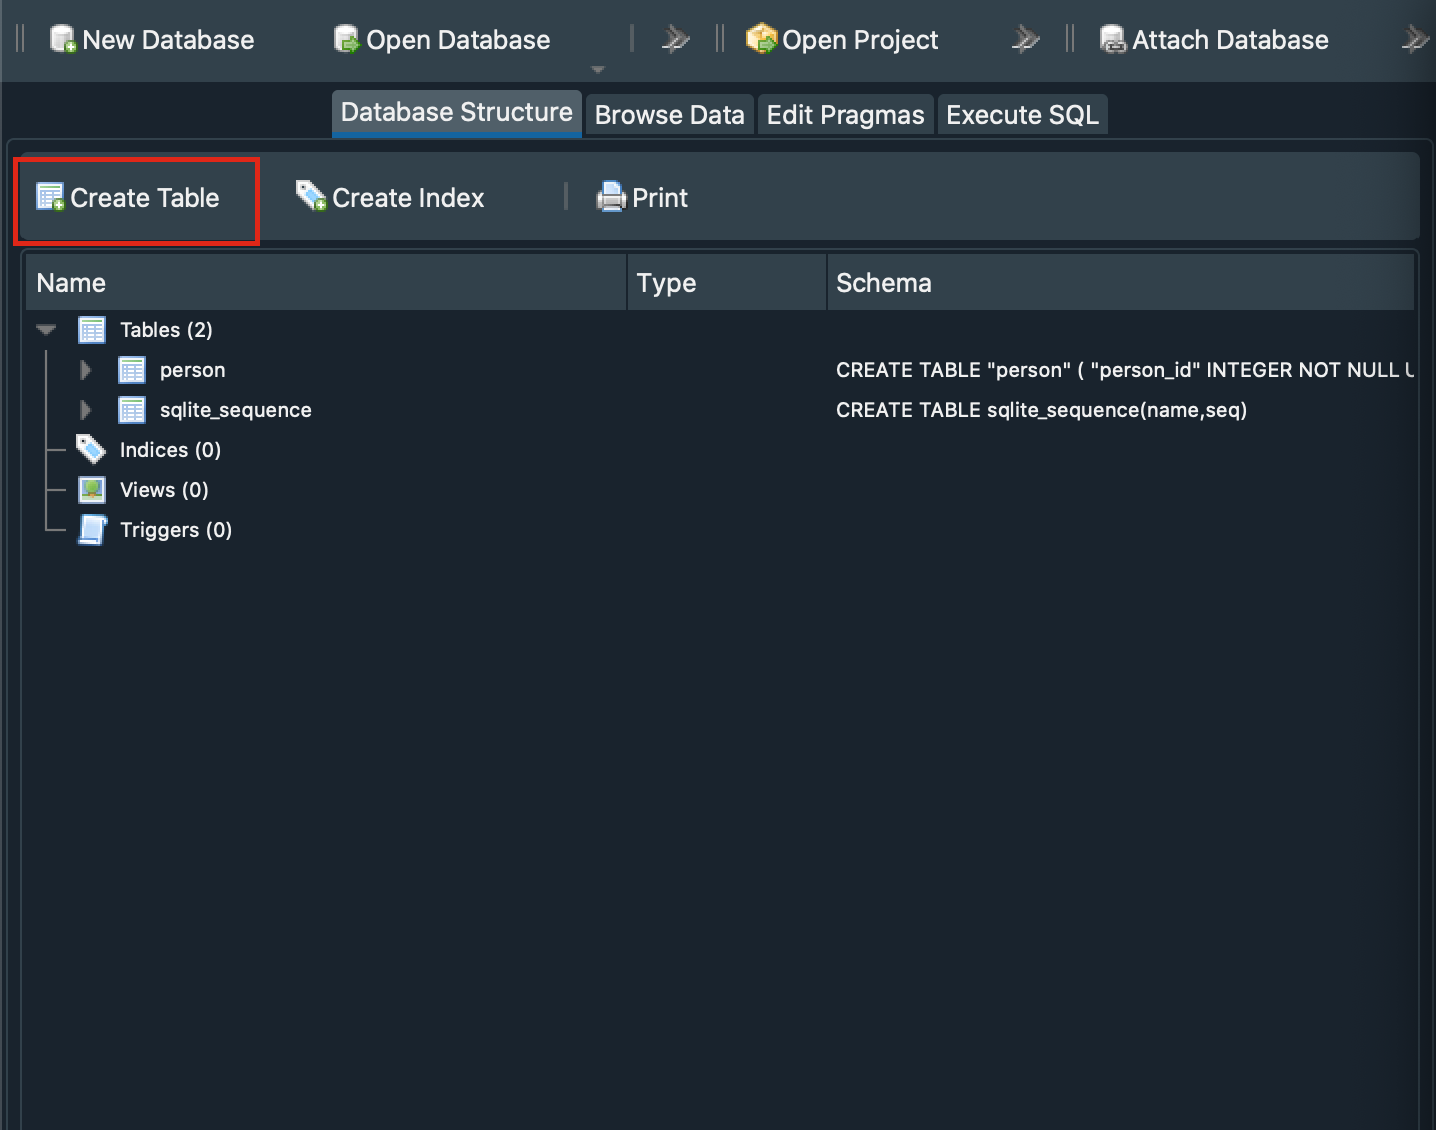
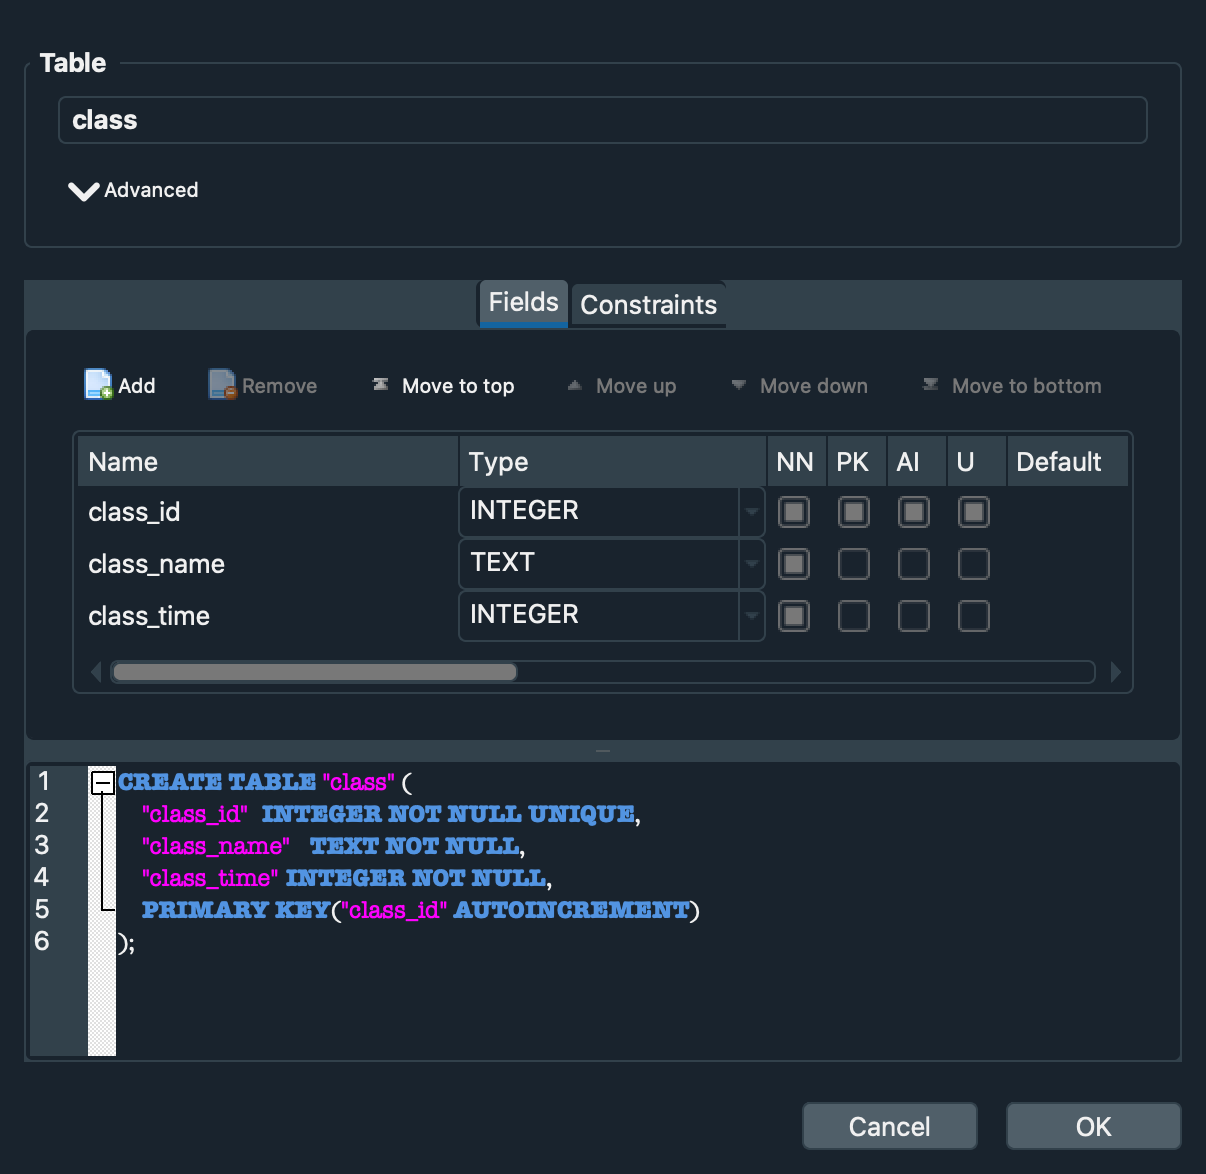
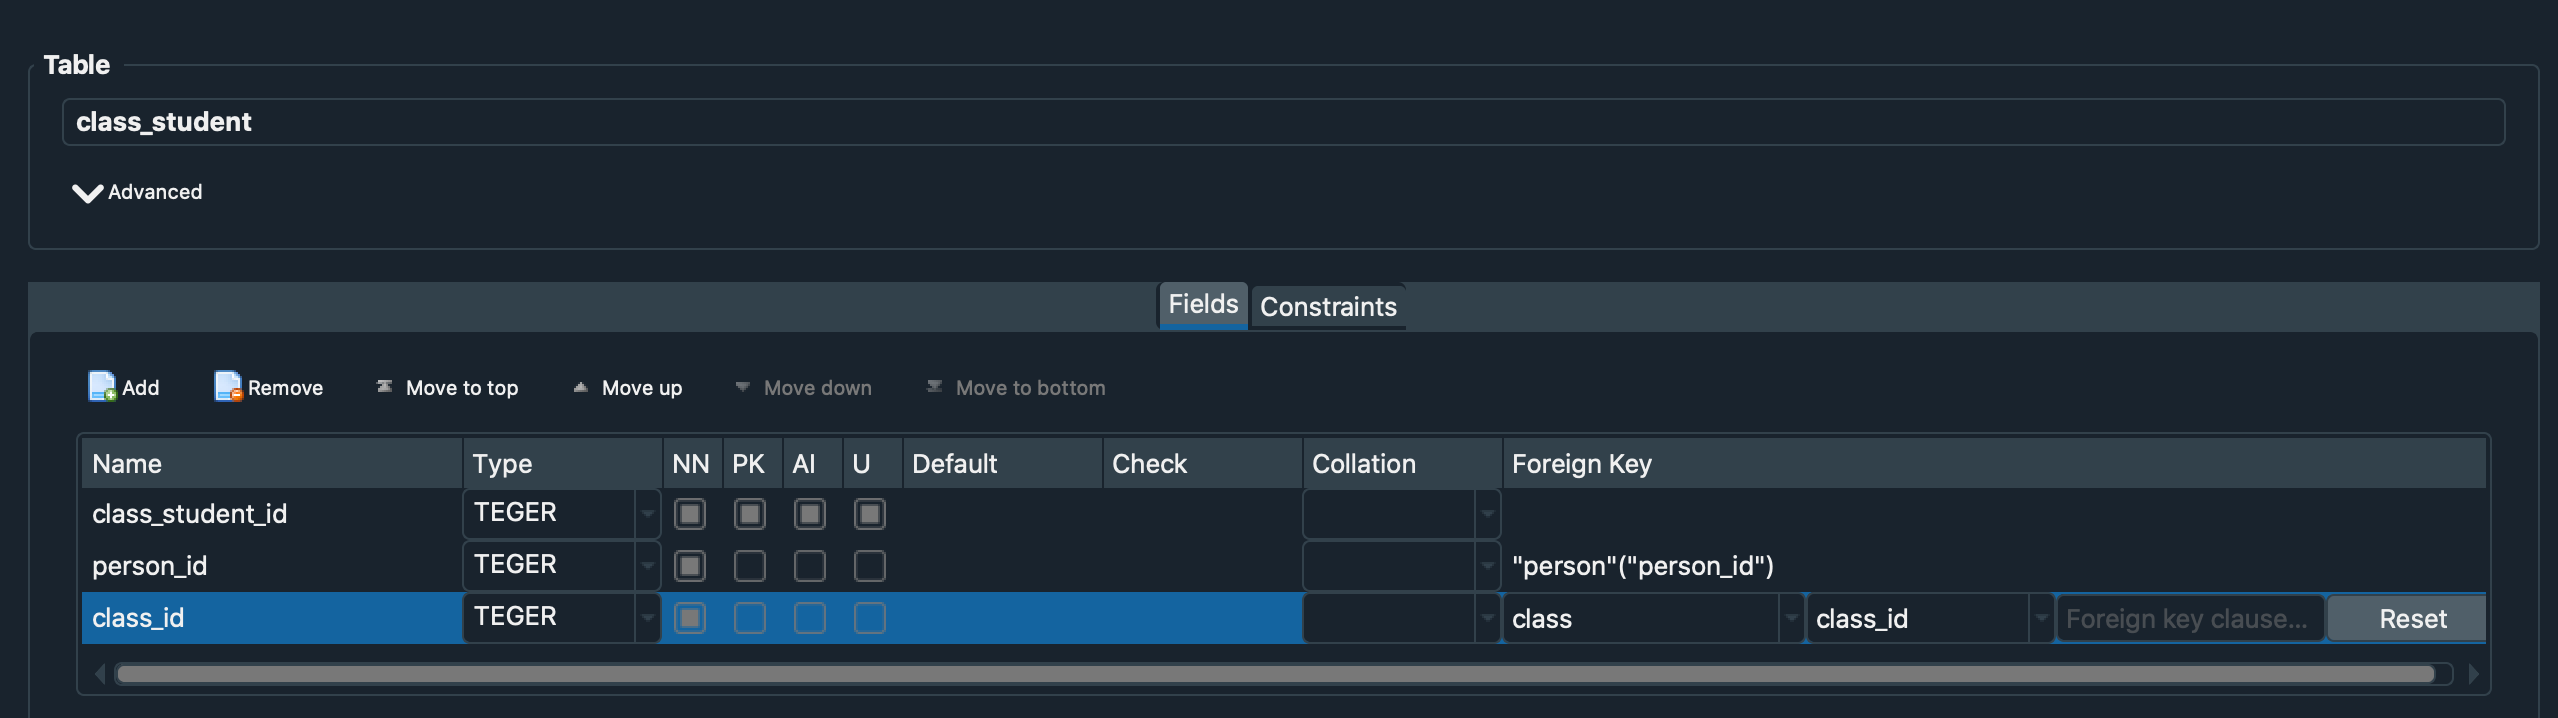


.png)
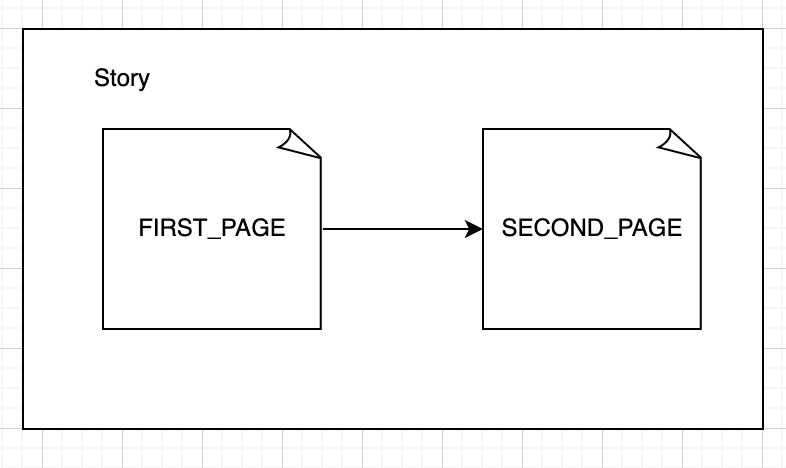
.png)